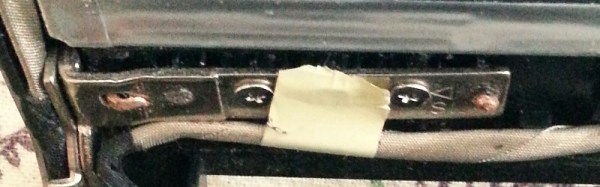
The weakest point in a laptop case may be the screen hinges, especially in heavily used machines. The mechanical stresses involved with opening a laptop can often break the thin plastic screw bosses and cause the threaded insert to pop out. What do you do? Get a hammer and some tacks of course!
[mightysinetheta]’s solution involves popping the bezel off the offending screen, then aligning the hinges in preparation for drilling holes though the computer’s plastic lid. Then he placed some short tacks though the holes and the hinges. Pressing the hinge down into the lid to ensure a tight fit, the hammer comes out to peen over the tip of the nail. Course that can be time consuming so just bending the tack over and flattening it down with the hammer works just as well.
With the hinge secured back into place his trusty laptop is back in service. The new additions on the back of the lid add a bit of a custom look that is purely functional.
Balance: we humans take it for granted. Without the sense of balance provided by our inner ears, we would have a hard time standing or walking around. What’s easy for us can be very hard for machines though. Projects that balance things have long been a challenge for engineers, makers and hackers. And rightly so, as building a machine to keep an object in balance often requires some novel electronic and mechanical solutions. This week’s Hacklet is all about projects that keep an object – or themselves – in balance.
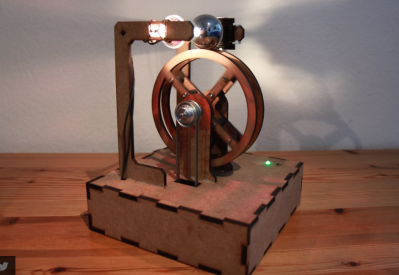
We start with [Manuel Kasten] and Balance Wheel. Inspired by a project at Chaos Communication Congress, [Manuel] created a hack that looks timeless. A stainless steel ball is balanced on top of a wooden wheel. The system detects the ball’s position using a solar cell. More light on the cell means the ball is slipping off the wheel. The system counteracts this by spinning the wheel to oppose the falling ball. In the old days this would have been an analog system. [Manuel] made things a bit more modern by using an ATmega644p processor. The video shows the wheel spinning a bit fast, as the system was tuned for a ping pong ball rather than a heavy steel roller.
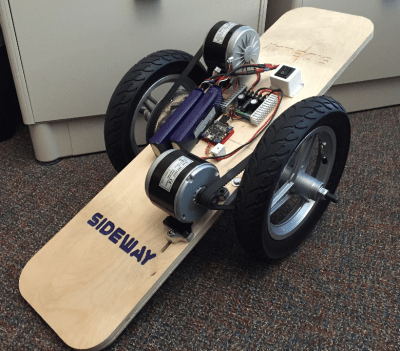
Next up is [Jason Dorie] with Sideway. Sideway is a two-wheeled skateboard that self-balances. One of the best parts of this project is that most of the mechanical components are from electric scooters, which means they are easy to source. The frame is even easier: A solid piece of plywood supports the rider and all the electronics. Two scooter motors are driven by a Sabertooth 2x32A motor controller. A Parallax Propeller performs the balancing act, obtaining IMU data from an ITG3200 digital gyro and an ADXL345 accelerometer. Speed is controlled by leaning forward and back, like a Segway. Steering is controlled by a Wiimote nunchuck. Sideway is powered by 3 cell LiPo batteries. [Jason] says this ride gets a lot of attention every time he takes it out.
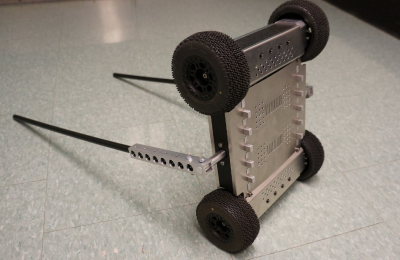
[Dominic Robillard] developed his Stair-climbing self-balancing robot as part of his masters degree at the University of Ottawa. We don’t know what grade his advisors gave him, but we give this project an A+. The robot is a 4WD off-road monster. Two heavy-duty drive motors give it tank style steering. The most impressive part of the robot are the two arms which allow it to roll its entire chassis up and over obstacles which would stop much larger robots. [Dominic’s] robot isn’t just statically balanced though – it can rear up and ride on two wheels Segway style. If it does tip over, the arms will lift it right back up!
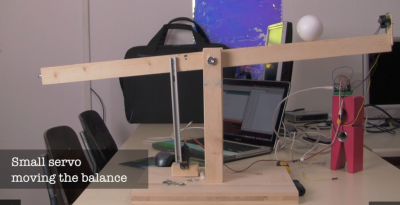
Finally, we have [Paul Bristow] with Terabalance. [Paul] got his hands on an early copy of the TeraRanger One, a Time of Flight (ToF) sensor developed at CERN. He decided to test it out by using it to balance a ping pong ball on a wooden bar. The sensor had to be slowed down quite a bit in this application, data is only read about 1000 times a second and averaged. An Arduino reads the distance data from the sensor and uses that data to drive a hobby servo. No PID loops here, in fact, Terabalance is a great example of how a proportional only system will hunt forever. That said, it is good enough to keep the ball on the balance bar.
There are a plenty of balancing projects on Hackaday.io. If you want to see more, check out the new well balanced project list! Did I miss your project? Don’t be shy, just drop me a message on Hackaday.io. That’s it for this week’s Hacklet, As always, see you next week. Same hack time, same hack channel, bringing you the best of Hackaday.io!
If you’ve gotten into software-defined radio (SDR) in the last five years, you’re not alone. A lot of hackers out there are listening in to the previously unheard. But what do you do when you find an interesting signal and you don’t know what it is? Head on over to the Signal Identification Wiki! You’ll find recordings and waterfall plots for a ton of radio signals categorized by frequency band as well as their use.
If you’re looking at a waterfall plot and you’re not sure what to make of it, the sigidwiki is worth a look. And it’s a wiki, so if you’ve got a cool signal and you want to add it, create an account and get to it!
Last session, we use the cheap and cheerful 4046 Phase-locked Loop chip as a simple voltage-controlled oscillator (VCO). It was dead simple, in fact, because the chip has a VCO already built in. There’s one big drawback of the 4046’s VCO; the pitch changes linearly with the control voltage. Ideally, as we’ll discuss in the next sections, we’d like the frequency to be an exponential function of the control voltage (CV), and that’s going to mean a little bit of analog circuitry.
René Schmitz has a fantastic exponential VCO design that’s almost a perfect fit for the Logic Noise series — it’s built with a minimum of parts, it’s a little bit rough around the edges, and at its core is a 4000-series CMOS chip that’s normally used for digital logic applications. The only drawback, from our perspective, is that it uses a dual (positive and negative) power supply. We’ll hack our way around that, and ignore some of René’s otherwise worthwhile refinements in the name of doing something truly quick and dirty. We’ll get 95% of the results with 70% of the work, although it’s easy enough to add on the rest if it strikes your fancy.
Like any good plan, you should always start with the intention to build a time machine. That way if your future self succeeds, your current self doesn’t have to worry about actually doing it!
Well, unfortunately it hasn’t quite worked out for hosts of [Toymaker], but they have managed to make a pretty authentic Telecom Time Machine instead!
What they’ve created is something called a “dumb terminal”. Back in the days of yore before personal computers existed, if you wanted to get “online” you would have to do so at a dumb terminal. It’s essentially a monochrome monitor, a keyboard, and a serial port. You would have to actually connect to the mainframe to do anything — but back then, you couldn’t just hook up a modem — oh no, you had to use an acoustic coupler to connect. You had to play sounds through your telephone in order to communicate with the mainframe. How’s that for a bit of history with your morning coffee!?
One of the keys to nuclear fission is sustaining a chain reaction. A slow chain reaction can provide clean power for a city, and a fast one can be used to create a weapon that will obliterate a city. These days, kids can learn about Uranium and Plutonium in high school. But just a few generations ago, the idea of splitting the atom was just a lofty goal for the brightest physicists and mathematicians who gathered at Los Alamos National Laboratory under the Manhattan Project.
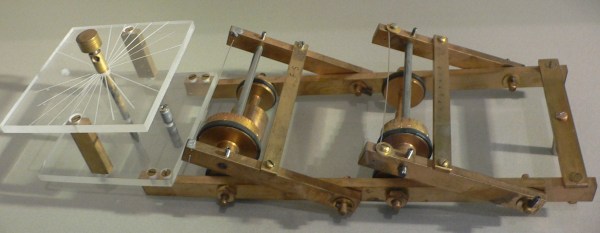
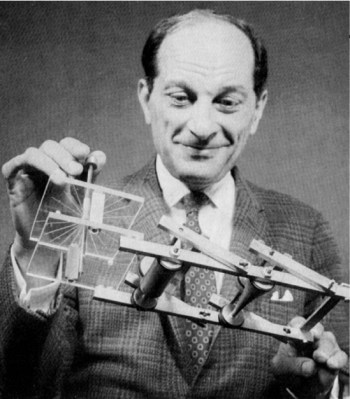
Decoding the mysteries of nuclear fission required a great deal of experimentation and calculations. One bright physicist in particular made great strides on both fronts. That man was [Enrico Fermi], one of the fathers of the atomic bomb. Perhaps his greatest contribution to moving the research beyond the Manhattan Project was creating a handheld analog computer to do the math for him. This computational marvel is known as the FERMIAC.
What is Fission?
Nuclear fission occurs when a nucleus is split into fragments, a process that unleashes a great deal of energy. As a handful of neutrons travel through a reactor pile or other fissionable material, a couple of outcomes are possible. Any one neutron collision might result in fission. This means there will be some number of new neutrons whose paths must be tracked. If fission does not occur, the neutrons may simply scatter about upon collision, which changes their speed and trajectory. Some of the neutrons might be absorbed by the material, and others will simply escape it. All of these possibilities depend on the makeup of the material being bombarded and the speed of the neutron.
Every event that happens to a neutron comprises its genealogical history. If this history is recorded and analyzed, a statistical picture starts to emerge that provides an accurate depiction of the fissility of a given material. [Fermi]’s computer facilitated the creation of such a picture by performing mathematical grunt work of testing different materials. It identified which materials were most likely to sustain a reaction.
Before he left Italy and the looming threat of fascism, [Fermi] led a group of young scientists in Rome called the Via Panisperna boys. This group, which included future Los Alamos physicist [Emilio Segrè], ran many experiments in neutron transport. Their research proved that slow neutrons are much better candidates for fission than fast neutrons.
During these experiments, [Fermi] ran through the periodic table, determined to artificially irradiate every element until he got lucky. He never published anything regarding his methods for calculating the outcomes of neutron collisions. But when he got to Los Alamos, [Fermi] found that [Stanislaw Ulam] had also concluded that the same type of repeated random sampling was the key to building an atomic weapon.
The Monte Carlo Method: Shall We Play a Game?
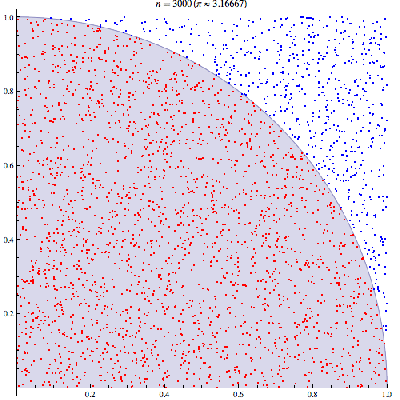
Monte Carlo method applied to approximating the value of π. by CaitlinJo
[Ulam], a Polish-born mathematician who came to the US in 1935, developed his opinion about random sampling due to an illness. While recuperating from encephalitis he played game after game of solitaire. One day, he wondered at the probability of winning any one hand as laid out and how best to calculate this probability. He believed that if he ran through enough games and kept track of the wins, the data would form a suitable and representative sample for modeling his chances of winning. Almost immediately, [Ulam] began to mentally apply this method to problems in physics, and proposed his ideas (PDF) to physicist and fellow mathematician [John von Neumann].
This top-secret method needed a code name. Another Los Alamos player, [Nick Metropolis] suggested ‘Monte Carlo’ in a nod to games of chance. He knew that [Ulam] had an uncle with a propensity for gambling who would often borrow money from relatives, saying that he just had to go to Monte Carlo. The game was on.
The Tricky Math of Fission
Determination of the elements most suitable for fission required a lot of calculations. Fission itself had already been achieved before the start of the Manhattan Project. But the goal at Los Alamos was a controlled, high-energy type of fission suitable for weaponization. The math of fission is complicated largely because of the sheer number of neutrons that must be tracked in order to determine the likelihood and speed of a chain reaction. There are so many variables involved that the task is monumental for a human mathematician.
[Stanislaw Ulam] and FERMIAC.
After [Ulam] and [von Neumann] had verified the legitimacy of the Monte Carlo method with regard to the creation of nuclear weaponry, they decided that these types of calculations would be a great job for ENIAC — a very early general purpose computer. This was a more intensive task than the one it was made to do: compute artillery firing tables all day and night. One problem was that the huge, lumbering machine was scheduled to be moved from Philadelphia to the Ballistics Research Lab in Maryland, which meant a long period of downtime.
While the boys at Los Alamos waited for ENIAC to be operational again, [Enrico Fermi] developed the idea forego ENIAC and create a small device that could run Monte Carlo simulations instead. He enlisted his colleague [Percy King] to build the machine. Their creation was built from joint Army-Navy cast off components, and in a nod to that great computer he dubbed it FERMIAC.
FERMIAC: Hacking Probabilities
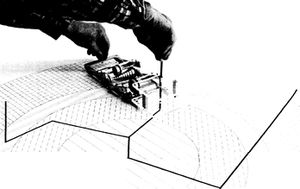
FERMIAC was created to alleviate the necessity of tedious calculations required by the study of neutron transport. This is something of an end-run around brute force. It’s made mostly of brass and resembles a trolley car. In order to use it, several adjustable drums are set using pseudorandom numbers. One of these numbers represents the material being traversed. A random choice is made between fast and slow neutrons. A second digit is chosen to represent the direction of neutron travel, and a third number indicates the distance traveled to the next collision.
FERMIAC in action.
Once these settings are dialed in, the device is physically driven across a 2-D scale drawing of the nuclear reactor or materials being tested. As it goes along, it plots the paths of neutrons through various materials by marking a line on the drawing. Whenever a material boundary is crossed, the appropriate drum is adjusted to represent a new pseudorandom digit.
FERMIAC was only used for about two years before it was completely supplanted by ENIAC. But it was an excellent stopgap that allowed the Manhattan Project to not only continue unabated, but with rapid progress. FERMIAC is currently on display at the Bradbury Science Museum in Los Alamos, New Mexico alongside replicas of Fat Man and Little Boy, the weapons it helped bring to fruition. [Fermi]’s legacy is cemented as one of the fathers of the atomic bomb. But creating FERMIAC cements his legacy as a hacker, too.
After Los Alamos, [Stanislaw Ulam] would continue to make history in the field of nuclear physics. [Enrico Fermi] was opposed to participating in the creation of the exponentially more powerful hydrogen bomb, but [Ulam] accepted the challenge. He proved that Manhattan Project leader [Edward Teller]’s original design was unfeasible. The two men worked together and by 1951 had designed the Teller-Ulam method. This design became the basis for modern thermonuclear weaponry.
Today, the Monte Carlo method is used across many fields to describe systems through randomness and statistics. Many applications for this type of statistical modeling present themselves in fields where probabilities are concerned, like finance, risk assessment, and modeling the universe. Wherever the calculation of all possibilities isn’t feasible, the Monte Carlo method can usually be found.
UPDATE: Commentor [lwatchdr] pointed out that the use of the FERMIAC began after the Manhattan Project had officially ended in 1946. Although many of the same people were involved, this analog computer wasn’t put into use until about a year later.
We were all despondent when our Chumby’s went dead. And plans to hack at least one of them died when the device quit powering on. [Spiros Papadimitriou] must have missed his too because he’s made a good start at making his own wireless, touchscreen, smart clock.
In all honesty, it isn’t much of a Chumby replacement yet. It has a clock and can control some devices. There’s some hooks to add a weather display that isn’t finished yet. Still, it is a working first step. Of course, anyone can take a Raspberry Pi (or similar), a Wifi dongle, and a touchscreen and do the same thing, right? Maybe, but it is a lot harder to make one you (or your significant other) wants on your nightstand. [Spiros] took a lot of time to design a beautiful 3D printed case.