extending an ebike

Extending The Range Of An Electric Bike

Cruising around town on your electric bike is surely a good time…. unless your bike runs out of juice and you end up pedaling a heavy bike, battery, and motor back to your house. This unfortunate event happened to Troy just one too many times. The solution: to extend the range of his electric bike without making permanent modifications.

Troy admits his electric bike is on the lower side of the quality scale. On a good day he could get about 15 miles out of the bike before it required a recharge. He looked into getting more stock battery packs that he could charge and swap out mid-trip but the cost of these was prohibitive. To get the extra mileage, Troy decided on adding a couple of lead-acid batteries to the system.

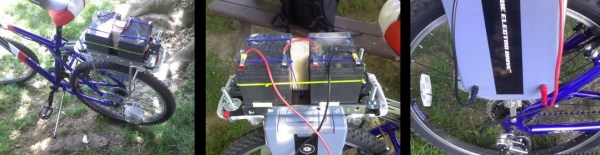
The Curry-brand bike used a 24vdc battery. Troy happened to have two 12v batteries kicking around, which wired up in series would get him to his 24v goal. The new batteries are mounted on the bike’s cargo rack by way of some hardware store bracketry. The entire new ‘battery pack’ can be removed quickly by way of a few wing nuts.

Connecting the new batteries to the stock system go a little tricky and the stock battery pack did have to be modified slightly. The case was opened and leads were run from the positive and negative terminals to two new banana plugs mounted in the battery pack’s case. The leads from the new batteries plug right into the banana plugs on the stock battery pack. The new and old batteries are wired in parallel to keep the voltage at 24.

Troy found that he’s getting about twice the distance out of his new setup. Not to bad for a couple on-hand batteries and a few dollars in odds and ends.

InfoFuse

This Message Will Self Destruct… As You Read It?

A group of Harvard chemists have come up with a novel use for fire. Through experimentation, they have been able to build what they call an InfoFuse. As the name implies, it’s essentially a burning fuse that can “transmit” information.

The fuse is made from flash paper, which is paper made from nitrocellulose. Flash paper burns at a relatively constant speed and leaves no smoke or ash, making it ideal for this type of project. The chemists developed a method of conveying information by changing the color of the flame on the paper. You might remember from high school chemistry class that you can change the color of fire by burning different metal salts. For example, burning copper can result in a blue flame. This is the key to the system.

The researchers dotted the flash paper with small bits of metal salts. As the flame reaches these spots, it briefly changes colors. They had to invent an algorithm to convert different color patterns to letters and numbers. It’s sort of like an ASCII table for fire. Their system uses only three colors. The three colors represent eight possible combinations of color at any given time. Just two quick pulses allow the researchers to convey all 26 letters of the English alphabet as well as ten digits and four symbols. In one test, the researchers were able to transmit a 20 character message in less than 4 seconds.

[Ben Krasnow] found the Harvard project and just had to try it out for himself. Rather than use colors to convey information, he took a more simple approach. He started with a basic strip of flash paper, but left large tabs periodically along its length. As the paper burns from end to end, it periodically hits one of these tabs and the flame gets bigger momentarily.

[Ben] uses an optical sensor and an oscilloscope to detect the quantity of light. The scope clearly shows the timing of each pulse of light, making it possible to very slowly convey information via fire. Ben goes further to speculate that it might be possible to build a “fire computer” using a similar method. Perhaps using multiple strips of paper, one can do some basic computational functions and represent the result in fire pulses. He’s looking for ideas, so if you have any be sure to send them his way! Also, be sure to check out Ben’s demonstration video below. Continue reading “This Message Will Self Destruct… As You Read It?”

Delta 3 Space 3D Printer

Prints In Space (Said In “Pigs In Space” Voice)

3D Printing on Earth is soooo last year. Recently, NASA has sent a 3D Printer to the International Space Station in order to test printing capability in space. The agency’s ultimate goal is to have a means to make parts and tools for astronauts that are far away from earth.

So, why should NASA have all of the extra-terrestrial printing fun? Three 15 year-olds thought that same thing and decided to build their own space printer. It’s goal, however, is a bit different from the one on the ISS. This printer is made to print on other celestial bodies such as the moon or Mars, not in a space station. The students call their project the DELTA 3 and as its name implies, is a delta-style printer and that’s where all similarities with conventional printers end. This printer has tank tracks so that it can maneuver itself around the planet. There is no print bed. The printer prints directly to the surface of which it is resting on. The frame is open at the front of the printer so that it can back up leaving a free-standing print in its wake. It certainly beats the hot-glue versions seen before and we think this is the Automated Build Platform of the future, today!

The DELTA 3’s electronic controls are also quite different from the norm. There is a Lego EV3 controller that is responsible for navigating the printer around obstacles to find a suitable print area. Once a location has been picked out, the EV3 triggers the standard Arduino Mega/RAMPS combo to coordinate the printing.

The young creators brought their DELTA 3 to the World Robot Olympiad just last month. They came in 4th in their division.

[via 3Dprint.com]


A Web Connected Seismometer

[10DotMatrix] has a budding interest in seismology, so she decided to make her own seismometer out of some easy-to-find materials. Seismometers are prohibitively expensive for hobbyists, but thankfully it’s really easy to build a usable siesmometer out of simple parts. [10DotMatrix]’s seismometer is built around a modified subwoofer, which acts as a transducer for the earth’s vibrations.

The subwoofer is mounted to the bottom of a tripod, which forms the structure of the seismometer. A slinky is stretched between the top of the tripod and a weight that rests on the coil of the subwoofer. Whenever the ground shakes, the slinky and weight vibrate and induce current in the voice coil.

Since these vibrations are usually quite small, the output of the subwoofer needs a bit of amplification. [10DotMatrix] fed the output of the woofer to an AD620 op amp, which amplifies the signal to a measurable level. The amplifier’s output is fed into an Intel Edison board, which samples the voltage and transmits it to a web dashboard for online viewing.

If you’re shaking with excitement about seismic measurements you’ll surely be interested in this similar method which uses a piezo element as the detector.

Social Logons

SpoofedMe Attack Steals Accounts By Exploiting Social Login Mechanisms

We’ve all seen the social logon pop up boxes. You try to log into some website only to be presented with that pop up box that says, “Log in with Facebook/Twitter/Google”. It’s a nice idea in theory. You can log into many websites by using just one credential. It sounds convenient, but IBM X-Force researchers have recently shown how this can be bad for the security of your accounts. And what’s worse is you are more vulnerable if the service is offered and you are NOT using it. The researcher’s have called their new exploit SpoofedMe. It’s aptly named, considering it allows an attacker to spoof a user of a vulnerable website and log in under that user’s account.

So how does it work? The exploit relies on vulnerabilities in both the identity provider (Facebook/Twitter/etc) and the “relying website”. The relying website is whatever website the user is trying to log into using their social media account. The easiest way to describe the vulnerability is to walk through an example. Here we go.

Let’s imagine you are an attacker and you want to get into some victim’s Slashdot account. Slashdot allows you to create a local account within their system if you like, or you can log in using your LinkedIn account. Your victim doesn’t actually have a LinkedIn account, they use a local Slashdot account.

The first step of your attack would be to create a LinkedIn account using your victim’s email address. This needs to be the same address the victim is using for their local Slashdot account. This is where the first vulnerability comes in. LinkedIn needs to allow the creation of the account without verifying that the email address belongs to you.

The second step of the attack is now to attempt to log into Slashdot using your newly created LinkedIn account. This is where the second vulnerability comes in. Some social media services will authenticate you to websites like Slashdot by sending Slashdot your user information. In this case, the key piece of information is your email address. Here’s the third vulnerability. Slashdot sees that your LinkedIn account has the same email address as one of their local users. Slashdot assumes that LinkedIn has verified the account and permits you, the attacker, to log in as that user. You now have access to your victim’s Slashdot account. In another scenario, Slashdot might actually merge the two credentials together into one account.

What’s really interesting about this hack is that it isn’t even very technical. Anyone can do this. All you need is the victim’s email address and you can try this on various social media sites to see if it works. It’s even more interesting that you are actually more vulnerable if you are not using the social logons. Some real world examples of this vulnerability are with LinkedIn’s social logon service, Amazon’s service, and MYDIGIPASS.com’s service. Check out the demonstration video below. Continue reading “SpoofedMe Attack Steals Accounts By Exploiting Social Login Mechanisms”

Computer Built Into A Board Uses Only 10 Watts

In the realm of low-powered desktop computers, there are some options such as the Raspberry Pi that usually come out on top. While they use only a few watts, these tend to be a little lackluster in the performance department and sometimes a full desktop computer is called for. [Emile] aka [Mux] is somewhat of an expert at pairing down the power requirements for desktop computers, and got his to run on just 10 watts. Not only that, but he installed the whole thing in a board and mounted it to his wall. (Google Translated from Dutch)

The computer itself is based on a MSI H81M-P33 motherboard and a Celeron G1820 dual-core processor with 8GB RAM. To keep the power requirements down even further, the motherboard was heavily modified. To power the stereo custom USB DAC, power amplifier board, and USB volume button boards were built and installed. The display is handled by an Optoma pico projector, and the 10-watt power requirement allows the computer to be passively cooled as well.

As impressive as the electronics are for this computer, the housing for it is equally so. Everything is mounted to the backside of an elegant piece of wood which has been purposefully carved out to hold each specific component. Custom speakers were carved as well, and the entire thing is mounted on the wall above the bed. The only electronics visible is the projector! It’s even more impressive than [Mux]’s first low-power computer.

e-waste small 3d printer

E-Waste Printer Looks Nice, Prints Really, Really Small

Prices of 3D Printers have certainly been falling quite a bit over the last few years. Even so, it is still, at a minimum, a few hundred dollars to get going in the hobby. [mikelllc] thought it would be a fun challenge to see if he can build a functional 3D printer for under $100.

To stay under his budget, [mikelllc] took a reasonable route and decided to use as many recycled parts as he could. In every DVD and floppy drive, there is a stepper motor, lead screw and carriage that is used to move the read/write head of the drive. These assemblies will be used to drive the 3 axes of the printer. Two DVD drives and one floppy drive were dissembled to access the needed components.

e-waste small 3d printer
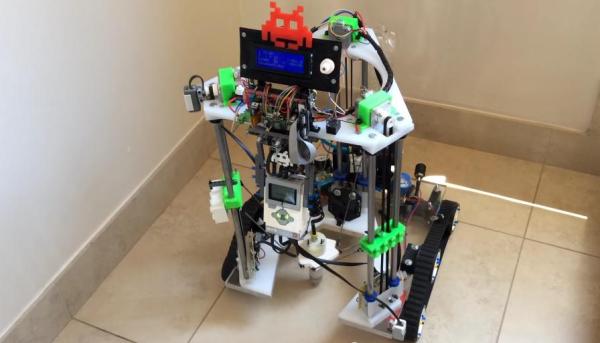
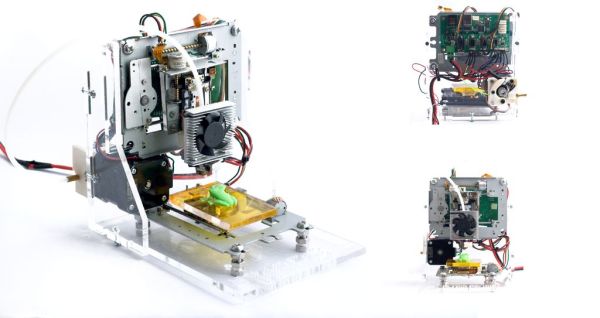
Luckily [mikelllc] has access to a laser cutter. He made the frame from 5mm acrylic sheet stock. All of the pieces have slots and tabs to ease assembly and keep everything straight and square. The motors and frames from the DVD and floppy drives are mounted to the acrylic frame pieces in strategically pre-planned holes. The Y axis is responsible for moving the print bed back and forth. It is mounted on screws so that it can be adjusted to ensure a level bed.

A little DVD drive stepper motor just isn’t powerful enough to be used as an extruder motor so a standard NEMA17 motor was purchased for this task. The motor is part of a MK7/MK8 style direct drive extruder that is made from mostly 3D printed parts. The extruder is mounted on the frame and a bowden tube guides the filament to the hot end mounted to the printer’s moving carriage. Remotely mounting the extruder motor keeps it’s mass off of the axes, which in this case may be too heavy for the small, scavenged drive stepper motors.

The electronics are standard RepRap type and the same with for the hotend. The recycled motors work well with the RepRap electronics. After all that hard work, the printable area is a mere 37mm x 37mm x 18mm, but that’s not the point of this project! [mikelllc] met his goal of building a super cheap printer from recycled parts. He has also made the extruder and laser cut frame files available for download so anyone can follow in his footsteps. If you’re digging this e-waste 3D Printer but want a larger print volume, check out this printer.