Custom Controllers For Kerbal Space Program

kerbal
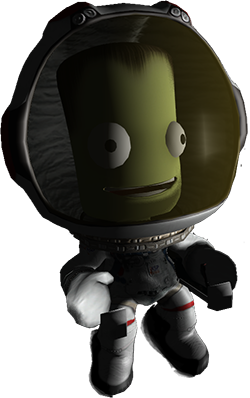
Kerbal Space Program is already a runaway indie video game hit, and if you ask some people, they’ll tell you it is the way to learn all about orbital dynamics, how spaceships actually fly, the challenges of getting to the mün. The controls in KSP are primarily keyboard and mouse, something that really breaks the immersion for a space flight simulator. We’ve seen a few before, but now custom controllers well suited for a Kerbal command pod can be made at home, with all the blinkey LEDs, gauges, and buttons you could want.

[Freshmeat] over on the KSP forums began his space adventures with a keyboard but found the fine control lacking. An old Logitech Dual Shock controller offered better control, but this gamepad doesn’t come with a throttle, and USB throttles for flight sims are expensive. He found a neat plugin for KSP made for interfacing an Arduino, and with a few modifications, turned his controller into a control panel, complete with sliders, pots, gauges, and all the other goodies a proper command pod should have.

[Freshmeat]’s work is not the only custom Kerbal controller. There’s a whole thread of them, with implementations that would look great in everything from a modern spaceplane to kerbalkind’s first steps into the milky abyss of space. There’s even one over on the Hackaday projects site, ready to fly Bill, Bob, and Jeb to the mün or a fiery explosion. Either one works.

Thanks [drago] for the tip.
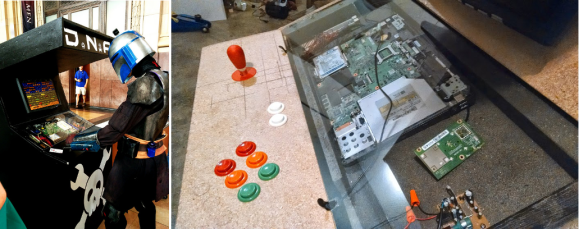
Retro Gaming Console, Now With Internet Radio

RaspPi Retro Gaming Console with Internet Radio

Do you ever miss your gaming system of yesteryear? [yv3] did so he built a retro gaming console. Even though [yv3] likes his old school games, he didn’t want to be stuck listening to old school 8-track tapes while playing those games. The solution for him was to build a retro gaming console with integrated internet radio.

The gaming portion of the build relies on RetroPie. The RetroPie disk image contains all of the software and emulators needed to turn a Raspberry Pi into a dedicated retro gaming system. The RetroPie project supports a lot of gaming systems, [yv3] chose to include Atari, Sega Master System and Genesis, NES, SNES, and Turbografx-16.

Raspberry Pi Internet Radio manages the radio portion of this project and is set up to start playing automatically when the unit is powered on. There are 5 buttons to change the station, volume and settings. The radio stations are managed by a text file residing on the SD card. Audio from the radio can be directed to either the HDMI or the analog out of the RaspPi.

Continue reading “Retro Gaming Console, Now With Internet Radio”

Laser Piano Worthy Of The Band ‘Wyld Stallyns’

Laser Piano uses Arduino

[Robi] and [Kathy] from elecfreaks have put together a how-to article about a Laser Piano they just built. Instead of keys, the user breaks beams of laser light to trigger the sounds.

Several laser pointer diodes are wired in parallel and mounted in a box, cardboard in this case. The laser diodes are aimed at photocells that reside on the other side of the box. Each photocellis connected to a digital input pin on an Arduino. When the Arduino senses a state change from one of the photocell, meaning the beam of light has been interrupted, it plays the appropriate wave file stored on an external JQ6500 sound module.

[Robi] admits that there are some improvements to be made, specifically the trigger response time and the piano sounding too monotonous. If you have any ideas, please leave them in the comments section.

Continue reading “Laser Piano Worthy Of The Band ‘Wyld Stallyns’”

The Old Ping-Pong Ball Levitation Trick

pingpongLev

[Jacob] has put a slightly new twist on the levitating ball trick with his ping-pong ball levitation machine. We’ve all seen magnetic levitation systems before. Here on Hackaday, [Caleb] built a Portal gun which levitated a Companion Cube. Rather than go the magnetic route, [Jacob] levitated a ping-pong ball on a cushion of air.

Now, it would be possible to cheat here, anyone who’s seen a demonstration of Bernoulli’s principle knows that the ball will remain stable in a stream of air. [Jacob] proves that his system is actually working by levitating ping-pong balls with different weights.

A Parallax Ping style ultrasonic sensor measures the distance between the top of the rig and the levitating ball. If the ball gets above a set distance, [Jacob’s] chipKit based processor throttles down his fans. If the ball gets too low, the fans are throttled up. A software based Proportional Integral Derivative (PID) loop keeps the system under control. A graph of the ball distance vs fan speed is displayed on an Android tablet connected to the controller via USB.

When [Jacob] switches a heavy ball for a light one, the lighter ball is pushed beyond the pre-programmed height. The controller responds by reducing the fan speed and the ball falls back. Who said you can’t do anything good with a box of corn dogs?

Continue reading “The Old Ping-Pong Ball Levitation Trick”

How to enter The Hackaday Prize by August 4th

Don’t Freak Out — Your TODO List For August 4th

The registration cut-off for The Hackaday Prize is August 4th. But this is not the day you need to have your project finished. You simply need to register your concept before the cutoff. This video walks you through the process, and we’ve included bullet points and links after the break for your convenience.

Continue reading “Don’t Freak Out — Your TODO List For August 4th”

Pocket Calculator Emulates Pocket Calculator

msp430 Calc Emu

[Chris] has built a pocket calculator that emulates… a pocket calculator. Two pocket calculators, in fact. Inspired by [Ken Shirriff’s] incredible reverse engineering of the Sinclair scientific calculator, [Chris] decided to bring [Ken’s] Sinclair and TI Datamath 2500II simulators to the physical world.

Both of these classic 70’s calculators are based on the TMS0805 processor. The 0805 ran with 320 11-bit words of ROM and only three storage registers. Sinclair’s [Nigel Searle] performed the real hack by implementing scientific calculator operations on a chip designed to be a four function calculator.

[Chris] decided to keep everything in the family by using a Texas Instruments msp430 microcontroller for emulation. He adapted [Ken’s] simulator code to run on a MSP430G2452. 256 bytes of RAM and a whopping 8KB of flash made things almost too easy.[Chris’] includes ROMs for both the TI and the Sinclair calculators. The TI Datamath ROM is default, but by holding the 7 key down during boot, the Sinclair ROM is loaded. The silk screen includes key icons for both calculators, as well as some Doge-inspired wisdom on the back.

All joking aside, these really are amazing little calculators. Children of the 60’s and 70’s will be taken back when they see the LEDs flash as the emulated TMS0805 performs algorithmic arithmetic. [Chris’] code is up on Github. While he hasn’t released gerbers yet, he does have images of his PCB layout on the 43oh.com forums.

Continue reading “Pocket Calculator Emulates Pocket Calculator”