Airliners have become an unremarkable part of modern life, but unless you happen to be an aircraft enthusiast, you’d be forgiven for thinking the latest Airbus model looks more or less the same as the Boeing 707 that ushered in the Jet Age. But that might soon change, with blended wing airliners looking like the next step in air travel efficiency. In the video after the break, [Real Engineering] takes us on a fascinating tour of the past and possible future of jet airliners.
Contemporary airliners all still follow the same old “tube and wing” design, but have become vastly more efficient. The latest jetliners burn almost 50% less fuel per passenger-km than they did 50 years ago. This is thanks to better engines, improved aerodynamics, reduced weight, and a vast array of other, often invisible changes. However, it’s looking like a more drastic change is needed to keep the progress going, and NASA, Boeing, and Airbus are all betting on blended wing designs to do this.
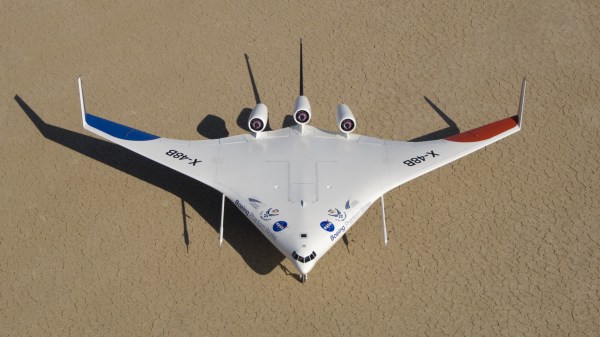
Blended wing aircraft are basically flying wings, where the cargo-carrying section of aircraft is shorter, wider, and produces lift. This layout can be used to increase the aircraft’s internal volume, and improve aerodynamic losses, by eliminating the tail. Research shows that blended wing design could reduce fuel consumption by as much as 27%. Since load and produced lift are spread more evenly along the entire width of the aircraft, it also reduces the amount of structural reinforcement required for the wings, especially at the root. The large internal volumes also allow other power sources, like hydrogen fuel cells to be used.
Blended wing aircraft are not without challenges. They are inherently unstable and require complex control systems to fly. These control systems depend on sensors, actuators, and software to work properly, and require multiple levels of redundancy. The omission of these redundancies ultimately led to the 2008 crash of a B-2 bomber, and the more recent fatal crashes of Boeing’s 737 MAX airliners. Also, unlike tubular fuselages, blended wing designs are not ideal pressure vessels. However, this is not a major problem thanks to the availability of carbon composite materials to create strong, lightweight structures.
With aircraft technology moving as fast as ever, we look forward to seeing what the future will bring. Whether it’s personal rotorcraft or commercial space flight, it sure won’t be boring.
Continue reading “From Tube And Wing To Just Wing: The Future Of Airliners” →