Dude, Where’s My Car?

Someone just stole your car. They took it right underneath your nose, and you have no idea where it is. Luckily, you have a GPS tracker installed and can pinpoint the exact location of the vehicle that thief drove away with.

Having a GPS tracker in your vehicle becomes extremely useful when something unexpected happens. Taking the necessary precautions to ensure a secure tracking system can save a lot of time and money if the car suddenly disappears.

Helping to solve the vanishing vehicle problem is the bright, young team at Cooking Hacks who created a step-by-step tutorial showing how to create a homemade GPS tracker. Their design is Arduino based and has a GPS+GPRS shield with an antenna attached to continuously pick up the location of the vehicle. Making a call to the Arduino inside triggers an SMS message to be sent back with the specific GPS data of where the tracker is stationed at. Information is then set to a server and inserted into a database, which can be accessed by opening up a specialized Android app.

We’ve seen similar ideas before, like this GPS tracker for stolen bikes, but this project by Cooking Hacks is unique because of its mobile phone integration with Google Maps. Not to mention, their video for the project is fantastically awesome.

If you have developed a system like this, be sure to let us know in the comments; and don’t forget to check out their video after the break.

Continue reading “Dude, Where’s My Car?”

Biofeedback Flowers At Burning Man

Burning man, the premier desert-based convention, is a vacation for some. [Sam], on the other hand, points out that he is there to get his hands dirty. This year, he (with a team of six) built a set of 20 interactive lotus flowers that light up in sync with a heartbeat.

[Sam]’s biofeedback circuit is able to sense up to two heartbeats per flower. When a person’s heartbeat is detected, a set of high-power LEDs light up from the base of the stem upwards towards the petals for an incredible illuminated display of biofeedback.

The lotus flowers themselves aren’t anything to scoff at, either. They range from 8 to 18 feet high and are made out of steel and rowlux plastic. The circuit boards are all custom-made as well, with every part chosen to be as affordable as possible. The whole installation is powered by a deep-cycle marine battery and a set of 6V batteries, which can run all of the electronics in the flowers for the entire night before needing a recharge.

Burning man is a great example of art meeting technology. For other examples, check out this 2010 pyrotechnic ball, or head there yourself next August! Be sure to check out the videos and the project’s code on the project site as well.

Raspberry Pi Gets VGA, Dual Screen Support

The Broadcom SOC in the Raspberry Pi is actually surprisingly powerful, it turns out. It’s actually capable of driving a VGA monitor through the GPIO pins using a handful of resistors.

[Gert van Loo], Raspberry Pi chip architect, wizard, and creator of a number of interesting expansion boards showed off a VGA adapter for the new B+ model at the recent Raspberry Pi Jam in Cambridge this week. Apparently, there is a parallel interface on the SoC that can be used to drive VGA with hardware using a resistor ladder DAC. That’s native VGA at 1080p at 60 fps in addition to HDMI for the Raspberry Pi. Only the new Model B+ has enough pins to do this, but it’s an intriguing little board.

The prospect of having two displays for a Raspberry Pi is very interesting, and the remaining four GPIOs available mean a touch screen could be added to one display, effectively making a gigantic Nintendo DS. Of course there are more practical problems a dual display Raspi solves, like driving a projector for the current crop of DSP/resin 3D printers, while still allowing for a usable interface during a print.

The VGA expansion board, “is likely to have issues with EMC,” which means this probably won’t be a product. Getting a PCB made and soldering SMD resistors isn’t that hard, though, and we’ll post an update when the board files are released.

Thanks [Uhrheber] for sending this one in.

Hackerspace Monitor

HackerSpace Monitor Monitors Hackerspace Environment

What’s going on at the Hackerspace? If you can’t answer that, maybe your ‘space needs a HackerSpace Monitor. [Tayken] over at the Tokyo Hackerspace has come up with a way to remotely monitor all the stuff you’d want to know about the ‘space.

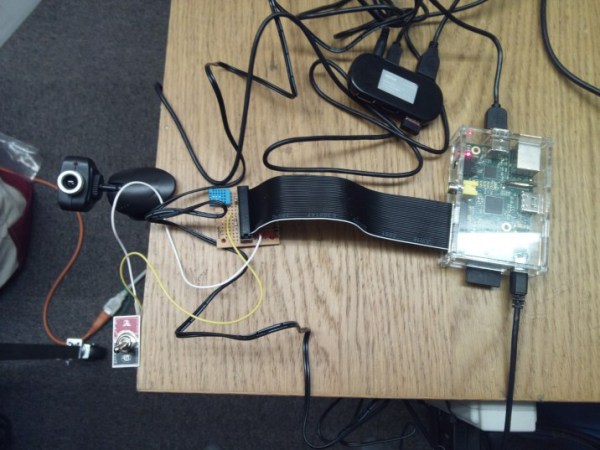
His project is based on a Raspberry Pi with a webcam connected to the Pi’s USB port by way of a hub. The webcam is set up to stream 2 frames per second, which is plenty to be able to judge the activity at the ‘space. A WiFi dongle is also plugged into the USB hub in order to gain internet access, send out the video and allow the ability to SSH into the Pi.

What if you’re on the fence about heading over to work on your favorite project but the current weather leaves you wondering what the temperature is going to be like at the hackerspace? Well, this project has that covered too. An off the shelf temperature and humidity sensor plugs directly into the Pi’s GPIO pins. [Tayken] used the Python-based package, RPi.GPIO, to manage the temperature and humidity sensor readings as well as a toggle switch that monitors if the main door is open or closed.

To get everything all the above information to be displayed on a webpage, [Tayken] had to do some fancy programming. Luckily for us, he has made all his code available for download. Not only is this a great convenience for members, but it can also show non-members when it is or isn’t a good time to show up to check the ‘space out.

DIY Powder Coating Oven Gets Things Cooking

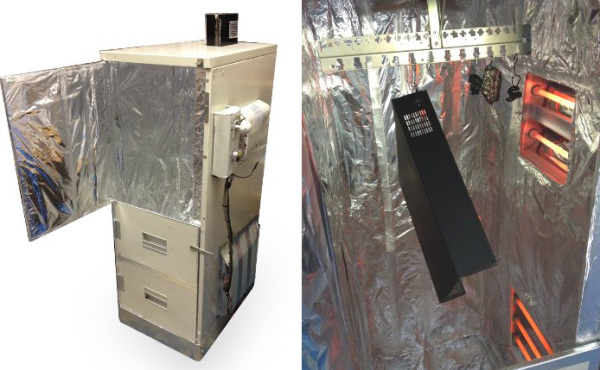
[Bob] needed an oven for powder coating metal parts. Commercial ovens can cost thousands of dollars, which [Bob] didn’t have. He did have an rusty old file cabinet though.  And thus, a plan was born. The file cabinet’s steel shell would make a perfect oven body. He just had to remove all the drawers, sliders, and anything combustible. A few minutes with an angle grinder made quick work of the sheet metal. The drawer fronts we re-attached with hinges, allowing the newly fashioned door to swing out-of-the-way while parts are loaded into the oven.

The oven’s heating elements are two converted electric space heaters. The heating elements can be individually switched off to vary power to the oven. When all the elements are running, the oven pulls around 2000 watts, though full power is only used for pre-heating.

[Bob] used a lot of pop rivets in while building this oven, and plenty of them went into attaching sheet metal guards to protect the outside of the heating units. To complete the electrical equipment, a small fan was placed on top of the oven to circulate the air inside.

The most important part of the build was insulation. The entire inside of the oven was coated with aluminum foil and sealed with heat proof aluminum tape. On top of that went two layers of fiberglass matting. Metal strips kept the fiberglass in place, and the stays were held down with rivets. One last layer of aluminum foil was laid down on top of the fiberglass. Curing powder coating produces some nasty gasses, so [Bob] sealed the gaps of the oven with rolled fiberglass matting covered by aluminum foil and tape.

[Bob] was a bit worried about the outside of the oven getting hot enough to start a fire. There were no such problems though. The fiberglass matting makes for an extremely good insulator. So good that the oven goes from room temperature to 400 °F in just 5 minutes. After an hour of operation, the oven skin is just warm to the touch.

If you need to find [Bob], he’ll be out in his workshop – cooking up some fresh powder coated parts.


Mood Lighting With LEDs And An Arduino

Regular candles can be awfully boring at times. They can only produce one color and the flicker is so… predictable. They can’t even be controlled by an infrared remote control, not to mention the obvious fire hazard. Now, however, [Jose] has come up with an LED candle that solves all of these problems. (Original link to the project in Spanish.)

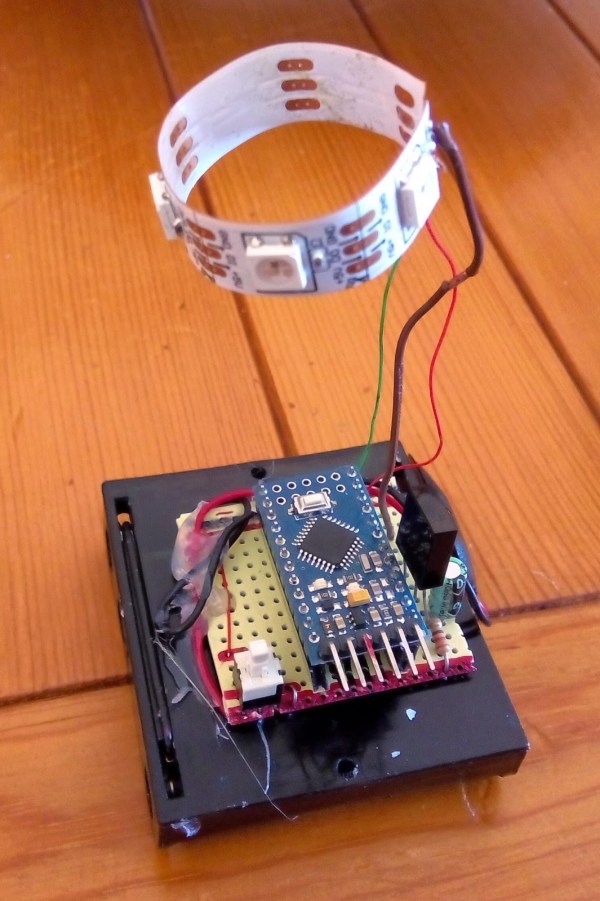
The heart of the project is an Arduino Pro Mini, which is especially suited for this project because of its size. [Jose] put the small form-factor microcontroller in the base of a homemade wax enclosure and wired it to a Neopixel WS2812b LED strip. The strip can produce any color, and has some programmed patterns including flicker, fade, rainbow, and fire.

The artificial candle is controlled with an infrared remote control, and all of the code for the project is available on the project site if you want to build your own. [Jose] has been featured here before for his innovative Arduino-driven RGB lighting projects, and this is another great project which builds on that theme!


Retrotechtacular: There’s More Than One Way To Escape A Submarine

And this 1953 United States Navy training film describes two ways to do so: collective escape via rescue chamber, and individual escape using SEAs.

The film first follows a fellow named [Baxter] and his men in the aft torpedo room.  His sub has failed to surface as scheduled. There are no officers present at the time of distress, so [Baxter, Torpedoman First] is in charge. His first directive is that [Johnson] extinguish his Chesterfield. There’ll be time enough for smoking on the rescue ship, [Johnson].

[Baxter] releases a marker buoy because it is daytime and the weather is fair. Had other conditions prevailed, [Baxter] would send up flares and bang on the hull to provide a sonic beacon for rescuers. Next, he checks the forward compartments. If they are clear, he leaves the hatches open to give his men more air. He checks the air purity and engages [Brooklyn] to pull down some COabsorbent.

[Baxter] and his men will be okay for a while. They have plenty of drinking water, food, juice, supplemental oxygen, and COabsorbent. Their best move is to take it easy and wait for the rescue chamber. That way, they’ll avoid drowning, exposure, and COpoisoning.

Elsewhere in the forward torpedo chamber, there’s a chlorine leak and it can’t be stopped. These nameless sailors have to work quickly to escape the noxious gas. First, they pass around the SEAs and turn them into respirators. Soda lime will filter out the chlorine gas from their lungs and eyes. They too will release a marker buoy, but the first order of business is to move to the escape trunk.

Communicating through gestures, the lead man assigns three men to break out the life raft. The men move to the trunk with the buoy, raft, ascending line, and a divers’ knife. They also take a battle lantern, hand tools, and spare SEAs, but leave their shoes behind. After equalizing the pressure in the trunk, they can get going on their escape. They open the hatch, float the buoy, and tie it off. Now the raft can be floated up the buoy line. Since they are 100 feet down, they send a man every ten seconds up the buoy line and he is to move approximately one foot per second. First man to surface inflates the raft, and Bob’s your uncle. Now, they just have to prevent sunburn and tell stories until the rescue ship finds them.

Continue reading “Retrotechtacular: There’s More Than One Way To Escape A Submarine”