Unlock on LAN

Unlock On LAN Apartment Security

Here’s a cool little variation of that handy little function called Wake on LAN — [Jonathan] found himself locked out of his apartment one too many times, so he decided to add his own fail safe backup in order to get inside without a key — using a Raspberry Pi of course.

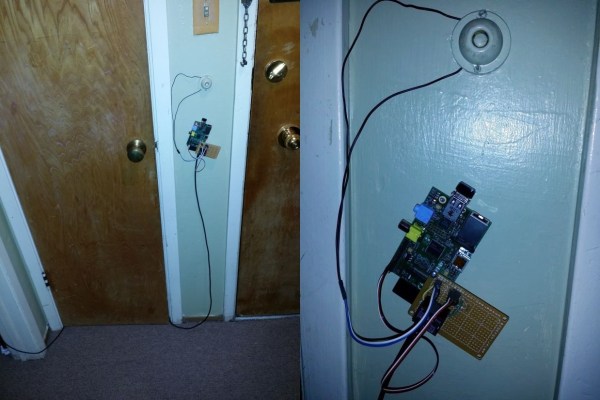
His apartment is one of those older style ones where the door is always locked and you use a buzzer to let someone in (or a key to get in yourself). This made it super easy to add some internet connectivity to the system. [Jonathan] tapped into the buzzer with a relay since the system uses medium voltage AC to operate. A Raspberry Pi triggers a transistor using its GPIO to click the relay on and off, effectively controlling the lock.

Using a WiFi dongle he’s connected the Pi to his home network and written a simple perl script to trigger the relay — all he has to do is visit a URL on his phone or computer and the door will unlock instantly!

Once the system worked [Jonathan] soldered all the components onto a breadboard and hooked it up. He still needs an enclosure for it, but it’s been working well since he installed it.

Another option would be to use an RFID tag system through the door, which could be pretty cool as well.

Radioshack Phone Dialer – Red Box

i thought i’d start out with this hack while we’re in beta, since it was one of the first ones that really got me interested in the way phones worked and how many consumer electronics can be used for new and educational things. a “red box” was a device that would simulate coins being dropped in to a pay-phone, hence free phone calls for many people until the phone systems changed. the most popular device to modify was a radioshack tone dialer, a simple solder of a 6.5536 mhz crystal was all it took and you could “drop” 5, 10 and 25 cents at a time to make calls.

Continue reading “Radioshack Phone Dialer – Red Box”

DIY UV Lamp Is The Cure For Nails And More

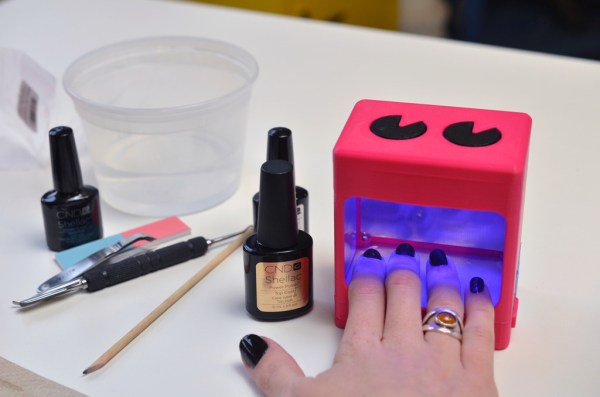
We must admit to wondering how Adafruit’s [Becky Stern] gets anything done with those fingernails of hers. They’re always long and beautifully painted without any chips, dings, or dents. As it turns out, she uses UV gel nail polish. It’s much more durable than standard air-dry polishes, but it requires UV light to cure. [Becky] bought a lamp to use at home, but it’s very bulky and must be plugged into the wall. She knew there was a better way and devised her DIY UV mini manicure lamp.

She really thought of everything. The open source 3D-printed enclosure includes a small compartment in the top for cuticle sticks, emery boards, and tweezers. The Li-poly battery is rechargeable over USB in conjunction with Adafruit’s PowerBoost 500c. The lamp itself is made from 30 UV LEDs and 100Ω resistors. [Becky] lined the inside of hers with silver sticky paper to help distribute the UV light evenly.

You know, this can also be used to erase EPROMs or to cure small DLP 3D prints. Do you have another use for it? Tell us in the comments. Introductory and partially hyperlapsed video after the break.

Continue reading “DIY UV Lamp Is The Cure For Nails And More”

THP Hacker Bio: Rusty Jehangir

[Rusty]’s project for the Hackaday Prize is extremely ambitious. He’s planning on sending an autonomous craft across the ocean, from LA to Hawaii, a distance that will end up being well over 2,500 miles The best part about this project? It’s already had some time in the ocean, cruising off the coast of southern California under its own power for a distance of 20km.

Why is [Rusty] doing this? Partly because he wanted to do something no one had ever done before. For him, this meant developing a cheap underwater thruster, building an autonomous solar-powered surfboard for a months-long voyage halfway across the Pacific. It’s a small step to the goal of exploring the deep ocean with his thruster and mostly off the shelf parts, but already [Rusty] has learned a lot about electronics in a marine environment and being confident enough to let a project go on its own for months at a time.

Interview below.

Continue reading “THP Hacker Bio: Rusty Jehangir”

Virtual Reality Expands Into The World Of Rollercoasters With ‘The Augmented Thrill Ride Project’

A rollercoaster company in Germany called Mack Rides joined forces with a team of virtual reality developers in the spring of 2014 to create an experience like no other.

The idea came from [Thomas], a professor at the University of Applied Sciences Kaiserslautern who was working in the department of Virtual Design at the time. The thought of extending a real rollercoaster ride with an Oculus Rift was an intriguing one, so he approached Mack Rides with the experiment, and the ground-breaking research began.

Hundreds of tests were done over the following weeks and months, which provided insight into how we perceive time and space while inside VR. This led to some interesting discoveries. For one, the VR track inside the Rift could be more complex than the real one. This meant that the directions could be contorted into different angles without the user feeling much of a difference. Knowing this, the developers were able to unfold/extend the track well beyond what was possible in real life.

Another epiphany had to do with the rails, which actually didn’t have to be present in VR at all. In fact, it was better if the tracks weren’t there because the experience was much more exciting not knowing which way the ride was suddenly going to take. This made things exponentially more surprising and compelling.

By far the most startling revelation was the reduction in dizziness and motion sickness during the tests. This was attributed to the complex synchronization that the mind goes through when melding together g-forces and the actual rollercoaster rides with the virtual ones displayed inside the Oculus Rift.

Continue reading “Virtual Reality Expands Into The World Of Rollercoasters With ‘The Augmented Thrill Ride Project’”

Master Clock Keeps Time For All Other Clocks

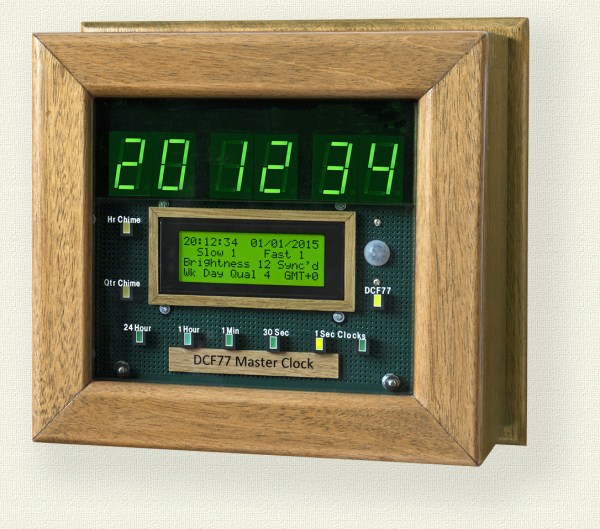
[Brett] just finished construction and long-term testing of this extremely accurate timepiece. It keeps such great time by periodically syncing with the atomic clock in Mainflingen, Germany.

The core of the project is an ATMega328 which uses the new DCF77 library for decoding the signal broadcast by an atomic clock. The libraries written by Udo Klein significantly increase the noise tolerance of the device reading the signal, but they will not work with any project that use a resonator rather than a crystal.

In the event of a complete signal loss from the atomic clock, the micro driving the clock also has a backup crystal that can keep the clock running to an accuracy of within 1 second per day. The clock can drive slave clocks as well, using pulses with various timings depending on what [Brett] needs them to do. The display is no slouch either: six seven-segment displays show the time and an LCD panel reads out data about the clock. It even has chimes for the hour and quarter hour, and is full of many other features to boot!

One of the most annoying things about timekeeping is daylight savings time corrections, and this clock handles that with a manual switch. This can truly take care of all of your timekeeping needs!

DIY Cargo Bike Made From Many Bikes

Many Gave Their Lives For This Cargo Bike To Be Re-Born

Cargo bikes are very specialized and you don’t see too many of them out on the streets because of that fact. Being uncommon also means they’re rather expensive if you wanted to buy a new one. Like any hardcore bike DIYer, [Mike] got around this issue by building his own out of a couple old bikes. His goal is to show car-dependent people that you can get away with biking most of the time, even if you need to move some stuff from place to place. The build process for this monster was so involved that it required two pages of documentation; Part 1 and Part 2!

There are a few types of cargo bikes. There is the trike (seen often in regular or reverse trike varieties) with a bin between the 2 adjacent wheels. Two-wheeled options are usually either front loaders (the storage area between the rider and the front wheel) or those with rear racks. Mike’s bike is the latter.

He started with a 26″ wheeled bike that was already a Frankenbike of sorts, even the frame alone was a conglomeration of two separate bikes! To start, the rear wheel and chain was discarded. A kid’s mountain bike with 20″ wheels was disassembled and the head tube was cut off. The top and down tubes of the smaller bike were notched so that they fit nicely with the seat tube of the larger bicycle. The two frames were then welded together along with several pieces of support to make sure the bike stayed together through the rigors of riding. The rear rack is made up of some old bike frame tubes and some metal from the frame of a sofa that was being thrown out. Nothing goes to waste at Mike’s place! The 20″ kids bike rear wheel already had a 5 speed cassette so that was a no brainner to re-install. In the end, Mike has a bike that cost him zero dollars and shows the world it is possible to build a utilitarian bike and reduce your dependence on automobiles.

If cargo bikes are your thing, you may be interested in this up-cycled cargo bike, this one with a huge front bucket or maybe even this nifty bike trailer.