A Classic TV Trope For An Escape Room

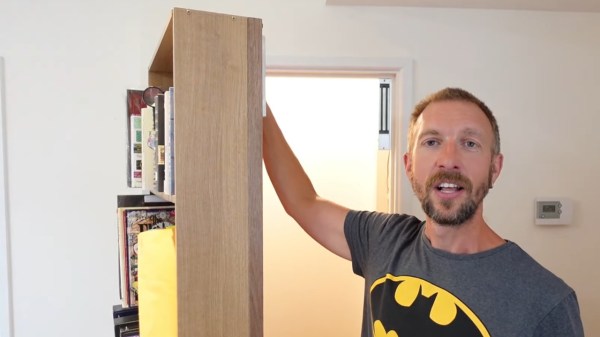
No spooky mansion is complete without a secret passage accessed through a book shelf — or so Hollywood has taught us. What works as a cliché in movies works equally well in an escape room, and whenever there’s escape rooms paired with technology, [Alastair Aitchison] isn’t far. His latest creation: you guessed it, is a secret bookcase door.

For this tutorial, he took a regular book shelf and mounted it onto a wooden door, with the door itself functioning as the shelf’s back panel, and using the door hinges as primary moving mechanism. Knowing how heavy it would become once it’s filled with books, he added some caster wheels hidden in the bottom as support. As for the (un)locking mechanism, [Alastair] did consider a mechanical lock attached on the door’s back side, pulled by a wire attached to a book. But with safety as one of his main concerns, he wanted to keep the risk of anyone getting locked in without an emergency exit at a minimum. A fail-safe magnetic lock hooked up to an Arduino, along with a kill switch served as solution instead.

Since his main target is an escape room, using an Arduino allows also for a whole lot more variety of integrating the secret door into its puzzles, as well as ways to actually unlock it. How about by solving a Rubik’s Cube or with the right touch on a plasma globe?

Continue reading “A Classic TV Trope For An Escape Room”

A ’70s TV With ’20s Parts

Keeping older technology working becomes exponentially difficult with age. Most of us have experienced capacitor plague, disintegrating wire insulation, planned obsolescence, or even the original company failing and not offering parts or service anymore. To keep an antique running often requires plenty of spare parts, or in the case of [Aaron]’s vintage ’70s Sony television set, plenty of modern technology made to look like it belongs in a machine from half a century ago.

The original flyback transformer on this TV was the original cause for the failure of this machine, and getting a new one would require essentially destroying a working set, so this was a perfect candidate for a resto-mod without upsetting any purists. To start, [Aaron] ordered a LCD with controls (and a remote) that would nearly fit the existing bezel, and then set about integrating the modern controls with the old analog dials on the TV. This meant using plenty of rotary encoders and programming a microcontroller to do the translating.

There are plenty of other fine details in this build, including audio integration, adding modern video and audio inputs like HDMI, and adding LEDs to backlight the original (and now working) UHF and VHF channel indicators. In his ’70s-themed display wall, this TV set looks perfectly natural. If your own display wall spotlights an even older era, take a look at some restorations of old radios instead.

Continue reading “A ’70s TV With ’20s Parts”

Raspberry Pi Simulates The Real Analog TV Experience

If you’ve laid hands on a retro analog TV, have the restoration bug, and you plan to make the final project at least somewhat period-correct, you face a bit of a conundrum: what are you going to watch? Sure, you can serve up just about any content digitally these days, but some programs just don’t feel right on an old TV. And even if you do get suitably retro programming, streaming isn’t quite the same as the experience of tuning your way through the somewhat meager selections as we did back in the analog days.

But don’t worry — this Raspberry Pi TV simulator can make your streaming experience just like the analog TV experience of yore. It comes to us from [Rodrigo], who found a slightly abused 5″ black-and-white portable TV that was just right for the modification. The battery compartment underneath the set made the perfect place to mount a Pi, which takes care of streaming a variety of old movies and shorts. The position of the original tuning potentiometer is read by an Arduino, which tells the Pi which “channel” you’re currently tuned to.

Composite video is fed from the Pi’s output right into the TV’s video input, and the image quality is just about what you’d expect. But for our money, the thing that really sells this is the use of a relay to switch the TV’s tuner back into the circuit for a short bit between channel changes. This gives a realistic burst of static and snow, just like we endured in the old days. Hats off to [Rodrigo] for capturing everything that was awful about TV back in the day — Mesa of Lost Women, indeed! — but still managing to make it look good.

Continue reading “Raspberry Pi Simulates The Real Analog TV Experience”

3D Print A Colour TV

The oldest form of television used a spinning disk with a progression of holes — a Nipkow disk — to slice the image into lines for display. They’re surprisingly simple machines and capable of unexpectedly high-quality images despite their relatively low resolution. Even better, in an age of microcontrollers and bright LEDs, making one that works is not the chore it might once have been. [Markus Mierse] has created one that uses an Arduino Mega and a set of 3D printed parts, so there’s no excuse for not having a spinning disk TV on your shelf.

The Arduino Mega is chosen because it has enough lines to drive three six-bit DACs for each of red, green, and blue. The disk is driven by a PWM motor controller, and synchronization is taken care of by a piece of reflective tape and an IR proximity sensor. Images and video are read from an SD card and displayed on the screen in glorious 32-line colour. The full build process can be seen in the video below the break.

A surprise when viewing mechanical TV is that its quality is much better than the meager resolution would have you believe, and this one with its colour display is much better than the usual monochrome devices. It’s hardly HDTV, but it acquits itself well and would provide an excellent talking point.

If you’re curious about Nipkow disks, they’re a subject we’ve examined in the past.

Continue reading “3D Print A Colour TV”

Build A Prop For A TV Premiere? Stranger Things Have Happened

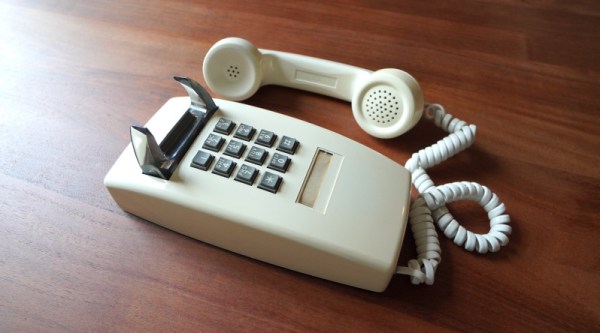
Some guys get all the breaks. [Guy Dupont] had the honor of building a working, interactive wall-mount landline phone for the red carpet premiere of a certain TV show. The phone was to be an Easter egg inside an 80s-style pizzeria set. About every two minutes the phone would ring, and anyone brave enough to answer would be greeted with either a fake pizza order, an old answering machine message, or a clip from The Show That Cannot Be Mentioned.

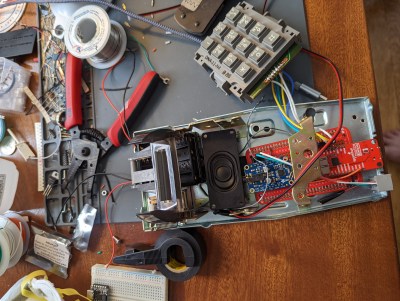
Lots of room inside those old housings.

So the phone doesn’t work-work, but the nostalgia is strong — picking up the receiver when the phone isn’t ringing results in a dial tone, and button pushing leads to the busy signal. Those old pleasant-but-stern operator recordings would have been cool, but there was only so much time. (Your call cannot be completed as dialed. Please check the number and try again.)

[Guy] used a SparkFun RP2040 to handle input from the DTMF keypad and play the tones, the dial and busy signals, and the various recordings into the ear of the receiver.

Instead of messing around with the high voltage needed to drive the original ringer and bell, [Guy] used a small speaker to play the ringing sound. Everything runs on eight AAs tucked under the keypad, which is stepped down to 5 V.

This project was built under fairly dramatic duress, which makes it that much more exciting to watch the build video after the break. With just five days to get the phone working and in the mail, [Guy] holed up on the floor of his office, his messy mid-move refuge from a house plagued by COVID. Unfortunately, the whole pizzeria thing fell through, so [Guy]’s phone will not get to have its moment on the red carpet. But at least it’s on the site that’s black and white and read all over.

[Guy] is no stranger to the old tech/new spec game. Remember that time he shoehorned Spotify into an iPod Classic?

Continue reading “Build A Prop For A TV Premiere? Stranger Things Have Happened”

Untangling The Maze Of Digital TV Upgrades

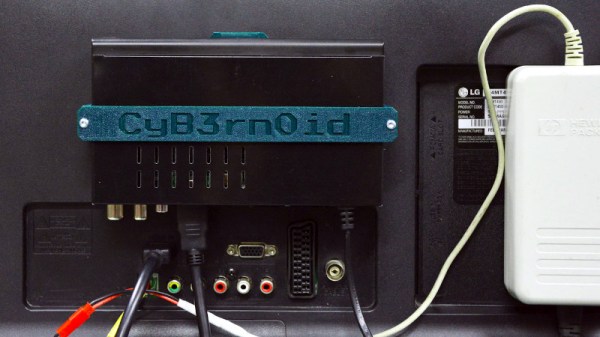
When we all shifted our television broadcasts to digital, for a moment it looked as though we might have had to upgrade our sets only once and a set-top box would be a thing of the past. In Europe that meant the DVB-T standard, whose two-decade reign is slowly passing to DVB-T2 for higher definition and more channels. All of this might seem simple but for the DVB-T2 standard being a transport layer alone without a specified codec. Thus the first generation of DVB-T2 equipment uses MPEG4 or H.264, while for some countries the most recent broadcasts use HEVC, or H.265. [CyB3rn0id] is there to guide us through the resulting mess, and along the way produce a nifty upgrade that integrates a set-top box on the back of an older DVB-T set.

Simply bolting a set-top box to a TV is not the greatest of hacks, however this one takes matters a little further with a 3D printed bracket and an extension which brings the box’s IR receiver out to the front of the TV on a piece of prototyping board. Along with a laptop power supply plumbed directly into the TV, it gives new life into a set which might otherwise have been headed for landfill.

As long-time readers will know, we quite like a TV retrofit here at Hackaday.

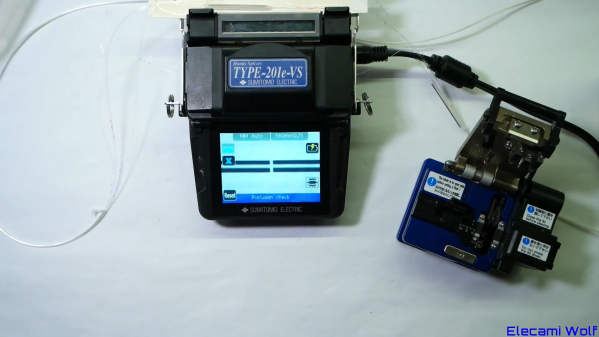
A fusion splicer being used to repair an optical fiber

Using A Fusion Splicer To Repair A Samsung TV’s Cable

Some Samsung TVs come with a system called One Connect, where all external cabling is connected to a separate box so that only one small signal cable goes to the TV. In some versions, the cable linking the TV with its Connect Box is a pure fiber optic cable that’s nearly transparent and therefore easy to hide.

Thin fiber optic cables are fragile however; when [Elecami Wolf] got one of these TVs for a very low price it turned out that this was because its One Connect cable had snapped. Replacement cables are quite expensive, so [Elecami Wolf] went on to investigate the inner workings of the fiber optic cable and figured out how to repair a broken one.

The cable consists of four pairs of plastic-coated glass fibers, which are attached to receivers and transmitters inside the thick connectors on either end. Repairing the cable required two things: figuring out which fibers should connect to each other, and a reliable way of connecting them together.

The first was difficult enough: a simple 1:1 connection didn’t work, so it took a bit of work to figure out the correct connection setup. One clever trick was pointing a camera at a working cable and comparing the flashing lights at each end; this helped to identify the right order for two of the four pairs. For the other two, a combination of reverse-engineering the electronic circuits and some systematic trial-and-error yielded a complete wiring diagram.

For the second part, [Elecami Wolf] called on a fiber optic expert who lent him a fusion splicer. This is a rather neat piece of equipment that semi-automatically brings two pieces of fiber together and welds them with an electric arc. Once this was complete, it was a matter of covering the splices to protect them from sharp bends, and the fancy TV was working again.

Although not everyone will have access to a multi-mode fusion splicer machine, [Elecami Wolf]’s videos provide fascinating insights into the workings of modern fiber-optic based consumer electronics. This might be the first fiber-optic splicing attempt we’ve seen; but if you’re trying to hook up an optical fiber to your circuit, this ball lens setup is a neat trick.

Continue reading “Using A Fusion Splicer To Repair A Samsung TV’s Cable”