Supercharging Your Digital Calipers

supercapCalipers01

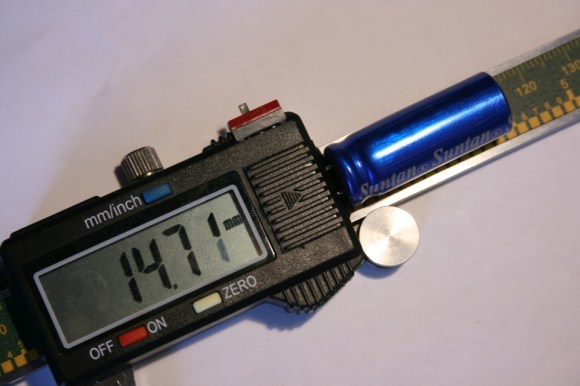
A dead battery in your digital calipers usually means a trip to the store for a new button cell. Not for [Trevor]. His hack substitutes a super capacitor, guaranteeing you’ll never need to rummage around for one of those pesky watch batteries again.

These calipers require only 20 seconds to reach a full charge that can last for a few days. Better still, [Trevor] designed a simple circuit with a voltage regulator at the end of the cord to allow charging via USB: just remember to flip the switch from “discharging” to “charging” mode. Although this is a fairly straightforward hack, its design is impressively tidy. The super capacitor fits perfectly at the end of the display and slides along with it, keeping it away from any important printed numbers. If these are the same calipers everyone seems to have these days, it looks like it may still fit in the provided case, too.

If you’re looking for more ways to beef up your calipers, try upgrading them with a Bluetooth module.

The Cramp: A MSP430-powered Crane Lamp

theCramp

If you think your last project required a lot of soldering, take a look at [Multivac’s] remote controlled and fully-articulable desktop crane lamp. Sure, it’s a 430 microcontroller combined with an LED driver, 32 LEDs, PWM control, and some moving parts: but take a closer look at the structure. The Cramp uses an old HDD as its base, with the crane spinning around the main bearing that previously supported the platter. A system of spools and pulleys provides a reasonable range of motion to the rest of the build. Relocating the entire assembly, however, is evidently an unpleasant task.

[Multivac] based his design on a Liebherr LR1750 Crawler Crane, which he meticulously pieced together using leftover copper salvaged from an upgrade to his home’s mains wiring. A mountain of solder secures what must include several hundred joints—possibly more. The head of the lamp is an elegant exoskeleton-interpretation of industrial designer Eero Saarinen’s TWA Flight Center. You can see the Cramp in action in the video below.

Continue reading “The Cramp: A MSP430-powered Crane Lamp”

3D Printering: Remote Control Of 3D Printers

extrude

With new owners comes new editorial direction. You’re looking at the first evidence of that right now. We’re going to be doing some weekly columns dedicated to certain subjects, and with our fascination of all things three dimensional, it only made sense our first weekly column was dedicated to 3D printers. And using 3D printers, stuff made with 3D printers. Also, things that can be used with 3D printers. Great wordsmiths we are, we’re calling this column ‘3D Printering.’ If you have a better name (or a title pic) send it in and we’ll probably use it.

With that out of the way…

This week we’re taking a look at remote printing. With anything from an Android tablet to a Raspberry Pi, it’s possible to have a networked 3D printer, the perfect thing for hackerspaces or anyone who wants to print objects from multiple computers. One of the most-used tools for this is OctoPrint, a printer host designed to be run on small embedded devices such as a Raspi.

We’ve seen OctoPrint before. but since then it’s matured a whole lot. with a ton of reports of successes running on everything from a Raspberry Pi, BeagleBone Black, and even an OUYA. All the major electronics boards – RAMPS, RAMBo, Sanguinololu – and firmwares should work with OctoPrint, making an Internet-connected 3D printer simply a matter of connecting a Raspberry Pi.

Of course OctoPrint isn’t the only networking solution for a 3D printer. PrintToPeer is deep into development and should be released sometime this fall. It’s a much more sophisticated way of networking a printer that includes an iPad app and ‘enterprise class’ functionality.

The PrintToPeer team is offering private beta invitations, but with a catch: you need to print out a piece of a sculpture and send it to them. These pieces will be unveiled in September as the largest 3D printed sculpture, and the word’s first collaborative 3D sculpture.

How To Use The Kenetis KL25Z Freedom Board As An HID Mouse

[Eric] is interested in turning this Freedom development board into an air mouse by using the onboard accelerometer. But he had to work through the particulars of the USB HID mouse class before he could get that done.

This Freescale FRDM-KL25Z is one of the awesome ARM boards we looked at a year ago. Can you believe you can get this thing for like thirteen bucks? We suppose the gotcha is that the CodeWarrior IDE meant for use with them is not entirely free. But there is a free trial, and [Eric] shows how much easier it is to tailor the USB stack for your needs with it.

Don’t worry though. If you’re like us and use Open Source For The Win he’s got you covered as well. When you’re done reading his HID mouse writeup head on over to his six-part tutorial for building a free toolchain for the Kenetis boards.

A Cable Box Becomes A Network Time Display

DVR

In 2011 [Erkki]’s DVB box gave up the ghost. It had been a fixture of his media center for quite a while, decoding cable and recording shows faithfully for years. A flaky power supply will bring down the mightiest machine, though. and the Topfield box eventually found itself in disuse. One thing [Erkki] liked about this cable box is its wonderful green LED clock – even after the box had been declared dead, he still used it as a clock. Not wanting to keep a faulty machine on life support, [Erkki] decided to strip the guts and replace them with a networked Arduino that receives time over a network

[Erkki] originally used an Arduino and an ENC28J60 Ethernet module to receive time from an NTP server and spit it out onto the LCD display. A full Arduino for this kind of job, especially one that’s a more or less complete project, is a bit overkill so [Erkki] designed a PCB to put his ‘duino to better use.

One interesting bit about this build is that [Erkki] found it completely broken one day. Figuring this was a problem with the microcontroller, he first fried the ATMega with 9 volts – the reasons escape us, however – and started work on programming a new chip. After looking at different ports on his NTP server with a microcontroller, [Erkki] realized he had reset his network switch recently, meaning the previous microcontroller was working perfectly.

In the future, [Erkki] hopes to add some new features to this 8×4 seven-segment display sitting in a large box; something like reading off the temperature, checking IRC and his physical mailbox, and notifying him when someone is at the front door.

A $5 ARM Development Board

Most of you know that there are plenty of ARM powered development boards out there, so you may not be really sure what a new one can still bring to the table.

With a $5 price tag, the open hardware McHck (pronounced McHack) is meant for quickly building projects on a small budget. The board created by [Simon] is based on a Freescale Cortex M4 microcontroller, and can be plugged directly into one’s computer. As a Direct Firmware Update (DFU) bootloader is present on the microcontroller, there is no need for external programming equipment.

The board has unpopulated footprints that allow users to add other functionalities that may be required for their future projects: a Real Time Clock (RTC), a Boost regulator for single cell battery operation, Buck and linear regulators, a Lithium Polymer (LiPo) battery charger and even an External Flash storage.

The Bill of Materials can be found on the project wiki and the McHck community will soon launch a crowdfunding campaign to send the 5th version of the board to all the hobbyists that may be interested.

And if you’re curious, you can also have a look at all the other boards that Hackaday featured these last months: the browser based IDE arm boardquad-core ARM dev board and the Matchbox ARM.

Soundball Bumps To Your Tunes

soundball-blinks-to-the-music

Meet soundball, a hobby electronics project when replaces a disco ball with one made of LEDs (translated) going every which way. This image shows the device before being injected into an enclosure. The final offering is a white project box with a hole in the top through which the diffuser covered blinky ball is supported.

The main board hosts a collection of the usual suspects: an ATmega328, an MSGEQ7 equalizer, a couple of TLC5940 LED drivers, and a footprint for a Bluetooth Shield. The equalizer chip provides [Cornelius] the audio analysis used to generate light patterns that go along with the music.  But he can still control the lights manually with a button on the case or by connecting to it via Bluetooth.

Swap out the LED drivers for some solid state relays and you can blink your Christmas lights to the music.

Continue reading “Soundball Bumps To Your Tunes”