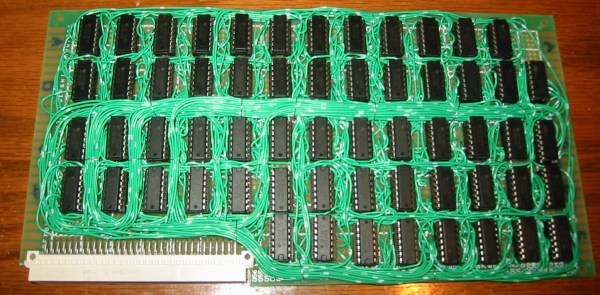
Turning The Stellaris Launchpad Into A Logic Analyzer

acquisition

If you have a Stellaris Launchpad sitting around, have a go at using it as a logic analyzer

The Stellaris logic analyzer is based upon this earlier build that took code from a SUMP comparable Arduino logic analyzer and ported it to the much faster and more capable Stellaris Launchpad with an ARM Cortex 4F processor.

This build turns the Launchpad into a 10 MHz, 8-channel logic analyzer with a 16 kB  buffer comparable with just about every piece of software thanks to the SUMP protocol. Even though the ARM chip in the Launchpad isn’t 5 Volt tolerant, only pins 0 and 1 on Port B are limited to 3.6 Volts. All the other pins on Port B are 5 Volt tolerant.

Not a bad piece of work to turn a Launchpad that has been sitting on your workbench into a useful tool.

Extracting Data With USB HID

sd_adaptor

High security workstations have some pretty peculiar ways of securing data. One of these is disabling any USB flash drives that may find their way into a system’s USB port. Security is a cat and mouse game, so of course there’s a way around these measures. [d3ad0ne] came up with a way of dumping files onto an SD card by using the USB HID protocol.

We’ve seen this sort of thing before where a microcontroller carries an executable to extract data. Previously, the best method was to blink the Caps Lock LED on a keyboard, sending one bit at a time to a micocontroller. [d3ad0ne]’s build exploits the USB HID protocol, but instead of 1 bit per second, he’s getting about 10kBps.

To extract data from a system, [ d3ad0ne] connects a Teensy microcontroller to the USB port. After opening up Notepad, [ d3ad0ne] mashes the Caps Lock key to force the Teensy to type out a script that can be made into an executable. This executable is a bare-bones application that can send any file back over the USB cable to the Teensy where it’s stored on an SD card. Short of filling the USB ports in a workstation with epoxy, there’s really no way to prevent secure files from leaking out of a computer.

Adding Shoulder Buttons To An RC Transmitter

radio

[Gerard] does puppeteering and animatronics work, and to remotely control his creations and characters he uses an off-the-shelf remote control radio. It’s you basic 6-channel setup, but [Gerard] wanted a way to control eye blinks and other simple actions with the press of a button. Sure, he could use the toggle switches on his transmitter, but he wanted something that wouldn’t require turning a servo on and off again. To fix this problem, [Gerard] added shoulder buttons to his transmitter with only a little bit of soldering.

[Gerard]’s transmitter uses toggle switches to send a signal on channels five and six. To add his push buttons, he simply drilled a hole in the plastic enclosure, installed a pair of push buttons, and wired them in parallel to the toggle switches.

Now [Gerard] has momentary switches on channels five and six, perfect for making his creations blink. Since the buttons are wired in parallel with the switches, flicking the switches to the ‘on’ position in effect takes the button out of the circuit, just in case the transmitter gets jostled around.

Gizmo Board, A Tiny X86 Dev Board

Gizmo

With the Raspberry Pi and sever other ARM dev boards seeing their time in the lime light, it’s no surprise other chip manufacturers would want to get in on the action. AMD is releasing a very tiny x86 dev board called the Gizmo, a four-inch square board that shrinks a desktop computer down to the palm of your hand.

The Gizmo is powered by a dual-core x86 Brazos CPU running at 1 GHz with an included Radeon HD 6250 graphics engine. Also on the board is 1GB of DDR3 RAM, a SATA, Ethernet, USB, VGA, Audio, PCI and PCIe ports, and a ton of GPIO pins that include ADCs and DACs. All this in a four-inch square package that boasts about twice the performance of a Raspberry Pi.

While the price of the Gizmo – $200 for an explorer kit – will probably preclude it from being as popular as a Raspberry Pi or other ARM board, sometimes you just need an x86 platform to do the job. With the powerful graphics potential of the Gizmo, we could easily see this board being used in a few computer vision or autonomous robot builds.

Pinoccio – An Ecosystem For The Internet Of Things

pinoccio-lead-scout-labelled

[Pinoccio] is currently an Indeigogo crowd-sourced project that aims use the real-world programmability of the Arduino through the internet using a wifi connection. One could rightly point out that this can already be done through the use of a wifi shield. Before ruling this device out, just “shush your shussins” and consider that it’s designed specifically for interfacing with “things” over the internet. This can replace several components (see 1:10 in the video after the break) and should be less of a hassle.

Additionally, with a shield on one of these devices, several other [Pinoccio] boards can communicate with the Internet using this as a hub in a mesh network. This is similar to how the many “smart” electrical meters work, with a grid router being a central hub for communications. Additionally, this board has a built in temperature sensor and a RGB (instead of a single-color) LED, so you can do some interesting stuff with it right out of the box. Assuming this project gets funded, which seems likely at this point, we’re excited to see the projects that get built using it! Continue reading “Pinoccio – An Ecosystem For The Internet Of Things”

How The 8085 ALU Is Structured

8085-alu-reverse-engineering

This is a microscopic photograph of an 8085 processor die. [Ken Shirriff] uses the image in his explanation of how the ALU works. It is only capable of five basic operations: ADD, OR, XOR, AND, and SHIFT-RIGHT. [Ken] mentions that the lack of SHIFT-LEFT is made up for by adding the number to itself which has the effect of multiplying a number by two; the same mathematical function performed by a shift operation.

His post details the gate arrangement for each ALU operation. This is clear and easy to follow, and was based on reverse engineering work already done by a team who meticulously decapped and photographed the dies.

Not long ago this explanation would have been voodoo to us. But we worked our way through The Elements of Computing Systems text-book by following the online Nand to Tetris course. It really demystifies the inner working of a chip like the 8085.

Now if you really want to understand this ALU you’ll build it for yourself inside of Minecraft.

[Thanks Ed]

Improved Hourglass Entropy

improved-hour-glass-entropy

[Wardy] built himself a high quality entropy source with parts he had lying around. It’s based on the hourglass entropy project we saw in a links post earlier this month. Just like that project, he is bouncing a laser off of the falling sand and reading the result. But he brings a few innovations to the party, and has test results to back up his work.

The first change is an obvious one; motorize the hourglass so that you don’t need to flip it by hand. We thought this might mess with the laser alignment but the clip after the break proved us wrong. He changed up the sensor, using an LED connected to the base of an NPN transistor. The next change was to mount the light sensor at an angle to the laser rather than straight on. This picks up reflections of the laser and not the direct beam itself, resulting in a wider range of readings.

He used an Ethernet shield to get the system on the network. It’s pushing 420k random numbers per second and was tested with the DieHarder suite. It didn’t get a very high score, but it did pass the test.

Continue reading “Improved Hourglass Entropy”