Building A Raspi Case In True Hackaday Fashion

[Ben] needed a case for his Raspberry Pi. Instead of going the usual laser-cut plastic or 3D printed route, he took a path far more familiar to us here at Hackaday. His case is built out of aluminum found in his basement, providing a neat reuse for some old aluminum extrusion he had lying around.

Part one of [Ben]’s thoroughly documented build goes over the process of acquiring some of this very handy aluminum extrusion. Part two covers a very neat feature of [Ben]’s scrap of aluminum: because of a pair of internal chamfers, [Ben] was able to mount his Raspi and USB hub to a separate piece of PVC and slide the whole assembly in.

The final assembly included dremeling a piece of aluminum plate for the Raspi and USB hub ports and wiring the whole thing together.

Right now the newly enclosed Raspi is working happily as [Ben]’s home server. Not exactly the use case a rugged aluminum case would see the best use from, but it looks great all the same.

Stacking GPS, GSM, And An SD Card Into An Arduino Shield

A few years ago, [Phang Moh] and his compatriots were asked by a client if they could make a vehicle tracking device for oil tankers all around Indonesia. The request of putting thousands of trackers on tanks of explosives was a little beyond [Phang Moh]’s capability, but he did start tinkering around with GPS and GSM on an Arduino.

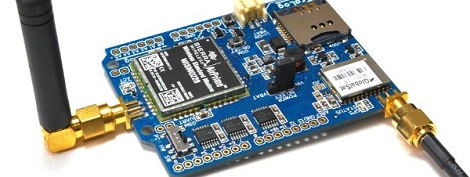
Now that tinkering has finally come to fruition with [Phang]’s TraLog shield, a single Arduino shield that combines GPS tracking with a GSM and GPRS transceiver. There’s also an SD card thrown in for good measure, making this one of the best tracking and data logging shields for the Arduino.

The shield can be configured to send GPS and sensor data from devices attached to an I2C bus to remote servers, or a really cool COSM server. [Phang] is selling his TraLog for $150, a fairly good deal if you consider what this thing can do.

Seems like the perfect piece of kit for just about any tracking project, whether you want to know the location of thousands of oil tankers or just a single high altitude balloon.

Tip ‘o the hat to [Brett] for finding this one.

Hackaday Retro Edition Roundup

It’s time for another update chronicling the adventures and misadventures of getting really old computers to load our retro edition!

First up is [Andrew Hull] and his brilliant use of a Raspberry Pi to get an old Psion 5mx PDA on the Internet. The Raspi served as a wireless bridge, taking in Internet from a WiFi dongle and sending it back out via a serial port. Here’s a great guide for enabling PPPD on the Raspi, and giving just about anything with a serial port an Internet connection.

It may push the limits of being a retro submission, but [Glen]’s use of a modem to get on the Internet calls to us like a siren song.

Did you know Corel made computers? Well, [Victor] has one, and it’s actually a pretty interesting machine. ARM processor, an actual hard drive, and dual Ethernet ports. It was built in the late 90s and the hard drive has since died, but [Victor] booted it into Red Hat over his network and loaded up our retro site.

Finally, we come to [Greg]’s submission. He could have sent in a Mac SE/30 submission, but figured that was old hat (do you see one on there, [Greg]. No. And it’s the best computer Apple will ever make). Instead, he had an old Powerbook Duo 2300c with a Duo 230 screen lying around.

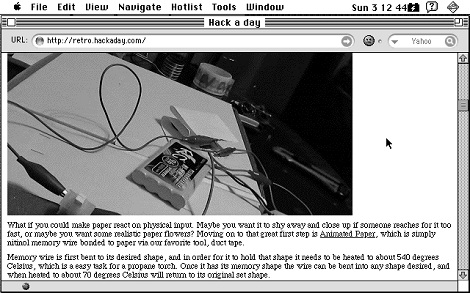
Powerbook Duos are pretty weird; they only had two ports – a single DIN-8 serial port and a dock connector. [Greg] had a Powerbook Duo dock that surprisingly had an Ethernet port. Third-party peripherals to the rescue, it seems. After plugging his Duo to his network and launching iCab, [Greg] was able to browse both the retro and main Hackaday editions. Picture Not bad for the smallest laptop Apple made before the Air.

Oh, [Greg] was also cool enough to write a tutorial for getting just about every Macintosh on the Internet. We’ve put that up on the retrocomputing guide portion of our retro site, and we’re always looking for new submissions.

You can check out the pics from all these submissions in a Web 2.0 WordPress gallery after the break, or head on over to the retro site and view them the way the gods of HTML intended.

Continue reading “Hackaday Retro Edition Roundup”

Hacking Beer Cans For Fun And Publicity

beer-keyboard

Although beer is generally a good way to get people to come to your trade show booth, [Robofun.ru] decided to put a new spin on things. Instead of (or possibly in addition to) giving out beer, they decided to turn 40 Staropramen beer cans into a keyboard.

This was done using an Arduino hooked up to four Sparkfun MPR121 Capacitive Touch Sensor Breakout Boards, allowing them to act as keys. These inputs are translated via the Arduino into a standard output (we assume USB) that can be plugged into any computer.  Additionally, a Sparkfun MP3 trigger board was used to control the sound effects.  Rounding out the build, a Raspberry Pi computer was used to run the human machine interface, a large plasma display.

Be sure to check out this keyboard in action after the break. If this isn’t enough alternative input fun, why not check our post about how to make a banana piano and giant NES controller. Continue reading “Hacking Beer Cans For Fun And Publicity”

IPhone Hack Isn’t Sold By Adafruit

light-up-iphone

[Becky] wrote in to tell us about her latest hack for Adafruit Industries. This hack will allow you to light up the Apple symbol on the back of your phone, and as she notes, it will definitely void your warranty. From the looks of the video, it requires some extremely good soldering skills, and optionally mid-level tape skills. If you’re up to the challenge, and have the stomach to see your iPhone on the operating table, the results are quite good.

One other challenge of doing this hack is that it uses a kit that Adafruit isn’t going to sell since it uses knock-off Apple parts. They exist somewhere, but where to source them would be a challenge. On the other hand, from a purely experimental/engineering point of view, the video after the break is quite interesting. Many of us would be very hesitant to take apart a several hundred dollar phone, much less solder to a power supply on it!

Continue reading “IPhone Hack Isn’t Sold By Adafruit”

The Inner Workings Of Servo Motors

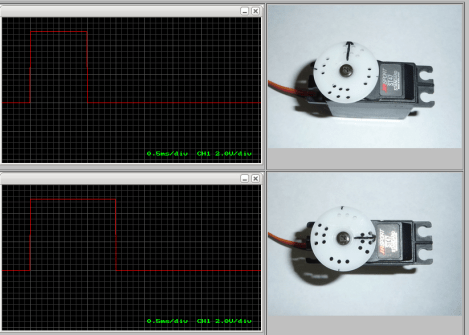
Servos seem to be the go-to option when adding motors to hobby projects. They’re easy to hack for continuous rotation for use in a robot, but with the control board intact they are fairly accurate for position-based applications. But do you know how the hardware actually works? [Rue Mohr] recently published an article that looks at the inner world of the servo motor.

As you know, these motors use a voltage, ground, and signal connection for control. The position of the horn (the wheel seen on the servos above) is dependent on that control signal. The duty cycle of a 20 ms pulse decides this. Inside the housing is a control board capable of measuring this signal. It’s got a chip that monitors the incoming PWM pulses, but that’s only half of the equation. That controller also needs feedback from the horn to know if its position is correct or needs to be changed. Integrated with the gear box that connects the motor to the horn is a potentiometer. It’s resistance changes as the horn turns. Knowing this, it is possible to fine tune a servo by altering that resistance measurement.

27 MHz Transmitter/receiver Pair Made With 555 Timers

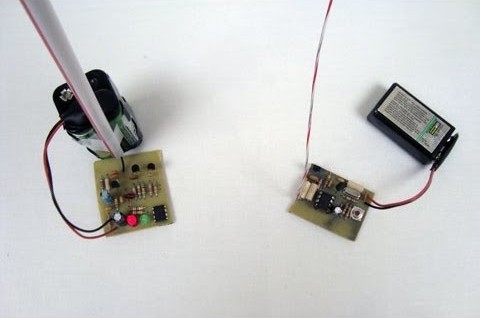
Get your feet wet with radio frequency transmitters and receivers by working your way through this pair of tutorials. [Chris] built the hardware around a couple of 555 timers so you don’t need to worry about any microcontroller programming. He started by building the transmitter and finished by constructing a receiver.

Apparently the 27 MHz band is okay to work with in most countries as long as your hardware stays below a certain power threshold. The carrier frequency is generated by the transmitter with the help of a 27.145 MHz crystal. The signal is picked up by the receiver which uses a hand-wrapped inductor made using an AL=25 Toroid Core. We’d say these are the parts that will be the hardest to find without putting in an order from a distributor. But the rest of the build just uses a couple 555 timer chips and passive components, all of which will be easy to find. The video after the break shows the project used to receive a Morse-code-style message entered with a push button. It would be fun to interface this with your microcontroller of choice and implement your own one-way error correction scheme.