Robot Bar Tender Records Wedding Guests Getting Drunk

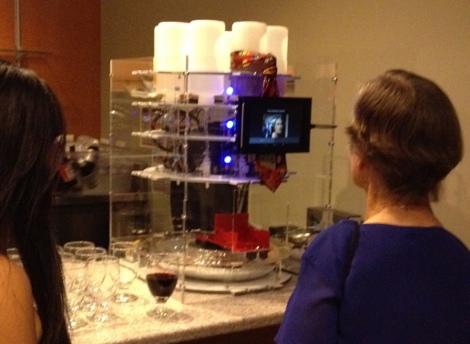
Having an open bar usually means hiring at least one bar tender. But this hack does away with those labor costs (and someone to make sure your teenage cousins aren’t drinking) by putting a robot in charge of things. But the fun doesn’t stop there. One of the features of this bartender is that it records a 30 second video every time it dispenses a beverage. We’d image these get a bit funny as the night wears on before taking a dramatic turn into sadness.

The link above shares a ton of details on the device so make sure that you click-through the different pages in the navigation bar. The mechanical page shows off all of the effort that went into designing the machine in Solidworks. The ingredients start on the top layer in inverted bottles. Each feeds to a valve which has its own nozzle. Like a round version of the Inebriator, a glass is placed in a trolley at the bottom that pivots around the center of the machine. Once it gets back to the opening in the acrylic case you can grab your drink, give it a quick stir, and off you go.

Check out the video after the break to get a look at the user interface which includes that recorded video greeting for the happy couple.

Continue reading “Robot Bar Tender Records Wedding Guests Getting Drunk”
Binoculars As A Zoom Lens

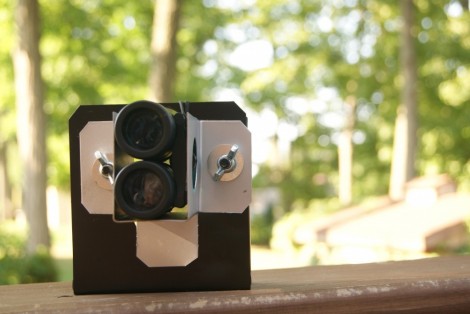
It may seem trivial at first, but the effect [Dan] gets when using binoculars as a telephoto lens is surprising. The images are well in focus with great colors. This technique not only brings your subject mater closer but also provides a depth-of-focus feature not normally available on simple cameras or camera phones.

The proof is in the example footage found after the break, but you’ll also find a video tutorial detailing the build. [Dan] already had the expensive components are a pair of mini binoculars and a Kodak Zx3 pocket camcorder. The camcorder is the same form factor as a smart phone so using different hardware will be a breeze. He started off by building a prototype out of paper. Basically it’s a bracket that properly aligns the camera with one lens of the binoculars. Once he had everything lined up he transferred his measurements to some sheet metal. The bracket for the binoculars is attached to the one for the camera using bolts and wing nuts to make it adjustable. One important part of the design is to gut a hole for access to the binocular focus wheel.

Continue reading “Binoculars As A Zoom Lens”

IOIO Controller Replacement For An RC Truck

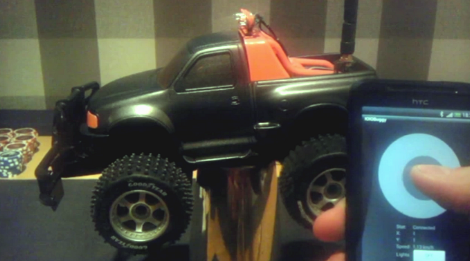
This RC truck can be controlled with the tip of your thumb or the tilt of a wrist. That’s thanks to the IOIO which was inserted in place of the toy’s original controller. [Exanko] made the hardware changes in order to use his Android phone as the controller. The white circle is a software joystick that acts as throttle when your thumb moves along the Y axis, and steering when it moves along the X axis. But while he was at it he also included accelerometer input as an alternative control option.

The IOIO board has a Bluetooth dongle connected to its USB port as a means of wireless communication. The dongle was hacked to accept an external antenna, thereby increasing the truck’s range. There is also some on-board flair like LEDs for lights and even a laser diode for… well we’re not sure what that’s for. Get a better look at the hardware internals in the clip after the break.

Continue reading “IOIO Controller Replacement For An RC Truck”

Typewriter Is USB Keyboard, Also Awesome

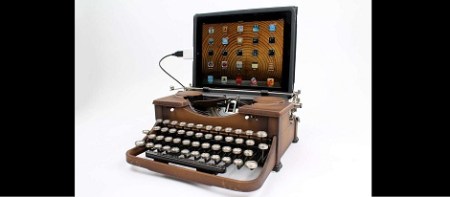
If you’re a brooding author putting the finishing touches on the next Great American Novel™ while sipping a latte in Starbucks, a MacBook is far too common to impress uncultured proles guzzling caramel macchiatos. No, to impress the next [Joyce] or [T. S. Eliot] sitting at the table next to you, you’ll need something much more hip, like a kit to turn a typewriter into a USB keyboard.

This kit to turn an old Underwood into a USB keyboard comes from the drawing board of [Jack Zylkin], member of Philly hackerspace Hive 76. [Jack] managed to make the process of turning an old typewriter into a keyboard a relatively painless process.

[Jack] created a sensor board loaded up with 74HC595 shift registers that easily mounts to the frame of just about any typewriter. When a key on the typewriter is struck, the mechanical levers strike metal strips soldered to the sensor board. An ATMega microcontroller records these keypresses and sends them over a USB port just like any other USB keyboard.

Modifying a typewriter into a USB keyboard is one of those projects we’d dread; you’d think there would be far too much futzing about with a lot of small electrical contacts and dirty mechanical devices. [Jack] actually managed to put together a very nice kit to turn a typewriter into a keyboard here.

You can pick up a kit over at [Jack]’s etsy store, but doing the same thing with a bit of perf board isn’t out of the question. Awesome video after the break.

Continue reading “Typewriter Is USB Keyboard, Also Awesome”

Giving The Nexus 7 HD Video Recording

As released, the Nexus 7 tablet includes a 1.2 Megapixel front-facing camera. Even though the camera supports taking pictures at a resolution of 1280 x 960, recording video is limited to a paltry 480p resolution. It turns out the inability to record HD 720p video isn’t a hardware limitation; engineers at either Google or Asus simply didn’t bother telling the Nexus 7 how to record in 720p.

[hillbeast] over on the XDA developers forum came up with a very easy fix for this problem that only involves a quick copy and paste job into the media_profiles.xml file.

After the break you can see two videos recorded with [thehillbeast]’s Nexus 7. The first is a 480p video of a bit of shrubbery and a fence, while the second video is the same scene recorded at 720p. A noticable difference in quality, and a neat hack to give the already awesome Nexus 7 some additional capabilities.

Continue reading “Giving The Nexus 7 HD Video Recording”

Disco Planet, A Massive RGBW LED Array In A 6′ Globe

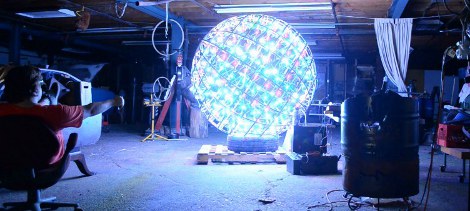
About half a year ago [John] over at Frank’s Kitchens came to me with an idea for a giant lighting project. He had this 6ft diameter aluminum frame globe rescued from the Philadelphia Theater Company and wanted it to be an interactive display of sorts. After a few discussions we got together and somehow managed to order 800 3 watt LEDs in red, green, blue, and white. We had a system that worked great on paper, and managed to get it built by Valentines day for a big show. It failed miserably and hardly even illuminated the LEDs. I, naturally, took this far too personally and set out for a complete redesign, looking in the direction of digitally addressable LED strips.

In addition to building a crazy turbo charged LED array I also spent a lot (a whole lot) of time coding a nice clean fully functioning RGB LED strip controller using an Arduino Pro Mini (5V 16 MHz), the MSGEQ7 audio frequency multiplexer (PDF) , and an IR remote. I plan on using this for other projects so the code can be easily reconfigured to use many different LED strips and a whole slew of IR remotes.

The schematic of the globe is here. The top half  of that schematic be catered to other projects using a variety of pre-built LED strips. The pastebin with code is here,  fastSPI_LED and IRRemote here and here. Some code jockeying was required to get IRRemote.h and FastSPI_LED to play nicely together, so check the code comments.

Continue reading “Disco Planet, A Massive RGBW LED Array In A 6′ Globe”

Bed Of Nails And Accuracy In PCB Manufacturing

A few days ago, we mentioned the new ARM-powered Teensy 3.0 project on Kickstarter. The creator, [Paul Stoffregen], decided to share the trials of building a test fixture along with a shocking comparison of the accuracy of different PCB manufacturers in an update to his Kickstarter.

Because [Paul]’s Teensy 3.0 has more IO pins than should be possible on such a small board, the test fixture to verify if a board is defective or not is fairly complex. To test each board, a Teensy is placed on dozens of spring-loaded contacts arranged like a bed of nails. From there, another Teensy (this time a Teensy 2.0) performs a few tests by cycling through all the pins with several patterns.

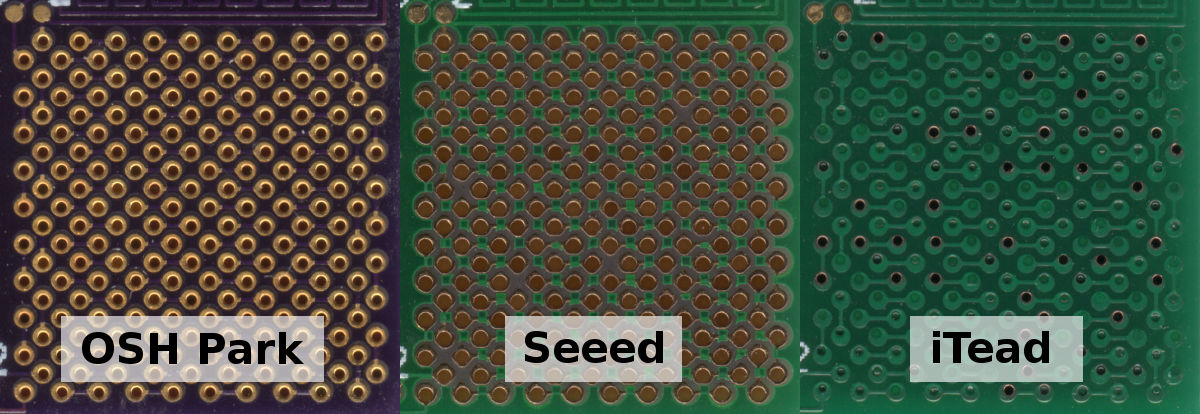
Because the spring-loaded contacts require rather precise drill holes in the PCB of his test fixture, [Paul] thought it would be neat to compare the accuracy of several board houses. In the title pic for this post (click to embiggen), [Paul] demonstrates the capabilities of OSH Park, Seeed Studio, and iTead Studio. The lesson here is probably going with a US company if quality drill work is a necessary requirement of your next project.