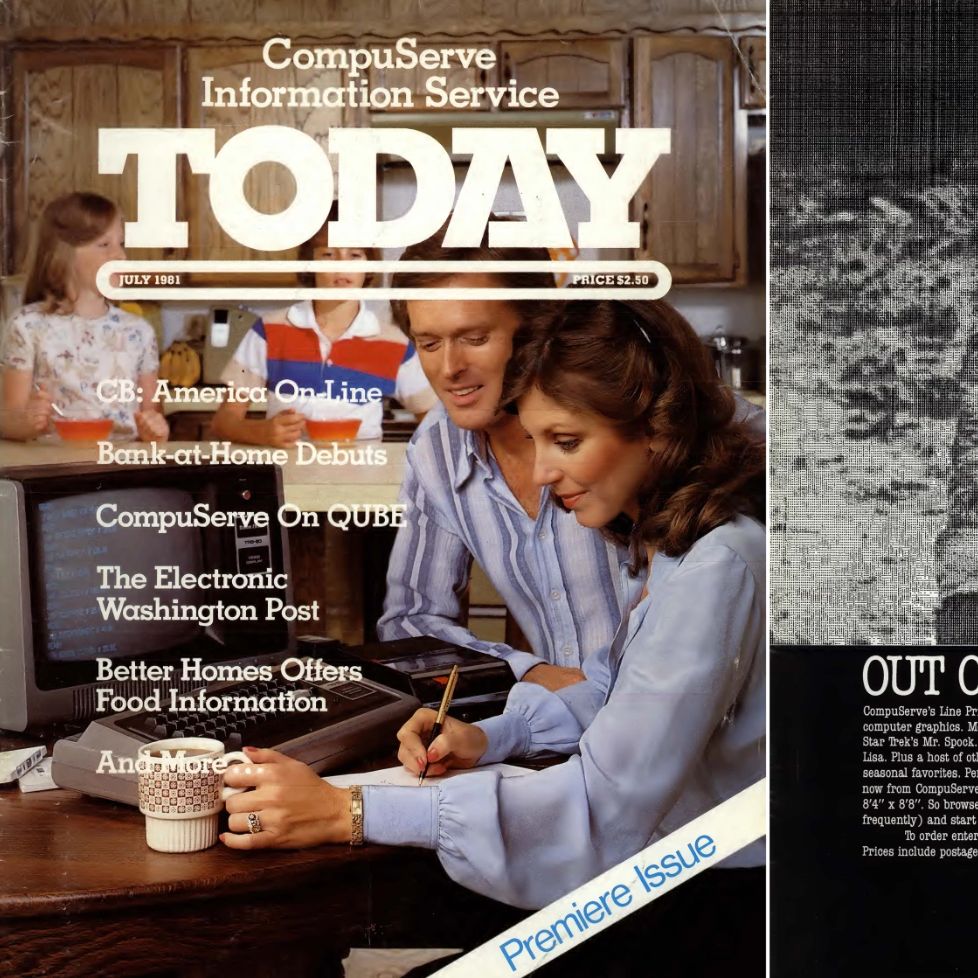
The Best Kind Of Handheld Gaming Is Homemade

[CNCDan] previously dabbled with Raspberry Pi CM4-powered gaming handhelds but was itching for something more powerful. Starting in May 2023, he embarked on building an Intel NUC7i5BNK-powered handheld dubbed NucDeck.

As he goes over the feature list, it sounds like a commercially available console. A 1024 x 600 screen provides a good balance of fidelity and performance. Stereo-chambered speakers provide good front-facing sound. Two thumbsticks with gyro aim assist, two hall effect triggers, and many buttons round out the input. Depending on the mode, the Raspberry Pi Pico provides input as it can emulate a mouse and keyboard or a more traditional gamepad. A small OLED screen shows battery status, input mode, and other options. This all fits on four custom PCBs, communicating over I2C. 6000 mAh of battery allows for a decent three hours of run time for simpler emulators and closer to an hour for more modern games.

The whole design is geared around easily obtainable parts, and the files are open-source and on GitHub with PDFs and detailed build instructions. We see plenty of gorgeous builds here on Hackaday, but everything from the gorgeous translucent case to the build instructions screams how much time and love has been put into this. Of course, we’ve seen some exciting hacks with the steam deck (such as this one emulating a printer), so we can only imagine what sort of things you can do once you add any new hardware features you’d like.

Continue reading “The Best Kind Of Handheld Gaming Is Homemade”

Tiny POV Turns Right Round For Volumetric Fun

Just when you think the POV thing has run out of gas, along comes [mitxela] to liven things up. In this, he’s taken the whole persistence of vision display concept and literally spun up something very cool: a tiny volumetric “electric candle” display.

As he relates the story, the idea came upon him on a night out at the pub, which somehow led to the idea of an electric candle. Something on the scale of a tea light would fit [mitxela]’s fascination with very small and very interesting circuits, so it was off to the races. Everything needed — motor, LIR2450 coin cell, RP2040, and the vertical matrix of LEDs — fits into the footprint of the motor, which was salvaged from a CD drive. To avoid the necessity of finding or building a tiny slip-ring, he instead fixed everything to the back of the motor and attached its shaft to a Delrin baseplate.

The 8×10 array of surface-mount LEDs stands atop the RP2040 with the help of some enameled magnet wire, itself a minor bit of circuit sculpture. There’s also a 3D-printed holder for a phototransistor and IR LED, which form a sensor to trigger the display; you can see [mitxela] using a finger to turn the display off and move it back and forth. It goes without saying that these things always look better in person than they do in stills or even on video, but we still think it looks fantastic. There’s also a deep dive into generating volumetric data in the write-up, as well as an unexpected foray into the fluid dynamics calculations needed to create a realistic flame effect for the candle.

All in all, this is a fantastic if somewhat fragile project. We love the idea of putting this in a glass enclosure to make it look a little like a Nixie tube, too.

Continue reading “Tiny POV Turns Right Round For Volumetric Fun”

Wolfenstein 3D Clone Makes Arduboy Debut

The 8-bit Arduboy isn’t exactly a powerhouse by modern gaming standards, or even really by old school standards for that matter. But for the talented developers that produce software for the system, that’s just part of the challenge. To date the monochromatic handheld has seen miniaturized takes on many well-known games, with several taxing the hardware beyond what most would have assumed possible.

But the latest entry into this catalog of improbable software, WolfenduinoFX, is easily the most technically impressive. As the name implies, this is a “demake” of 1992’s iconic Wolfenstein 3D. It features 10 levels based on the original game’s shareware release, with the enemies, weapons, and even secret rooms lovingly recreated for the Arduboy’s 128 x 64 OLED display.

Arduboy FX Mod-Chip

Now, those of you who have experience working with the ATMega32u4 microcontroller at the heart of the Arduboy might think this is impossible…and you’d be right. The only way developer [James Howard] was able to pull this feat off was by leveraging the extended flash memory offered by the Arduboy FX.

This upgrade, which was developed in conjunction with the community, allows the handheld to hold hundreds of games by loading them from an SPI flash chip. For WolfenduinoFX, that flash chip is used to hold graphical assets for the game that would otherwise be too large to fit on the MCU alone.

When we looked at the Arduboy FX back in 2021, it was clearly a must-have upgrade, so it’s no wonder that the newest version of the handheld has the capability built-in. Now that games are actually requiring the expanded flash to function, it seems we’ve officially entered into a new era for the quirky little handheld that [Kevin Bates] first sent our way nearly a decade ago. Long live the Arduboy!

Continue reading Wolfenstein 3D Clone Makes Arduboy Debut”

Build A Strandbeest Replica Of Your Very Own

[Theo Jansen] is famous for his giant walking Strandbeest creations. They’re elegant, impressive, and powered by nature, and their walking mechanism is a thing of beauty. If you’ve ever wanted to build your own, [Antonio Garcia] has just the guide to get you started on the smaller scale.

Unlike so many other builds today, this one features some good old fashioned craft techniques. The build uses popsicle sticks for the legs, what appear to be toothpicks for the joints, and a cardboard box for the main body. A small brushed DC motor is used for propulsion to keep things easy, which runs off a few AA batteries. It’s a gearmotor, which gives it plenty of torque to propel the walking mechanism without undue strain.

It may not be powered by nature, and it may not be taller than most humans, but it’s still got an appealing gait and it still inspires us with its design. If you want to learn more, go ahead and take a gander at [Theo Jansen’s] own designs and see what you can pick up. Video after the break.

Continue reading “Build A Strandbeest Replica Of Your Very Own”

Simple Chemistry To Metallize And Etch Silicon Chips

We’ve been eagerly following [ProjectsInFlight]’s stepwise journey toward DIY semiconductors, including all the ups and downs, false leads, and tedious optimizations needed to make it possible for the average hacker to make chips with readily available tools and materials.

Next up is metallization, and spoiler alert: it wasn’t easy. In a real fab, metal layers are added to chips using some form of deposition or sputtering method, each of which needs some expensive vacuum equipment. [ProjectsInFlight] wanted a more approachable way to lay down thin films of metal, so he turned to an old friend: the silver mirror reaction. You may have seen this demonstrated in high school chemistry; a preparation of Tollen’s reagent, a mix of sodium hydroxide, ammonia, and silver nitrate, is mixed with glucose in a glass vessel. The glucose reduces the reagent, leaving the metallic silver to precipitate on the inside of the glass, which creates a beautiful silvered effect.

Despite some issues, the silvering method worked well enough on chips to proceed on, albeit carefully, since the layer is easily scratched off. [ProjectsInFlight]’s next step was to find an etchant for silver, a tall order for a noble metal. He explored piranha solutions, which are acids spiked with peroxide, and eventually settled on plain old white vinegar with a dash of 12% peroxide. Despite that success, the silver layer was having trouble sticking to the chip, much preferring to stay with the photoresist when the protective film was removed.

The solution was to replace the photoresist’s protective film with Teflon thread-sealing tape. That allowed the whole process from plating to etching to work, resulting in conductive traces with pretty fine resolution. Sure they’re a bit delicate, but that’s something to address another day. He’s come a long way from his DIY tube furnace used to put down oxide layers, and suffering through the search for oxide etchants and exploring photolithography methods. It’s been a fun ride so far, and we’re eager to see what’s next.

Continue reading “Simple Chemistry To Metallize And Etch Silicon Chips”

Adding Cellular Connectivity To The Hackaday Supercon Badge

Did you manage to make it down to Hackaday Supercon 2023? Maybe you did, and maybe you had a great time hacking away on the badge. [Dan] and ex-Hackaday alumnus [Mike Szczys] certainly did, with the guys from Golioth adding cellular connectivity to the hardware and developing a community art project.

The badge was hooked up over I2C to a Golioth Aludel Mini, which is a prototyping platform featuring a Sparkfun nRF9160 cellular modem. A custom Micropython implementation was compiled for the badge so that the badge could act as an I2C peripheral to be queried by the Aludel Mini. The sketch app on the badge was tweaked to allow the small pictures it created to be be uploaded to a cloud site called Badgecase, programmed in Rust. Amusingly, it turns out the sketch app uses a rectangular workspace, though you only see a circular section of it on the Supercon badge’s awesomely round display.

Much of the hack is happening off-board from the badge itself, but it’s a neat piece of work that shows how easy cellular connectivity is to implement these days. We’ve seen some other great feats with the Vectorscope badge, and it looked great if you happened to 3D print a case for it, too. Video after the break.

Continue reading “Adding Cellular Connectivity To The Hackaday Supercon Badge”

Honey, I Ate The Camera

We like cameras here at Hackaday. We like them a lot. But until now that liking has never extended to liking their taste. A build from [Dmitri Tcherbadji] could change all that though, and he’s created a working Fuji Instax Square camera made from gingerbread.

To look at, it’s a straightforward box camera, albeit one made from sheets of gingerbread stuck together with what looks like icing. The film rests in an off-the-shelf development unit but the rest is edible, including unexpectedly the lens which is made of sugar glass. The photos it returns are definitely somewhat cloudy, but that it works at all is a significant feat.

While it’s an unconventional choice it’s clear that gingerbread, or at least a baked material similar to it, could become a useful tool in a maker’s arsenal. In this case it’s light-proof, but were instantly curious about how well a moulded piece of dough might hold its shape when baked. He reports the gingerbread expanding in the oven, however we’re guessing that tuning the quantity of raising agent could help.

Home-made cameras have featured here many times, but Instax seems to pop up most often as a hacked in replacement for obsolete Polaroid packs.