Making Old Organs More Portable With MIDI

In the 60s 70s and early 80s, roadies would lug hundreds of pounds of musical equipment around to gigs. Although the 8×10 Ampeg bass cabinet wasn’t fun in the least, the absolute worst was the Hammond organ. These behemoths of tonewheel organs sounded great, but moving them was a pain. For better or worse, portable MIDI keyboards caught up with the sound quality of these old electromechanical monsters. Everything is still not right with keyboard players; a good set of organ foot pedals is still hard to come by. To solve this problem, [Jeremy] converted his old Hammond A-100 organ pedals to MIDI giving him all the feel and aesthetics of an ancient instrument without all the heft.

To transform the ancient A-100 bass pedals into a keyboard, [Jeremy] turned to the HighlyLiquid MIDI CPU. This small board provides a few dozen pins to wire up to switches and potentiometers. A new switch assembly was built for the bass pedals using a momentary push button switch under each key. These buttons are wired up to the MIDI CPU, and everything worked out wonderfully.

Although there’s no video of the newly portable Hammond organ in action (something off Zeppelin I, [Jeremy]…) there is a great Flickr photoset of the entire build. Awesome work, [Jeremy]

Report From RoboGames 2012

Last week we reported on the upcoming 2012 Robogames competition would be held in San Mateo, California. Nobody from the Hackaday staff could make it this year, but luckily [Sabrina Merlo] from the Make: blog was able to provide a full report of the spectacle of fire, sparks and pierced metal this year.

For anyone who remembers the wonderful Battlebots TV show from 10 years ago, the main event is very familiar: two competitors face off with the remote-controlled extensions of themselves in a Lexan enclosed arena. The resulting battle is an orgy of flames sparks and mortally wounded robots. Yes, there are a ton of wedge robots, but most of them had very interesting weapon designs.

Off the main stage, there are also more traditional robotics competitions. Sumo robots try to push each other out of a ring, robot soccer tries to demonstrate a mechanistic Pelé, and foot-tall MechWarriors battle in the streets of a miniaturized city.

There were also a lot of not-really-battling robots like a robotic foosball table. It sounds like everyone had a blast, so we might be hitting up the bay area this time next year.

Printing PCBs On A Junked Epson Printer

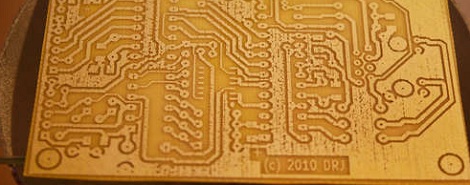
When it comes to making PCBs at home really quickly, there’s not much to improve upon with [Ryan]’s bodged up Epson printer that prints an etch mask directly on a piece of copper clad board.

Like most of the direct to copper PCB printer conversions we’ve covered ( 1, 2, 3 ), [Ryan]’s build relied on an Epson printer and Mis Pro yellow ink. The Mis Pro ink is one of the most etch-resistive substances that can be shot out of an inkjet printer, and Epson printer cartridges use a piezo pump that is perfect for squirting ink out on command.

After tearing the printer apart and lifting the print head a bit, [Ryan] needed a proper feed system to control where on the copper he was printing. He managed to make a board carrier out of a sheet of aluminum. By taping down the copper clad board, everything seems to work phenomenally.

After the break you can check out how fast [Ryan] can print out a fully etch-resisted PCB. It’s not improbable that he could produce a few dozen boards an hour; something our toner transfer PCB production method would kill for.

via makezine

Continue reading “Printing PCBs On A Junked Epson Printer”

Finding The Average Of Every Font

An old book – the smell, the texture of the slowly rotting paper, and the smudges and margin notes accrued over decades – is one of the finer points in life taken for granted much too often. We’re bombarded with high precision vector typefaces all day, but [Dan]’s Avería font is beautiful in its irregularity. [Dan] made a font that is the average of all the fonts installed on his computer, and the result looks surprisingly great.

[Dan] started his journey down the generative font path by making images of every letter of all his fonts and mashing them together with a PHP script. The result was a terribly blurry font, and unfortunately this had been done before. [Dan] wanted a font with clearly defined edges, though, so the obvious solution would be to take the grayscale result of his first experiment, set a threshold, and make a monochromatic image. This plan didn’t pan out, and [Dan] needed a cleverer way to go about things.

The solution to the problem is astonishingly simple; [Dan] took the perimeter of each font glyph and divided it into hundreds of points. These points could then be averaged in 2D space making a real ‘average’ font.

Even though this project isn’t the usual ‘Arduino doing something’ fare, [Dan] came up with a really clever way of doing something that produced something really cool. It’s enough of a hack in our books. Tip ‘o the hat to [Aleks Clark] for sending this one in.

Build Your Next Robot With Amazon Supply

If you’re a home hardware hacker in the United States, chances are most of your electrical components come from Mouser or Digikey, your hardware and tools from Grainger, and your raw materials from McMaster-Carr. This setup is great – we’d hate to locally source parts for a robot – but organizing larger orders can be a bit of a pain. Enter Amazon Supply, the new place to buy business and industrial equipment.

Right now the selection is a little thin, but if you’re looking for a single place to buy a quality soldering iron, a 0.005″ endmill or a set of brass balls, now you’ve got a one stop shop with the insanely fast shipping Amazon has won our hearts with.

While Amazon Supply isn’t selling even the most basic electrical component, the service was just launched, and if there’s a market, [Bezos] will go after it. Time will tell if our beloved vendors have a serious competitor on their hands.

Thanks [Vasili] for sending this in.

Monitoring A Solar Array Output

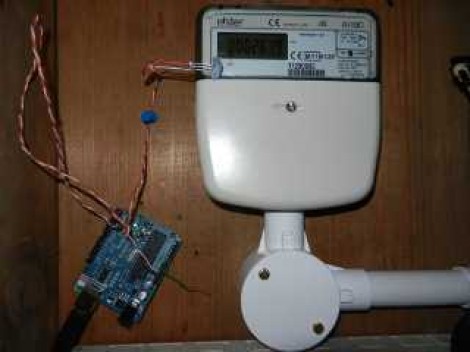
After years of hoping and wishing [Dave] finally took the plunge and installed solar panels on the roof of his house. He’s got twelve panels that are each rated at 240 Watts! But just having them sitting there and pumping power back to the grid isn’t enough. Understandably, he decided to add his own solar array monitor so that he could see just what those babies are bringing to the party.

The solar array has an inverter which takes the DC from the cells and converts it to mains voltage AC for use on the grid. The system includes a panel meter which you’d normally find on the supply to the house. All he needed to do is find a way to grab the data from that device. It’s an Elster meter, and offers two types of feedback: a blinking LED that corresponds to each Watt-hour passing through the meter, and an IrDA port which provides a more error-proof method of reading data. Monitoring the 1 Wh pulse is quite a popular method for keeping track of your electric meter, but if your hardware misses a pulse the data will be off. [Dave] chose to use a light sensor to monitor the IrDA output, which is encoded data. As long as you can read the protocol, which has been published by Elster, a transmission can be missed now and again without disturbing the overall power consumption data.

8-bit Logic Chip Computer Build

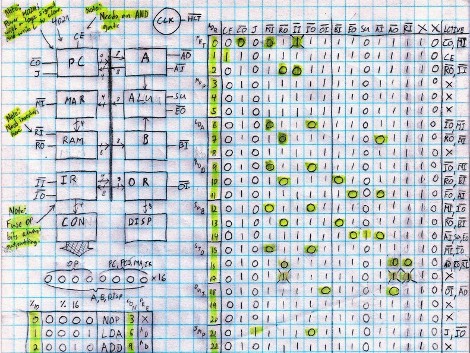
[Kyle] has been hard at working building an 8-bit computer from the ground up. He’s using a set of logic IC’s for the various components, and some NVRAM chips to store the control words. What you see above is the roadmap for his instruction set. He’s just started writing them to the chips, making the job easier by building an Arduino-based programmer.

We’ve enjoyed watching [Quinn Dunki’s] progress with her Z80  6502-based PC build which started on a breadboard in much the same way but has come a long way since those humble beginnings. Recently we also looked in on a 4-bit computer that is using discrete components. But [Kyle’s] take on the challenge falls somewhere in between the two.

The gist of his design can be found in one of his earlier post. He’s got a ring counter which starts by clearing the address register. It then loads the NVRAM address of the next instruction which is then executed on the subsequent count. It seems the build still has some way to go so make sure to keep your eye out for updates.

[via Reddit]