A Better Dust Skirt For Your CNC Mill

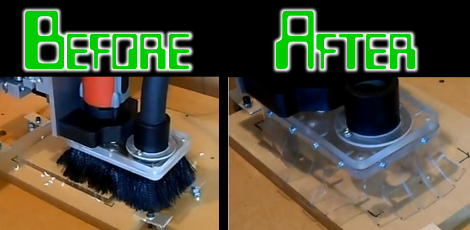
[Joshendy] wanted to get a better look at the cutting head on his CNC mill when it was running. The problem is that the rotating blades throw up a lot of junk which you don’t want flying around the shop so they’re usually surrounded with a shroud connected to a shopvac. He just milled is own transparent dust skirt to solve the problem.

The original dust skirt uses black bristle brushes to contain the waste from the cut. In addition to obscuring your view of the cutter this didn’t do a very good job of containing bits and pieces. The solution seen on the right uses clear, flexible PVC as the skirt. The video after the break details the build process. [Joshendy] cut out a replacement plate which is then fitted with magnets to connect to the cutter. The skirt is affixed to that plate with a series of screws, making it easy to replace if it ever wears out.

Continue reading “A Better Dust Skirt For Your CNC Mill”

An Inside Look On How Reed Switches Are Manufactured

reed-switch

[York] wrote in to share a video he stumbled across while researching reed switches and relays, which documents the tightly controlled process through which they are produced. Like many other electronic components out there, we usually don’t give a lot of thought to how they are made, especially when the final cost is relatively small.

For something often taken for granted, the process is an incredibly precise one, requiring a clean room environment the entire way through. The video follows the production line from beginning to end, including the soft annealing of the contacts to remove magnetic remanence, the sputtering process that applies sub-micron thick conductive coatings to the contacts, through the laser cutting and sealing of the glass tubes that make up the body of the switch.

At the end of the day, the video is little more than a manufacturer’s promotional video, but it’s worth the 8 minutes it takes to watch it, if only to satisfy your curiosity as to how they are made.

Continue reading “An Inside Look On How Reed Switches Are Manufactured”

“Machining” Copper Parts Using Cupric Chloride

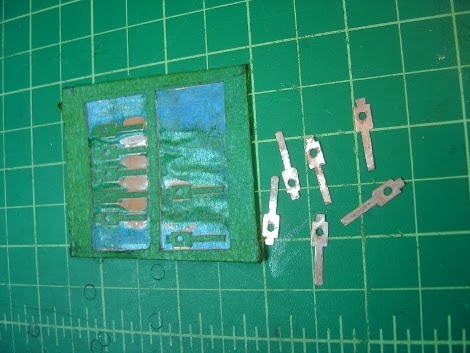
[Ben Ardwin] was asked by a friend to help fix an old motor. It needed a new set of brushes. They’re just thin pieces of copper that mount on the motor housing and contact the commutator. The metal is so thin he thought he’d try fabricating replacements by dissolving copper stock.

This is not copper clad board; the raw material used in PCBs that has a copper-covered fiberglass substrate. It’s just thin sheets of copper stock. [Ben] started by covering top and bottom with painter’s tape. This will act as a resist for the chemical etchant. He headed over to the laser cutter to remove the tape mask around the outline of the parts. From there it’s into the Cupric Chloride for about two hours.

The etched parts are a bit rough around the edges so he cleaned them up by hand using a file. When writing to us about the process he suggests a few improvements. The tape used for masking wasn’t ideal and he would try a different method. He would also remove less area around the parts to help speed up the process.

This technique is a really becoming popular as a home-fabrication tool. Recently we’ve seen etched copper used to make a faceplate for an enclosure, and a translucent template for a clock.

Robotic Doodle Clock

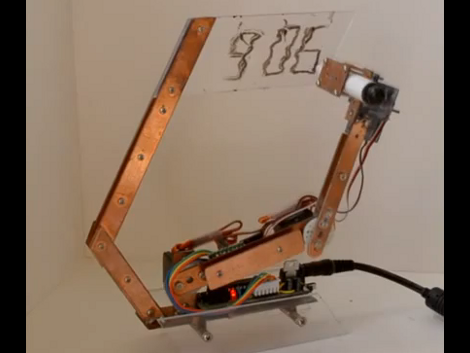
This clock has a robotic twist to it. It will show you the time by drawing it in dry-erase marker. There’s a bit of play in the arm joints and some loose motor precision which results in a wavy font that prompted [Ekaggrat] to name his project the Doodle Clock.

The shape and building material used here really make the timepiece look great. We think if the arm holding the acrylic writing surface had been at right angles this would not look nearly as pleasing. The video after the break shows the bot in action, at first flexing its wrist to switch back and forth between marker and eraser. From there it starts to draw the time, tracing the segments of each digit multiple times to achieve a readable number. The entire thing is driven by an Arduino compatible board mounted on the base of the clock.

This reminds us of that felt-tipped Turing Machine. A variation on that would also make a really nice clock display.

Continue reading “Robotic Doodle Clock”

Poking Machine

We may be showing our age here, but we have no idea what a ‘poke’ on Facebook actually means. Whether it’s the passive-aggressive manifestations of online stalkers or an extension of  the ‘like’ button, all we know is [Jasper] and [Bartholomäus] built a machine that translates virtual pokes into our analog world.

The “Poking Machine” as [Jasper] and [Bart] call it, syncs to your phone over a Bluetooth connection. The build is incredibly simple: just an ATtiny running Arduino for ATtiny, a Bluetooth controller (possibly this one from Sparkfun), and a servo. When the Facebook app on [Jasper] and [Bart]’s phone receives notification of a ‘poke’, the servo is powered and gently taps the wearer on the arm.

One thing we really like about this project is the case made of several layers of laser-cut acrylic bolted together. This case offers a very clean look even if it is a bit ungainly. We suppose the guys could have used a simple vibration/pager motor for this build, but it wouldn’t exactly be a poking machine at that point. Check out the build video after the break.

Continue reading “Poking Machine”

Nanoscale 3D Printing

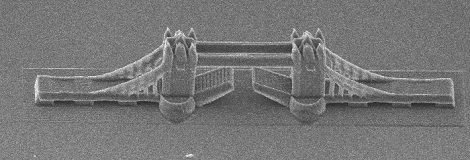
This 3D-printed model of the Tower Bridge is only 200 micrometers long. To put that into perspective, the distance between the towers is the width of a human hair. This model is the product of research at the additive manufacturing department of the Vienna University of Technology

The models were fabricated much like normal stereolithography – a laser shines onto a vat of light-sensitive resin. The resin hardens when exposed to light, and the model is built up layer by layer. These nanoscale models were made using a process called “two-photon lithography,” something we’re not going to pretend we understand completely but here’s a nice paper that provides a good overview. Needless to say, the precision these prints exhibit are nearly ludicrous. The researchers claim a precision of ±1µm, a respectable amount of precision for very high-tech machining applications.

The researches posted a video of the fabrication of a nanoscale F1 race car filmed in real-time. Check that out after the break.

Continue reading “Nanoscale 3D Printing”

A Mannequin Head + Arduino + Webcam = Lots Of Creepy Fun!

styrofoam head robot

This mannequin head was purchased years ago on sale for less than $3. As with many things one sees while shopping, it didn’t have a purpose at the time, but seemed like it would be useful later. Add in an Arduino, some servos, and electronics parts that were acquire in a similar manner, and you have all the ingredients needed for a cool hack.

The build is well documented in the video after the break, and we especially like at 2:24 when who we suppose is the mom says “Look at this mess!” Apparently the next iteration will be a robot to clean everything up!

This iteration is quite impressive though, as it uses a webcam to track objects using a servomotor and lists the code used. For a view of it tracking stuff along with a view of the PC, fast forward to around 8:45. In addition to tracking the parts using the servo, the non-webcam eye changes color from green to yellow depending on if it’s tracking or not. It also featured a blinking necklace, which is also a plus in our eyes.

[youtube http://www.youtube.com/watch?v=TithLO3KzzU&w=470&h=315%5D

For more random head-like creepiness, be sure to check out [Boxie the Creepster]!