Using Mains Wiring As An Antenna

Make sure to brush up on your safety protocol if you undertake this project. The penalty for messing up when using live wiring as a radio receiver antenna is rather severe. But after reading about it in some old books [Miroslav] decided to give this technique a try.

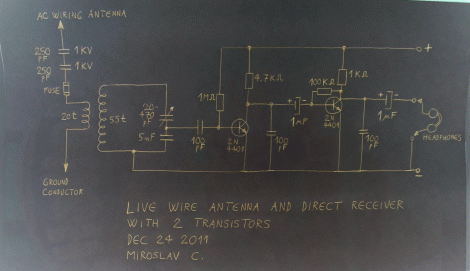
We love the old-school chalk board he used to map out his test circuit. With safety in mind, he uses two high voltage capacitors in series. If these should somehow fail, there is also a fuse which would blow, disconnecting the apparatus from mains. But just to be sure, he isolated the circuit using a two coils. These step down the voltage, but would also burn out if hit with a voltage spike.

You can see the results he gets using the setup as an AM radio receiver in the video after the break. He tested against a meter long antenna and found that his setup far outperforms it. Actually, he found that a six foot extension cord which is not plugged into the wall will also outperform the 1m antenna. Something to keep in mind the next time the ball game isn’t coming in as clear as you would like.
Continue reading “Using Mains Wiring As An Antenna”

Zombie [Jackson] Bot Dances To Thriller

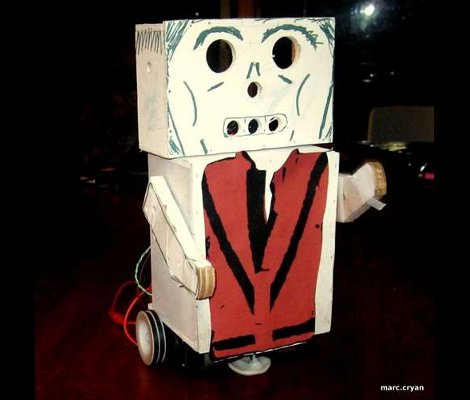
[Marc Cryan] built this little bugger which he calls Wendell the Robot. But what good is an animatronic piece like this unless you do something fun with it? That’s why you can catch the movements matching [Michael Jackson’s] choreography from the music video Thriller in the clip after the break.

This is a ground-up build for [Marc]. He started by designing templates for each of the wood parts using Inkscape. After printing them out, he glued each to a piece of 1/4″ plywood and cut along the lines using a band saw. We don’t have a lot of adhesive spray experience, but he mentions that the can should have directions for temporary adhesion so that the template can be removed after cutting.

During assembly he makes sure to add servo horns for easy connection when adding the motors. All together he’s using five; two for the wheels, two for the arms, and one for the neck. A protoboard shield makes it easy to connect them to the Arduino which is used as a controller.

Continue reading “Zombie [Jackson] Bot Dances To Thriller”

Full Color Laser TV

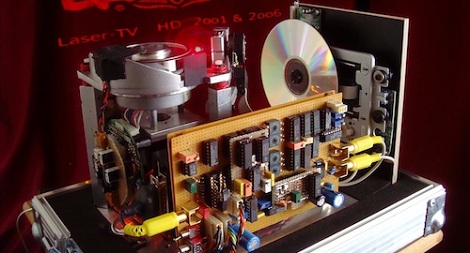
Back in 2001, [Helmar] made an awesome monochrome video display out of a red laser pointer and a spinning 18-sided mirror. Blue and green lasers are much less expensive than they were a decade ago, so [Helmar] decided to go full color with his laser projector. (In German, so fire up Chrome or get the Google translation)

The ancient website for [Helmar]’s green-only projector goes over the principles of operation. A single laser shines onto a multi-faceted polygonal mirror. This is reflected onto another mirror that provides the reflection for each line in a frame of video. Earlier this year, [Helmar] hacked up a red and blue laser to complement the preexisting green laser. The end result is an RGB projector powered by friggin’ lasers.

As far as we can tell, the projector only has composite input; the attached DVD player provides all the signaling for that. Amazingly, [Helmar] didn’t use a microcontroller for the circuitry. All the electronics are simple logic gates. Really amazing if you ask us.

Continue reading “Full Color Laser TV”

Homebrew On The Rigol DS1052E ‘scope

We love our little Rigol 1052E oscilloscope. It’s seen us through some perplexing problems and loved being upgraded from 50 MHz to 100 MHz. We’ve always been pleased with its role dictating waveforms for us, but we never thought we’d see homebrew apps for our little ‘scope.

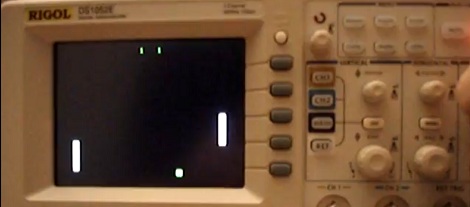
We’re not exactly sure who [Krater] is, but he’s been working on some homebrew development for the Rigol DS1052E oscilloscope. Right now the capabilities are somewhat limited; all programming is via PEEKs and POKEs. Still, this is a fairly impressive development.

This wonderful little ‘scope has already had some time in the limelight by being easy to upgrade to 100 MHz. Hopefully with the new capabilities (Tetris, somebody make Tetris), this scope will become a staple in workshops around the world.

A tip ‘o the hat goes to [Rainer Wetzel] for sending this one in. Check out the video after the break to see an almost-working game of Pong playing on the 1052E

EDIT: [krater] dropped into the comments to tell us about his blog entry. Keep up the good work.

Continue reading “Homebrew On The Rigol DS1052E ‘scope”

Printing With Clear Polycarbonate

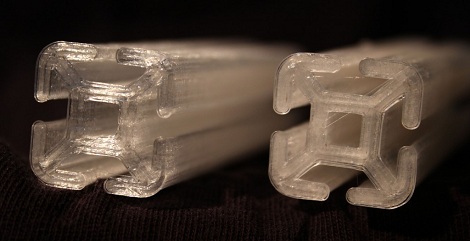
Those of us with 3D printers have had two major choices when selecting a material to print with – ABS, a very hard plastic, and PLA, a more brittle plastic with a lower melting point. [Alex] and [Luke] have been experimenting with printing polycarbonate and creating clear crystalline objects on a standard 3D printer.

The first foray into printing polycarbonate didn’t go so well for [Luke]. Objects came out looking very milky and there was a bit of popping during filament extrusion. The guys solved this problem by putting the polycarbonate filament in a food dehydrator overnight to get rid of the moisture. Polycarbonate has a higher melting temperature than other plastics – around 260 degrees Celsius – which can cause some problems with Teflon insulators in the hot ends of extruders. The guys didn’t have any problems with fumes, though.

If you’ve ever wanted to print something clear, it looks like it’s now possible. Check out the video after the break to see a Makerbot Thing-O-Matic printing with clear polycarbonate.

Continue reading “Printing With Clear Polycarbonate”

Doomsday Keg Of Radness Helps Ring In The New Year

doomsday-keg

Lots of people buy noise makers for New Year’s eve, others opt to sing Auld Lang Syne – then there’s these guys.

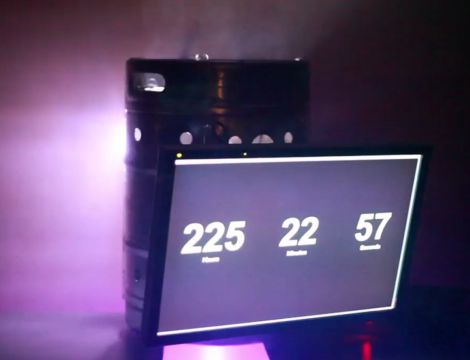
The crew at Stone Brewing Company throw an annual bash at their brewery in celebration of New Years, and while [Dino’s] countdown timer is great for intimate settings, they needed something bigger to wow the crowd. A busted half barrel was all the inspiration they needed to build the “Doomsday Keg of Radness”.

[Mike Palmer], the Creative Director at Stone handed the keg off to the maintenance crew for some remodeling, and got ready to fit it with all sorts of lights and other goodies. Holes drilled in the keg were fitted with bright pulsing LEDs, while additional LED light strips were laid out around the perimeter. The bottom was cut out to accommodate a Moonflower LED module, and a 24” monitor was strapped to the side in order to display a countdown timer. An old Macbook jammed inside the keg runs the video display, while the rest of the lighting is remotely controlled with an RF transmitter.

Now mind you this all went down last year, but since the display was such a hit, they will be busting it out again for the 2011 celebration.

Check out the short demo video below to get a look at the Doomsday Keg in action.

Continue reading “Doomsday Keg Of Radness Helps Ring In The New Year”

So You Wanna Learn FPGAs…

FPGAs are the bee’s knees. Instead of programming a chip by telling it what to do, FPGAs allow you to tell a chip what to be. Like everything though, a new skill set is needed to fully exploit the power of FPGAs. [Mike Field] decided to give back to the internet community at large and put up a crash course in FPGA design.

Right now, [Mike] has a couple of modules up that include subjects like binary math, busses, counting, and of course setting up the FPGA hardware. The recommended hardware is the Papilio One, although the Digilent Nexys2 is what [Mike] has been using so far.

We’ve seen a ton of awesome stuff that uses FPGAs, like the emulated Mac Plus, breaking HDCP, and an Ocarina of Time. [Mike]’s tutorials look like a great starting point for some FPGA work. [Mike] is also looking for some feedback on his tutorials, so if you’ve got an idea of what he should cover be sure to drop him a line.

EDIT: The server was running on an FPGA and we can’t find a cache anywhere. If you’ve found a mirror, send a message. Apparently Amazon’s EC2 runs on an FPGA.