diy_table_saw

DIY Table Saw Cuts Through Anything, Leaves No Room For Mistakes

Students in the BASTLI lab at the Swiss Federal Institute of Technology Zurich had been stuck using underpowered and unreliable saws for quite some time. The saws often got stuck while cutting through PCBs and were generally a drag to use. When group member [Mario Mauerer] came across a big and powerful brushless motor in his basement, he decided it was time to upgrade the lab’s cutting tools.

Along with fellow student [Lukas Schrittwieser] he built a test rig to see how powerful the motor really was, and satisfied with the results, the pair set off to build their own table saw. The enclosure was wrapped up pretty quickly, leaving the pair to source a power supply. Rather than purchase one, they built a 700w monster switching PSU to power their saw.

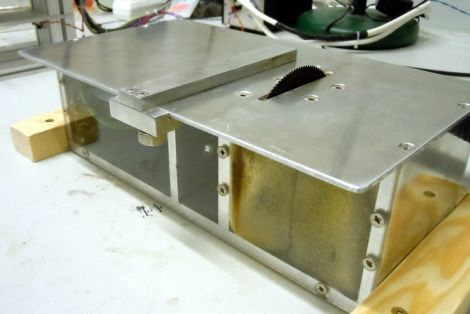
As you can see in the video below the saw chews through most things with the greatest of ease, but the students added a “boost button” to the saw just in case they need to run it at full tilt.

While we can’t exactly overlook the lack of finger and eye protection in their demonstration, it does look like a great little tool to have around.

Continue reading “DIY Table Saw Cuts Through Anything, Leaves No Room For Mistakes”

Maker Faire KC 2011: In Photos (Part 1)

As a writer for Hackaday, I get to see CNC machines, Prototypers, Tesla coils, and much more on a nearly daily basis. However, there are an uncountable number of people that don’t usually get to share in these technical wonders. Maker Faires provide the chance for the public to see and interact with the inventions, kludges, and geniuses that put together the things we write about on Hackaday.

Follow along after the break for some photos of the interesting things I got to see and enjoy.

Continue reading “Maker Faire KC 2011: In Photos (Part 1)”

Repaired Microwave Keypad Looks As Good As New

microwave_keypad_repair

Instructables user [Rohit] had an out-of-warranty microwave with a broken membrane keypad. Much like our friend [Alexandre] from Brazil, he found the cost of replacement parts beyond reasonable, so he had to find a way to repair it instead.

He disassembled the front cover of his microwave to get at the main controller board. Once it was detached, he removed the keypad’s cover to get a closer look at the matrix underneath. While taking notes on how the matrix was wired, he found that some keypad traces connected to other traces rather than buttons. He says that they are likely used by the microwave to detect that the keypad is present, so he made sure to short those traces out on the controller board when he wired everything back together.

He replaced the aging keypad with microswitches, but rather than mount them on the front panel of the microwave, he drilled holes for each switch so that he could mount them inside the face plate. Once everything was wired and glued in place, he re-mounted the keypad’s cover. Now the microwave looks stock but has firm, reliable, user-serviceable buttons that are sure to last quite a while.

Adjustable Voltage And Polarity Tester

polarity_tester

Instructables user [Rudolf] wrote in to share a handy little tool he created with ham radio operators in mind. Now and again, he found himself connecting to an unknown power supply, and rather than blow out all his expensive radio gear, he decided to put together a simple polarity and voltage tester that can be easily carried out in the field.

The tester features a pair of powerpole connectors, which are used quite often for connecting HAM gear. A PIC12F675 runs the show, acting as an adjustable comparator for detecting voltage levels. By default, his probe glows amber when the supply voltage is below 11.5V, turning green when the supply is between 11.5V and 15V. When the detected voltage is too high, the built-in LED glows a bright red. When the polarity is reversed, the LED flashes red regardless of the supply voltage.

All of these trigger levels can be set in the PIC’s code, which [Rudolf] is kind enough to include on his page, along with schematics for making your own.

Cheap And Reliable Portable Face Recognition System

faceaccess_portable_facial_recognition

For their senior ECE 4760 project, engineering students [Brian Harding and Cat Jubinski] put together a pretty impressive portable face recognition system called FaceAccess. The system relies on the eigenface method to help distinguish one user from another, a process that the pair carried out using MatLab.

They say that the system only needs to be hooked up to a computer once, during the training period. It is during this period that faces are scanned and processed in MatLab to create the eigenface set, which is then uploaded to the scanner.

Once programmed, the scanner operates independently of the computer, powered by its own ATmega644 micro controller. Users enroll their face by pressing one button on the system, storing their identity as a combination of eigenfaces in the onboard flash chip. Once an individual has been enrolled, a second button can be pressed to gain access to whatever resources the face recognition system is protecting.

The students say that their system is accurate 88% of the time, with zero false positives – that’s pretty impressive considering the system’s portability and cost.

Stick around to see a quick demo video of their FaceAccess system in action.

Continue reading “Cheap And Reliable Portable Face Recognition System”

Mini Light Table Fits Inside A Briefcase

portable_light_box

Hackaday forum member [Mike] was looking for project ideas when his girlfriend, an art major, suggested that he build her a light table to help with her various assignments. Having seen a few of these projects pop up from time to time, he figured he was up to the task. He started hunting around at his local thrift stores and finally came across what he was looking for – a hard-sided Samsonite briefcase.

He ripped out the bottom lining of the briefcase and proceeded to paint the inside white in order to properly reflect the lighting he would be adding shortly. A pair of under-cabinet lights were installed, and wired to be easily toggled on the outside of the case. He located some white acrylic to serve as the top of the table, trimming it to fit snugly in the case without any need for fasteners.

His girlfriend loved the table, though we would be interested in seeing a more portable version – it is built into a briefcase after all. We would love to hear your suggestions on how he might make this more portable, so let us know in the comments.

The Basics Of Building A Multitouch Table

Here is a bare-bones multitouch table setup. We looked in on [Seth Sandler’s] multitouch work a few years ago when he completed the MTmini build. He’s scaling up the size a bit with the MTbiggie, and showing you how easy it is to put together. The demo rig seen above is just a couple of chairs, a sheet of acrylic, a mirror, a projector, a computer, and a diy infrared webcam.

The rig uses ambient infrared light to detect the outlines of your fingers when they touch the acrylic surface. A webcam with an exposed camera film filter feeds an image of the infrared light received below the surface to the computer. The incoming video is processed using Community Core Vision, where each individual point is isolated and mapped. Once the data is available the sky’s the limit on what you can develop. [Seth’s] demo packages include a mouse driver, some physics applications, an Angry Birds implementation, and a few others. See for yourself in the video after the break.

Continue reading “The Basics Of Building A Multitouch Table”