This week Jonathan Bennett and Jeff Massie chat with Sylvestre Ledru about the Rust Coreutils! Why would we want to re-implement 50 year old utilities, what’s the benefit of doing them in Rust, and what do the maintainers of the regular coreutils project think about it?
Hacker Tactic: Single-PCB Panels
Ordering a PCB? Two of them? Three? Five? For about eight years now, I’ve been regularly ordering large numbers of different PCBs, and, naturally, have developed a toolkit to make things smoother. One trick is PCB panelization, and you should really know about it.
You might’ve encountered PCB panels already. Perhaps, if you order PCBA at a fab, you will get your board returned in a whole new form-factor, with rails on the sides that you have to snap off before your PCB is usable. Those rails are used so that your PCBs are easier to handle during assembly, but that’s far from the only reason why you would make a panel.
If you need multiple pieces of a PCB, your fab may say that building 50 pcs is classified as “large batch” and that takes longer than 30 days, which delays your entire PCB order. I’ve been there, five years ago, running out of time right before Chinese New Year. The fix was simple – I made a 2×2 panel and ordered that in quantity of 10-15. Panelization might be a little more expensive, or maybe even cheaper, but, most importantly, it will be faster.
In a few hours’ time, I sat down, figured out that KiCad has built-in features for panelization, and ordered panels instead of separate PCBs. Thanks to that, I made the Chinese New Year deadline that year and could successfully restock my store, letting me earn a fair bit of money instead of keeping a popular product out-of-stock – ultimately, helping my family stay up on rent that month.
Panelization lets you hack around many PCB ordering and assembly limitations, and I’ve only gotten started – there’s way way more! For now, let’s sort out panelizing multiples of the same PCB. As long as your boards are using KiCad (or KiCad-converted from Eagle/EasyEDA/Altium/gerbers), there’s no better software than KiKit.
Making Art With Maxwell’s Equations
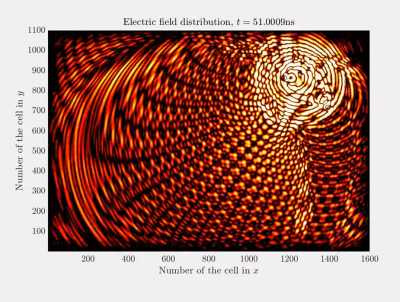
When you think of art, you might think of portraiture, landscapes, or other kinds of paintings. But mathematics can feel artistic at times, too. We’ve all seen gorgeous Mandelbrot fractals, and less gorgeous Julia fractals, but that’s not all that’s out there. As [Prof. Halim Boutayeb] demonstrates, Maxwell’s equations can show us some real beauty, too.

The work involves running simulations of multiple electromagnetic sources moving, bouncing around, interacting, and so on. The art comes in the plotting of the fields, in warm colors or just outright rainbows. The professor does a great job of pairing some of these videos with pumping electronic music, which only adds to the fun.
Of course, the colors are pretty, but there’s a lot of valuable physics going on behind all this. Thankfully, there are all kinds of additional resources linked for those eager to learn about the Finite Difference Time Domain method and how it can be used for valid simulation tasks.
Throw this kind of stuff on a projector at your next rave and you will not be disappointed. Video after the break.
FDM Filament Troubles: Keeping Hygroscopic Materials From Degrading
Despite the reputation of polymers used with FDM 3D printing like nylon, ABS, and PLA as being generally indestructible, they do come with a whole range of moisture-related issues that can affect both the printing process as well as the final result. While the concept of ‘baking’ such 3D printing filaments prior to printing to remove absorbed moisture is well-established and with many commercial solutions available, the exact extent to which these different polymers are affected, and what these changes look like on a molecular level are generally less well-known.
Another question with such hygroscopic materials is whether the same issues of embrittlement, swelling, and long-term damage inflicted by moisture exposure that affects filaments prior to printing affects these materials post-printing, and how this affects the lifespan of FDM-printed items. In a 2022 paper by Adedotun D. Banjo and colleagues much of what we know today is summarized in addition to an examination of the molecular effects of moisture exposure on polylactic acid (PLA) and nylon 6.
The scientific literature on FDM filaments makes clear that beyond the glossy marketing there is a wonderful world of materials science to explore, one which can teach us a lot about how to get good FDM prints and how durable they will be long-term.
Continue reading “FDM Filament Troubles: Keeping Hygroscopic Materials From Degrading”
Hacking An IP Camera To Run Your Own Software
Ah, generic unbranded IP cameras. Safe, secure? Probably not. [Alex] has been hacking around with one of his very own, and he’s recently busted the thing wide open.
Determining that the camera had a software update function built in, [Alex] saw an opening for hijinks. The first issue was that the camera only accepts encrypted update packages, which complicates things somewhat. However, through some smart reverse engineering, the format of the updates and their encryption method became obvious to [Alex]. Oh, and partly because there was a GitHub repository online featuring the source code used by the manufacturer to encrypt their updates. That definitely helped. It also led [Alex] to suspect the manufacturer may not have properly respected the open source license of some of the routines involved.
In the demo of the exploit, [Alex] has the camera reach out to www.pudim.com.br instead of the servers of the original manufacturer. That’s a pretty clear way to show that the camera has been owned.
We first featured [Alex]’s work in this space all the way back in 2019. It’s come a long way since then!
Continue reading “Hacking An IP Camera To Run Your Own Software”
A Look At The DEC VT220, A Proper Serial Terminal
If you’re reading Hackaday, we’re willing to bet that if somebody asked you about a serial terminal, you’d immediately think about a piece of software — a tool you run on the computer to communicate with some hardware gadget over UART. You might even have a favorite one, perhaps minicom or tio. You’d be technically correct (which we all know is the best kind of correct), but if you wind back the clock a bit, there’s a little more to the story.
You see, the programs we use these days to talk to microcontrollers and routers are more accurately referred to as serial terminal emulators, because they are doing in software what used to be the job of hardware. What kind of hardware? Why beauties like this DEC VT220 for example.
Continue reading “A Look At The DEC VT220, A Proper Serial Terminal”
Seiko Had A Smartwatch In 1984
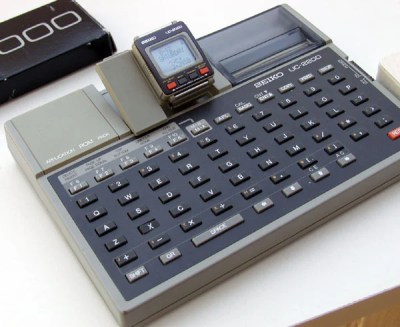
You might think of the smartwatch era as beginning with Apple, relatively recently. Or, you might think back to those fancy Timex models with the datalink thing going on in the 1990s. Seiko can beat them all, though, with its UC-2000 smartwatch that debuted all the way back in 1984.

The UC-2000 very much looks cutting edge for its era, and absolutely ancient today. It featured a 4-bit CPU, 2 kilobytes of RAM, and 6 kilobytes of ROM. Display was via a simple 10×4 character LCD in a rectangular form factor, with four buttons along the bottom. Branded as a “personal information processor,” it was intended for use with the UC-2100 dock. This added a full physical QWERTY keyboard that interacted with the UC-2000 when the two were combined together. Alternatively, you could go for the UC-2200, which not only had a keyboard but also a thermal printer to boot. Oh, and ROM packs for Microsoft Basic, games, or an English-to-Japanese translator.
 What could you do on this thing? Well, it had basic watch functions, so it told the time, acted as a stop watch, and an alarm, of course. But you could also use it to store two memos of up to 1000 characters each, schedule appointments, and do basic calculations.
The one thing this smartwatch was missing? Connectivity. It couldn’t get on the Internet, nor could it snatch data from the ether via radio or any other method. By today’s measures, it wouldn’t qualify as much of a smartwatch at all. Moreso a personal organizer that fit on the wrist. Still, for its day, this thing really was a whole computer that fit on your wrist.
Would you believe we’ve seen the UC-2000 before? In fact, we’ve even seen it hacked to play Tetris! Video of that wonderful feat after the break.
Continue reading “Seiko Had A Smartwatch In 1984”


