While it might not be comprehensive, [Bret.dk] recently posted a retrospective titled “Every Single Board Computer I Tested in 2025.” The post covers 15 boards from 8 different companies. The cheapest board was $42, but the high-end topped out at $590.
We like the structure of the post. The boards are grouped in an under $50 category, another group for $50-100, and a final group for everything north of $100. Then there’s some analysis of what RAM prices are doing to the market, and commentary about CIX P1, Qualcomm, RISC-V, and more.
A friend of mine has been a software developer for most of the last five decades, and has worked with everything from 1960s mainframes to the machines of today. She recently tried AI coding tools to see what all the fuss is about, as a helper to her extensive coding experience rather than as a zero-work vibe coding tool. Her reaction stuck with me; she referenced her grandfather who had been born in rural America in the closing years of the nineteenth century, and recalled him describing the first time he saw an automobile.
Après Nous, Le Krach
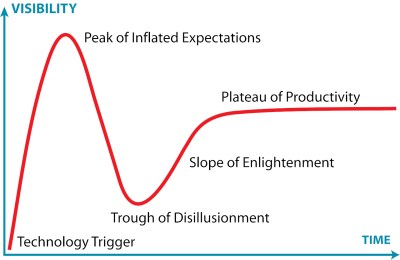
The Gartner hype cycle graph. Jeremykemp, CC BY-SA 3.0.
We are living amid a wave of AI slop and unreasonable hype so it’s an easy win to dunk on LLMs, but as the whole thing climbs towards the peak of inflated expectations on the Gartner hype cycle perhaps it’s time to look forward. The current AI hype is inevitably going to crash and burn, but what comes afterwards? The long tail of the plateau of productivity will contain those applications in which LLMs are a success, but what will they be? We have yet to hack together a working crystal ball, but perhaps it’s still time to gaze into the future. Continue reading “Ask Hackaday: What Will An LLM Be Good For In The Plateau Of Productivity?”→
Regular Hackaday readers will no doubt be familiar with the work of Matthew Alt, AKA [wrongbaud]. His deep-dive blog posts break down hardware hacking and reverse engineering concepts in an engaging way, with practical examples that make even the most complex of topics approachable.
But one of the problems with having a back catalog of written articles is making sure they remain accessible as time goes on. (Ask us how we know.) Without some “algorithm” at play that’s going to kick out the appropriate article when it sees you’re interested in sniffing SPI, there needs to be a way to filter through the posts and find what’s relevant. Which is why the new “Roadmap” feature that [wrongbaud] has implemented on his site is so handy.
At the top of the page you’ll find [wrongbaud]’s recommended path for new players: it starts with getting your hardware and software together, and moves through working with protocols of varying complexity until it ends up at proper techno wizardry like fault injection.
Clicking any one of these milestones calls up the relevant articles — beginners can step through the whole process, while those with more experience can jump on wherever they feel comfortable. There’s also buttons that let you filter articles by topic, so for example you can pull up anything related to I2C or SPI.
Further down the page, there’s a helpful “Common Questions” section that gives you a brief overview of how to accomplish various goals, such as identify an unknown UART baud rate, or extract the contents of an SPI flash chip.
Cryptography is a funny thing. Supposedly, if you do the right kind of maths to a message, you can send it off to somebody else, and as long as they’re the only one that knows a secret little thing, nobody else will be able to read it. We have all sorts of apps for this, too, that are specifically built for privately messaging other people.
Only… sometimes just having such an app is enough to get you in trouble. Even just the garbled message itself could be proof against you, even if your adversary can’t read it. Enter The Guardian. The UK-based media outlet has deployed a rather creative and secure way of accepting private tips and information, one which seeks to provide heavy cover for those writing in with the hottest scoops.
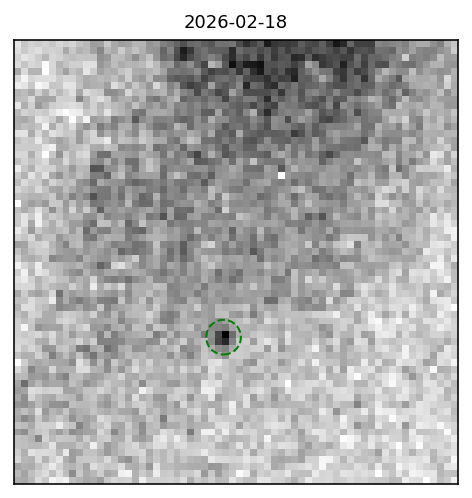
When Asteroid 2024 YR4 was first discovered, it created a bit of a kerfuffle when it was reported it had a couple-percent chance of hitting the Earth in 2032. At 60 meters (196 feet) across, this would have been in the “city killer” class that nobody really wants to see make landfall, so NASA and the ESA scrambled all assets to refine its trajectory in time to do something about it. Amongst those assets was the James Webb Space Telescope (JWST), which is now reporting it will miss both us and our moon.
Even with the JWST, asteroid 2024 YR4 only fills a few pixels.
We reported that JWST was being tapped for this task over a year ago, when the main concern was still if YR4 might hit Earth or not. An Earth impact was fairly quickly ruled out as the window narrowed to include only to Earth’s moon, and concern shifted to excitement. A city killer striking Earth is obviously bad news. The same thing happening to the Moon is a chance to do science — and 2032 would have been plenty of time to get assets in place to observe the impact.
Unfortunately for the impact-curious, JWST was able to narrow down the trajectory further — and we’ve now gone from up to a 4% chance of hitting Luna to a sure miss of 20,000 km or more.
As this game of cosmic billiards we call a solar system continues, it’s only a matter of time before Earth or her moon is struck by another object. Unless we can deflect it, that is — NASA and partnering agencies have been testing how to do that.
It’s hard to deny that label printers have become more accessible than ever, but an annoying aspect of many of these cheap units is that their only user interface is a proprietary smartphone app connected via Bluetooth. The Fichero-branded label printer that [0xMH] obtained for a mere 10 Euro at a store in the Netherlands was much the same, with an associated app that doesn’t just bind it to smartphones, but also requires no fewer than 26 permissions. Obviously this required some reverse-engineering of the BLE protocol.
The fruits of this reverse-engineering effort can be found in the GitHub repository, with the most interesting part probably being that this Fichero is just one of many relabeling of generic label printers, this one being an AiYin D11, by Xiamen Printer Future Technology. This means that other iterations of this D11 will work exactly the same, as they all use the same ‘LuckPrinter’ SDK.
[0xMH] provides a Web GUI to talk with a local D11 printer, though you can also use the Python scripts, or of course implement the protocol using your favorite language and frameworks, so that you can finally control a cheap label printer from a PC or even BLE-equipped MCU like the software gods intended.
The rapidly-improving speed and versatility of digital computers has mostly driven analogue computers out of use in modern systems, as has the relative difficulty of programming an analogue computer. There is a kind of art, though, in weaving together a series of op-amps to perform mathematical calculations; between this, a historical interest in the machines, and their rarity value, it’s no wonder that new analogue computers are being designed even now, such as [Markus Bindhammer]’s system.
The computer is built around a combined circuit board and patch panel, based on the designs included in three papers in a online library of analogue computer references. The housing around the patch panel took design cues from the Polish AKAT-1 analogue computer, including the two dial voltage indicators and an oscilloscope display, in this case an inexpensive DSO-138. The patch panel uses banana connectors and the jumper wires use stackable connectors, so several wires can be connected to the same socket.
The computer itself has a summing amplifier circuit, a multiplier circuit, an integrator, and square, triangle, and sine wave generators. This simple set of tools is enough to simulate both simple and complex math; for example, [Markus] squared five volts with the multiplier, resulting in 2.5 volts (the multiplier divides the result by ten). A more advanced example is a leaky-integrator model of a neuron, which simulates a differential equation.