Compared to through-hole construction, inspecting SMD construction is a whole other game. Things you thought were small before are almost invisible now, and making sure solder got where it’s supposed to go can be a real chore. Add some ball grid array (BGA) chips into the mix, where the solder joints are not visible by design, and inspection is more a leap of faith than objective proof of results.

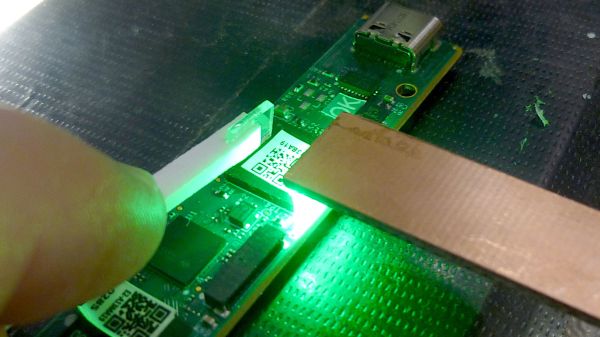
Unless, of course, you put the power of optics to work, as [Petteri Aimonen] does with this clever BGA inspection tool. It relies on a pair of tiny prisms to bounce light under one side of a BGA chip and back up the other. The prisms are made from thin sheets of acrylic; [Petteri] didn’t have any 1-mm acrylic sheet on hand, so he harvested material from a razor blade package. The edge of each piece was ground to a 45-degree angle and polished with successively finer grits until the surfaces were highly reflective. One prism was affixed to a small scrap of PCB with eleven SMD LEDs in a row, forming a light pipe that turns the light through 90 degrees. The light source is held along one edge of a BGA, shining light underneath to the other prism, bouncing light through the forest of solder balls and back toward the observer.
The results aren’t exactly crystal clear, which is understandable given the expedient nature of the materials and construction employed. But it’s certainly more than enough to see any gross problems lying below a BGA, like shorts or insufficiently melted solder. [Petteri] reports that flux can be a problem, too, as excess of the stuff can crystalize between pads under the BGA and obstruct the light. A little extra cleaning should help in such cases.
Haven’t tackled a BGA job yet? You might want to get up to speed on that.