Close To The Metal

Firmware is caught between hardware and software. What do I mean? Microcontroller designers compete on how many interesting and useful hardware peripherals they can add to the chips, and they are all different on purpose. Meanwhile, software designers want to abstract away from the intricacies and idiosyncrasies of the hardware peripherals, because code wants to be generic and portable. Software and hardware designers are Montagues and Capulets, and we’re caught in the crossfire.

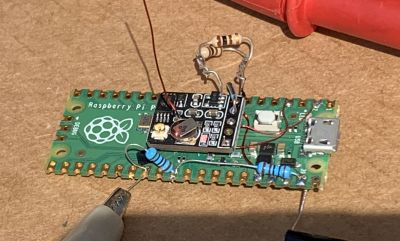
I’m in the middle of a design that takes advantage of perhaps one of the most idiosyncratic microcontroller peripherals out there – the RP2040’s PIOs. Combining these with the chip’s direct memory access (DMA) controllers allows some fairly high-bandwidth processing, without bogging down the CPUs. But because I want this code to be usable and extensible by a wide audience, I’m also trying to write it in MicroPython. And configuring DMA controllers is just too idiosyncratic for MicroPython.

But there’s an escape hatch. In my case, it’s courtesy of the machine.mem32 function, which lets you read and write directly into the chip’s memory, including all of the memory-mapped configuration registers. Sure, it’s absurdly low-level, but it means that anything you read about in the chip’s datasheet, you can do right away, and from within the relative comfort of a Micropython program. Other languages have their PEEK and POKE equivalents as well, or allow inline assembler, or otherwise furnish you the tools to get closer to the metal without having to write all the rest of your code low level.

I’m honestly usually a straight-C or even Forth programmer, but this experience of using a higher-level language and simultaneously being able to dive down to the lowest levels of bit-twiddling at the same time has been a revelation. If you’re just using Micropython, open up your chip’s datasheet and see what it can offer you. Or if you’re programming at the configure-this-register level, check out the extra benefits you can get from a higher-level language. You can have your cake and eat it too!

Making A Concrete Sign

While paging through the feed a few days ago our attention was caught by something a little away from the ordinary in Hackaday terms, a DIY video about creating cast concrete signage from [Proper DIY] which we’ve placed below the break. A deceptively easy-looking mould-making process has a few tricks that  will make the difference between a hard-wearing sign that lasts for years, and a lump of concrete.

So, to make a cast concrete sign, you throw together a mould with some letters, and chuck in some concrete? Not so fast, because the key appears to be preparation, and ensuring that there are no 90-degree corners on the mould parts. The letters are carefully shaped and sealed with varnish before being attached to the mould with silicone adhesive, and all the corners are beveled. Finally a light oil is used as a release agent, and hefty vibration takes care of any air bubbles.

The result is a set of signs, but we can see these techniques finding uses outside signage. For example, how about casting using a 3D printed mould?

Continue reading “Making A Concrete Sign”

This 3D Printable Soldering Air Filter Really Sucks

If you solder (and we know you do), you absolutely need ventilation, even for that lead-free stuff. Fortunately, [tinyboatproductions] has gotten into air quality lately and is here to help you with their snappy 3D printed air-filtering design.

At the heart of this build is a 120 mm notoriously-quiet Noctua fan coupled with a carbon filter. It does what you’d think — position the fan the right way and it sucks the air through the filter, which catches all those nasty particles.

The only problem is that the Noctua uses PWM, so there’s no governing it with a just potentiometer. To get around this, [tinyboatproductions] introduced an Arduino Nano and a buck converter, both of which were admittedly a bit overkill. Now the speed can be controlled with a pot.

Once control of the fan was sorted, [tinyboatproductions] decide to add an OLED display to show the fan speed and power condition, which is a nice touch. Be sure to check out the build video after the break.

If this doesn’t have quite enough features for you, here’s one that’s battery powered.

Continue reading “This 3D Printable Soldering Air Filter Really Sucks”

Because You Can: Linux On An Arduino Uno

There are a few “Will it run” tropes when it comes to microcontrollers, one for example is “Will it run Doom?“, while another is “Will it run Linux?”. In one of the lowest spec examples of the last one, [gvl610] has got an up-to-date Linux kernel to boot on a vanilla Arduino Uno. And your eyes didn’t deceive you, that’s a full-fat kernel rather than the cut-down μClinux for microcontrollers.

Those of you who’ve been around a while will probably have guessed how this was done, as the ATmega328 in the Uno has no MMU and is in to way powerful enough for the job. It’s running an emulator, in this case just enough RISC-V to be capable, and as you’d imagine it’s extremely slow. You’ll be waiting many hours for a shell with this machine.

The code is written in pure AVR C, and full instructions for compilation are provided. Storage comes from an SD card, as the ATmega’s meagre 32k is nowhere near enough. If you’re having a bit of deja vu here we wouldn’t blame you, but this one is reputed to be worse than the famous 2012 “Worst PC Ever“, which emulated ARM instead of RISC-V.

Thanks [Electronics Boy] for the tip!

Restoration Of A Thinkpad 701C

This is like ASMR for Hackers: restoration specialist [Polymatt] has put together a video of his work restoring a 1995 IBM Thinkpad 701c, the famous butterfly keyboard laptop. It’s an incredible bit of restoration, with a complete teardown and rebuild, even including remaking the decals and rubber feet.

[Polymatt] runs Project Butterfly, an excellent site for those who love these iconic laptops, offering advice and spare parts for restoring them. In this video, he does a complete teardown, taking the restored laptop completely apart, cleaning it out, and replacing parts that are beyond salvaging, like the battery, and replacing them. Finally, he puts the whole thing back together again and watches it boot up. It’s a great video that we’ve put below the break and is well worth watching if you wonder about how much work this sort of thing involves: the entire process took him over two years.

We’ve covered some of his work in the past, including the surprisingly complicated business of analyzing and replacing the Ni-Cad battery that the original laptop used. Continue reading “Restoration Of A Thinkpad 701C”

Crabapplepad Folding Keyboard Is Actually Pretty Sweet

[Sergei Silnov] was quite attached to the Microsoft Natural Ergonomic 4000 keyboard, an updated version of their Natural keyboard that brought so many into the split fold. But once [Sergei] started writing notes in coffee shops, it was time for something portable.

The trouble with many portable keyboards, especially folding ones, is that they’re not often comfortable to type on. However, the Crabapplepad, a sleek, elegant offering, looks as though it begs to differ.

[Sergei] truly thought of everything and packed it into this 2cm thick wonder. There’s a little kickstand to hold your phone, or you can just throw an Apple trackpad between the halves and it magnetically attaches. Inside there’s a Seeed Studio XIAO nRF52840, and the switches are the extremely thin and hard-to-find Kailh PG1425 X, a sweet-looking scissor switch.

The only problem with X-switches is that there is only one type of keycap for them at the moment, and there aren’t any homing bums for F and J. To get around this, [Sergei] designed some 3D-printed frames to go around the keycaps and make them more distinct. Yes, this beauty it is open source, so go forth and be comfortable in absolute style. Don’t forget to check out the demo after the break.

To be honest, there once was a pretty good folding keyboard — the Palm Portable. Don’t worry; someone made a Bluetooth adapter for them.

Continue reading “Crabapplepad Folding Keyboard Is Actually Pretty Sweet”

This Packable Ham Radio Antenna Is Made From Nothing But Tape

On today’s episode of “Will It Antenna?”, [Ben Eadie (VE6SFX)] designs and tests an antenna made entirely of tape, and spoiler alert — it works pretty well.

By way of background, the basic design [Ben] uses here is known as a J-pole, a popular “my first antenna” design for amateur radio operators looking to go beyond the stock whip antenna that comes with that cheap handy-talkie you just can’t resist buying as soon as you get your license. Usually, though, hams will build their J-poles from rigid materials, copper water pipe being a typical choice. Copper has the advantage of being easily sourced, and also results in a self-supporting, weather-resistant antenna that’s easy to mount outdoors. However, copper is getting to be egregiously expensive, and a couple of meters of water pipe isn’t exactly amenable to portable operation, if that’s your jam.

To solve those problems, [Ben] decided to keep his copper use to a minimum with a roll of copper foil tape. He doesn’t provide any specs on the tape, but it looks like it’s about 6 mm (1/4″) wide and judging by a quick Amazon search, probably goes for about $10 a roll. He starts the build with a couple of strips of plain old duck tape — we’ve already had the “duck vs. duct” argument — laid out with the sticky sides together. The copper foil is applied to the duck tape backing using dimensions from any of the J-pole calculators available online. Dimensions are critical to getting good performance from a J-pole, and this is where [Ben]’s tape design shines. Element too long? No problem, just peel up a bit and tear some off. Did you go too far and make an element too short? Easy — just stick on an extension piece of foil. Tuning the location of the feedline connection was a snap, too, with movable terminals held in place with magnets.

Once everything was tuned up, [Ben] soldered down the feed points and covered the foil with a protective layer of duck tape. The antenna performed swimmingly, and aside from costing almost nothing to build, it weighs very little, rolls up to fit in a pack for field operations, and can easily be hoisted into a tree for better coverage. Looks like we’ll be putting in an order for some copper tape and building one of these too. Continue reading “This Packable Ham Radio Antenna Is Made From Nothing But Tape”