2023 Hackaday Supercon Badge: Welcome To The Vectorscope

This year, the Supercon badge goes analog! (Or at least fakes it pretty convincingly.) Taking inspiration from the phosphor scopes of yesteryear, the 2023 Vectorscope badge is part analog audio playground, part art project, and all about prototyping. Who doesn’t like the warm glow and lovely green fade of an old Tektronix tube scope? That’s what we’re after.

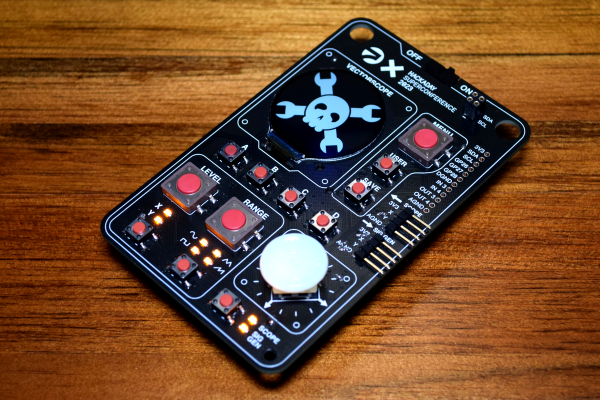
Conceptually, the badge is two separate devices in one. Most obvious is the vectorscope, which takes in voltages in the 0 V – 3 V range and plots them out in X-Y mode in glorious fake-phosphor effect on the lovely round IPS screen. We’ve also tied an audio amplifier to the Y input that plays whatever waveform you’re watching.

But you don’t have to bring your own waveforms with you – the other half of the badge is an arbitrary programmable waveform generator that drives two channels. Off the bat, it’s configurable with the front panel controls, so you’re obviously invited to make Lissajous figures and store them in the program memories.

Combining the two halves lets you draw in voltages and time, but not until you connect them together, naturally. You see, this isn’t an analog simulation – it’s the programmable equivalent of the real deal, courtesy of the AK4619 ADC/DAC. Voltages go out on one set of pins and come back in on the other.

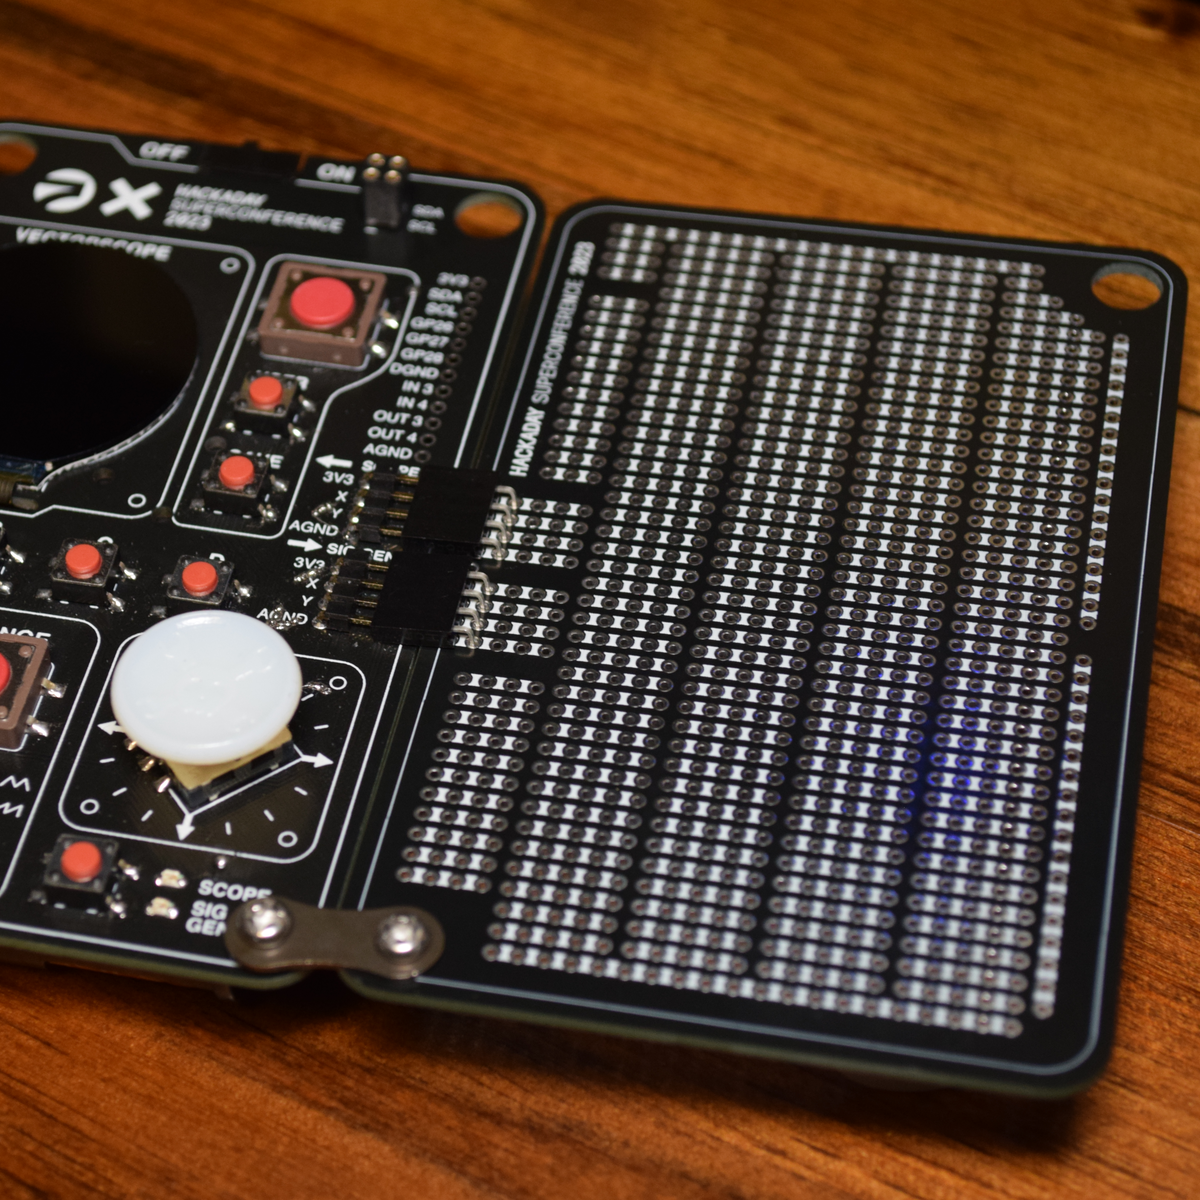
And you get to play around with these voltages in through-hole space too, because we’ve included a very generous prototyping board for your analog explorations. Does this instantly suggest a curve tracer to you? Be our guest! Other forms of analog video-mangling? We want to see what you come up with. Make an audio filter and watch it work on the screen in front of your very eyes.

Of course we’re not leaving you code monkeys out in the cold. MicroPython puts the “programming” in the programmable waveform generator. If you’re not content with the four stock waveforms, you’re invited to write your own. And this is where it gets artsy.

You can upload your own repetitive waveforms to the onboard direct digital synth routine, but why stop there? We’ve left most of the processing power of the underlying RP2040 untouched, for you to use. And four buttons on the front panel let you store and play back your code, so you have space to stash your demos, and a sweet joystick with a custom keycap gives you control.

Continue reading “2023 Hackaday Supercon Badge: Welcome To The Vectorscope”

Atari Introduces A New Old Console

Readers of a certain age no doubt remember the Atari 2600 — released in 1977, the 8-bit system helped establish the ground rules for gaming consoles as we know them today, all while sporting a swanky faux wood front panel designed to make the system look at home in contemporary living rooms.

Now, nearly 50 years later, the Atari 2600 is back. The new system, imaginatively named the 2600+, looks exactly like the original system, albeit at around 80% scale. It will also work the same way, as the system will actually be able to play original Atari 2600 and 7800 cartridges. This is something of a surprise when compared to the previously released retro consoles from the likes of Sony and Nintendo, as they were all limited to whatever games the company decided to pack into them. Of course, this probably has something to do with the fact that Atari has been selling newly manufactured 2600 games for some time now.

Although it will play original cartridges, it’s still an emulated console at heart. There aren’t a lot of technical details on the product page, but it does say the 2600+ is powered by a Rockchip 3128 SoC with 256 MB of DDR3 RAM and 256 MB eMMC flash. Some quick searching shows this to be a pretty common board for set-top gadgets, and wildly overpowered considering the meager requirements for emulating a game console from 1977. We wouldn’t be surprised to find it’s running some kind of minimal Linux install and using one of the existing open source emulators.

While the 2600+ sports the same 9-pin D-sub controller connectors as the original console, it thankfully embraces modern display technology and outputs over HDMI. Each console will come with a “10-in-1” cartridge that contains some of the console’s most popular titles, as well as a modernized version of the original single-button joystick. (Unlike the original, the 2600+ comes with only a single joystick — the other is sold separately.)

Atari won’t start shipping the 2600+ until this fall, but they’re currently taking preorders for the $130 system. We’re eager to see somebody pull it apart, as the earlier “mini” consoles ended up being ripe for hacking.

Continue reading “Atari Introduces A New Old Console”

Review: WAINLUX K8, A Diode Laser That’s Ready To Work

Rarely a week goes by that some company doesn’t offer to send us their latest and greatest laser. You know the type — couple of aluminum extrusions, Class 4 diode flopping around in the breeze, and no enclosure to speak of unless you count the cardboard box they shipped it in. In other words, an accident waiting to happen. Such gracious invitations get sent to the trash without a second thought.

Now don’t get me wrong, I have no doubt that the average Hackaday reader would be able to render such a contraption (relatively) safe for use around the shop. Build a box around it, bolt on a powerful enough fan to suck the smoke out through the window, and you’ve turned a liability into a legitimate tool. But the fact remains that we simply can’t put our stamp on something that is designed with such a blatant disregard for basic safety principles.

The earlier WAINLUX JL4 — lucky rabbit foot not included.

That being the case, a recent email from WAINLUX nearly met the same fate as all those other invitations. But even at a glance it was clear that this new machine they wanted to send out, the K8, was very different from others we’d seen. Different even from what the company themselves have put out to this point. This model was fully enclosed, had a built-in ventilation fan, an optional air filter “sidecar”, and yes, it would even turn off the laser if you opened the door while it was in operation. After reading through the promotional material they sent over, I had to admit, I was intrigued.

It seemed like I wasn’t the only one either; it was only a matter of days before the Kickstarter for the WAINLUX K8 rocketed to six figures. At the time of this writing, the total raised stands at just under $230,000 USD. There’s clearly a demand for this sort of desktop laser, the simplicity of using a diode over a laser tube is already appealing, but one that you could actually use in a home with kids or pets would be a game changer for many people.

But would the reality live up to the hype? I’ve spent the last couple of weeks putting a pre-production WAINLUX K8 through its paces, so let’s take a look and see if WAINLUX has a winner on their hands.

Continue reading “Review: WAINLUX K8, A Diode Laser That’s Ready To Work”

A Mainframe Computer For The Modern Age

The era of mainframe computers and directly programming machines with switches is long past, but plenty of us look back on that era with a certain nostalgia. Getting that close to the hardware and knowing precisely what’s going on is becoming a little bit of a lost art. That’s why [Phil] took it upon himself to build this homage to the mainframe computer of the 70s, which all but disappeared when PCs and microcontrollers took over the scene decades ago.

The machine, known as PlasMa, is not a recreation of any specific computer but instead looks to recreate the feel of computers of this era in a more manageable size. [Phil] built the entire machine from scratch, and it can be programmed directly using toggle switches to input values into registers and memory. Programs can be run or single-stepped, and breakpoints can be set for debugging. The internal workings of the machine, including the program counter, instruction register, accumulator, and work registers, are visible in binary lights. Front panel switches let you control those same items.

The computer also hosts three different microcodes, each providing a unique instruction set. Two are based on computers from Princeton, Toy-A, and Toy-B, used as teaching tools. The third is a more advanced instruction set that allows using things like emulated peripherals, including storage devices. If you want to build one or just follow along as the machine is constructed, programmed, and used, [Phil] has a series of videos demonstrating its functionality, and he’s made everything open-source for those more curious. It’s a great way to get a grasp on the fundamentals of computing, and the only way we could think of to get even more into the inner workings of a machine like this is to build something like a relay computer.

Continue reading “A Mainframe Computer For The Modern Age”

Hackaday Prize 2023: Over-the-Top Programmable Resistor Looks The Part And Performs

Every once in a while we get wind of a project that we’re reluctant to write up for the simple reason that it looks too good to be true. Not that projects need to be messy to be authentic, mind you, but there are some that are just so finished and professional looking that it gives us a bit of pause. [Sebastian]’s programmable precision resistor is a shining example of such a project

While [Sebastian] describes this as “a glorified decade resistance box,” and technically that’s exactly right — at its heart it’s just a bunch of precision resistors being switched into networks to achieve a specific overall resistance — there’s a lot more going on here than just that. The project write-up, which has been rolling out slowly over the last month or so, has a lot of detail on different topologies that could have been used — [Sebastian] settled on a switched series network that only requires six relays per decade while also minimizing the contribution of relay contact resistance to the network. Speaking of which, there’s a detailed discussion on that subject, plus temperature compensation, power ratings, and how the various decades are linked together.

For as much that’s interesting about what’s under the hood, we’d be remiss to not spend a little time praising the exterior of this instrument. [Sebastian] appears to have spared no expense to make this look like a commercial product, from the rack-mount enclosure to the HP-esque front panel. The UI is all discrete pushbuttons and knobs with a long string of 16-segment LEDs — no fancy touch-screens here. The panel layout isn’t overly busy, and looks like it would be easy to use with some practice. We’d love to hear how the front and rear panel overlays were designed, too; maybe in a future project update.

This honestly looks like an instrument that you’d pay a princely sum to Keithley or H-P to own, at least back in the late 1990s or so. Kudos to [Sebastian] for the attention to detail here.

Ask Hackaday: Why Retrocomputing?

I recently dropped in on one of the Vintage Computer Festival events, and it made me think about why people — including myself — are fascinated with old computer technology. In my case, I lived through a lot of it, and many of the people milling around at VCF did too, so it could just be nostalgia. But there were also young people there.

Out of curiosity, I asked people about the appeal of the old computers on display there. Overwhelmingly, the answer was: you can understand the whole system readily. Imagine how long it would take you to learn all the hardware and software details of your current desktop computer CPU. Then add your GPU, the mass storage controllers, and your network interface. I don’t mean knowing the part numbers, specs, and other trivialities. I mean being able to program, repair, and even enhance it.

Continue reading “Ask Hackaday: Why Retrocomputing?”

Examining Test Gear From Behind The Iron Curtain

Back in 1978, an oscilloscope was an exotic piece of gear for most homebrewers. We expect they were even more rare in private hands behind the iron curtain, and [Thomas Scherrer] shows us a Soviet X1-7B combination oscilloscope and spectrum analyzer (he thinks, at least, it is a spectrum analyzer) that he got working.

The Soviet scope is clearly different with its Cyrillic front panel. Luckily, Google Translate was up to the task of decoding a picture of the device. However, the differences aren’t just cosmetic. The scope also has a very interesting rotating bezel around the round CRT. You can see a video of the 8.2 kg scope below.

A quick look inside looks pretty conventional for a scope of that era that used all transistors in the circuitry. The rotating bezel, though, also controls something that looks like a big mechanical switch and cavity or, perhaps, a big mechanical variable component of some kind.

Satisfied that the insides were in reasonable shape, [Thomas] was ready to try turning it on. We want to say it went well, but… there was censored audio, along with a loud noise, right after it was plugged in. Troubleshooting centered on what was producing a burned smell, but a quick examination didn’t turn up anything obvious, despite being localized to the power circuitry. The fuse didn’t blow, oddly, and — even more puzzling — the unit was off when plugged in!

It turns out the input power filter leaked to the chassis. Since he had a ground on the chassis, that explained the failure, and while it was annoying, it was better than getting a shock with a hot chassis. The second plug in went better.

It finally did work, at least somewhat, although he never explored some of the odd features the scope appears to have. We love the old boat anchor scopes but don’t see many Soviet instruments, at least not those of us on this side of the Atlantic.

We do see a few Soviet-era computers now and again. As for the fuse not blowing, it was shorted before the fuse, but apparently, fuses don’t always blow when you expect them to, anyway.

Continue reading “Examining Test Gear From Behind The Iron Curtain”