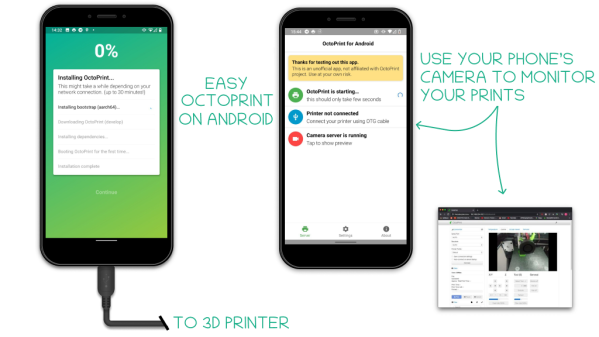
Robotic Worm Uses NinjaFlex Filament

If you think about building a moving machine, you probably will consider wheels or tracks or maybe even a prop to take you airborne. When [nwlauer] found an earthworm in the garden, it inspired a 3D-printed robot that employs peristaltic motion. You can see a video of it moving, below.

The robot uses pneumatics and soft plastic, and is apparently waterproof. Your printer’s feed path has to be pretty rigid to support flexible filament without jamming. There’s also some PVA filament and silicone tubing involved.

Continue reading “Robotic Worm Uses NinjaFlex Filament”

Plaster Annealing 3D Prints For Strength

[Stefan] is always trying to make stronger 3D prints. Annealing can strengthen prints, but often at the expense of the part’s exact dimensions. His latest approach is to embed the prints in plaster and then anneal in an attempt to fuse the plastic together without changing its shape or size. Did it work? See for yourself in the video below.

He’s done a lot of work we’ve taken note of before where he measures the strength of parts after different post-processing steps. His test plastic parts used both PLA and PETG.

Continue reading “Plaster Annealing 3D Prints For Strength”

3D-Printed Adapter Keeps Your Guitar In Tune And In Style

If you like building or upgrading guitars, you may have already learned the valuable lesson that the devil absolutely is in the detail when it comes to to replacement parts. Maybe you became aware that there are two types of Telecaster bridges right after you drilled the holes through the body and noticed things just didn’t quite fit. Or maybe you liked the looks of those vintage locking tuners and the vibe you associate with them, only to realize later that the “vintage” part also refers to the headstock, and the holes in your modern one are too big.

The latter case recently happened to [Michael Könings], so he did what everyone with a 3D printer would: make an adapter. Sure, you can also buy them, but where’s the fun in that? Plus, the solution is as simple as it sounds. [Michael] modelled an adaptor to bridge the gap between the headstock holes and the tuner shaft, but unlike the commercial counterpart that are mounted only on one side, his fills up the entire hole and fits the entire construct tightly together. For even more overall stability, he added an interlocking mechanism on the back side that keeps all the adaptors in line, and also allows for some possible distance differences.

[Michael] initially considered using wood filament for cosmetic reasons, but due to lack of the material went with simple white PLA instead. In the end, it doesn’t matter too much, as most of it hides under the new tuners’ metal covers anyway — and the small parts that are visible will serve as a great reminder of this lesson in guitar variety. Speaking of 3D printing and guitar variety, now that we reached the headstock, and have seen bodies for a while already (including bass), only 3D-printed guitar necks are missing. Well, we’ve had them on violins though, even with 6 strings, but they also don’t have to deal with frets and have a bit less tension going on.

Reforming 3D Prints With Salt And Heat

The biggest problem with fused deposition 3D prints is that while the layers should stick together, they aren’t the same as a solid piece of plastic you would get from, say, injection molding. You can anneal plastic using moderate heat, but it is likely to cause the part to deform or change size. [Free Spirit 1] has a solution for this. Using a powdered salt, the part is packed on the inside and out and put in an oven. The results in the video below look really impressive.

In addition to making the part look solid and — we assume — adding strength, the resulting prints are also water- and gas-tight which was the purpose of the effort. That alone would make the technique worthwhile.

The only thing we noticed is that the part has to have access to hold the salt. Anything not supported would be subject to deformation. However, the ground-up salt is so fine that it should be relatively easy to fill in most parts and, of course, print with 100% infill to avoid hollow internal areas.

[Free spirit 1] used a coffee grinder to get the salt powder, but apparently you can buy “flour salt.” We wondered if other powders might work well, too. Apparently, sand didn’t work out, perhaps because the salt dissolves out in water, so whatever you use, it should probably dissolve in something that won’t attack your plastic.

Annealing isn’t a new idea, and we’d love to see some objective tests on this new method.

Continue reading “Reforming 3D Prints With Salt And Heat”

Plastic Prosthetics For Rubber Duckies

Will someone please think of the rubber duckies?!

For decades they’ve been reduced to a laughing stock: a caricature of waterfowl. Left without a leg to stand on, their only option is to float around in the tub. And they don’t even do that well, lacking the feet that Mother Nature gave them, they capsize when confronted with the slightest ripple. But no more!

Arise!

Due to the wonders of 3D printing, and painstaking design work by [Jan] from the Rubber Ducky Research Center, now you can print your own rubber ducky feet. We have the technology! Your ducks are no longer constrained to a life in the tub, but can roam free as nature intended. The video (embedded below) will certainly tug at your heartstrings.

OK, it’s a quick print and it made my son laugh.

The base and legs probably don’t fit your duck as-is, but it’s a simple matter to scale them up or down while slicing. (Picture me with calipers on the underside of a rubber ducky.) The legs were a tight press-fit into the body, so you might consider slimming them down a tiny bit when doing the scaling, but this probably depends on your printer tolerances.

It looks snazzy in gold-fleck PETG, and would probably work equally well for some more elaborate rubber duckies as well.

Continue reading “Plastic Prosthetics For Rubber Duckies”

Figuro Draws 3D In Browser

We would have never guessed there would be so many browser-based CAD packages. While TinkerCAD is great for simple things, there are also packages such as OnShape that rival commercial CAD programs. A site calle Figuro claims to occupy the space between TinkerCAD and Blender. We aren’t so sure, but it is an interesting entry into the field. Apparently, Figuro has been around for some time, but has recently had a major face lift. The new interface looks good, but it has invalidated a number of video tutorials on their YouTube channel.

One of the things we like about TinkerCAD is it is highly discoverable. That is, you can fire it up, play with it a bit, and probably do quite a few things. Maybe it is just us, but Figuro didn’t give us the same experience. It is easy enough to draw simple shapes. But trying to multiselect was unreliable. Panning and rotating the view was very sensitive too, so we found we were occasionally lost in the work view with no easy way to reset the view. Even something as simple as subtracting one shape from another was painful.

Continue reading “Figuro Draws 3D In Browser”

TOBOT Is Your Tic Tac Toe Opponent With A Bad Attitude

[3dprintedlife] is apparently a little bored. Instead of whiling away the time playing tic tac toe, he built an impressive tic tac toe robot named TOBOT. The robot uses a Rasberry Pi Zero and a Feather to control a two-axis robot arm that can draw the board and make moves using a pen. It also uses a simple computer vision system to look at the board to understand your move, and it has a voice too.

The other thing TOBOT has is a bad attitude. The robot wants to win. Badly. Check out the video below and you’ll see what we mean.

Continue reading “TOBOT Is Your Tic Tac Toe Opponent With A Bad Attitude”