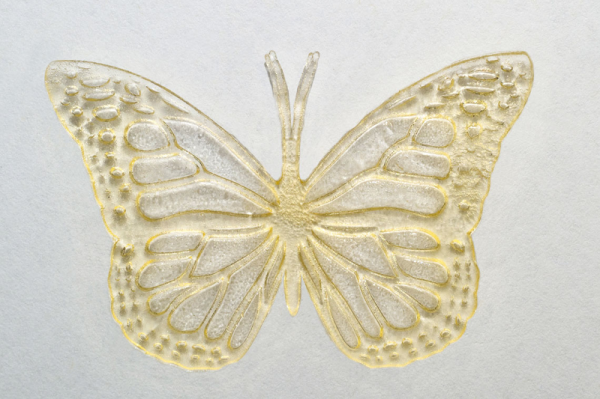
University of Toronto researchers have succeeded in converting used cooking oil — from McDonald’s, no less — into high-resolution 3D printing resin. Your first response might be: “Why?”, but thinking about it there are several advantages. For one thing, waste oil is a real problem for the food industry, and thus it can be acquired rather cheaply. An even bigger benefit is that the plastic that originates from this oil is biodegradable. Their 3d-printed butterfly, of course, is made from the recycled resin.
We aren’t chemists, but apparently 3D resin has a lot in common with cooking oil already. The team used a one-step chemical process to convert one liter of McDonald’s greasiest into a little more than 400 milliliters of resin.
At a recent swap meet, [digitalrice] found what appeared to be a like-new QIDI X-Plus 3D printer. It wasn’t clear what was wrong with it, but considering it retails for $900 USD, he figured the asking price of $150 was worth the gamble. As you might expect, the printer ended up being broken. But armed with experience and a supply of spare parts, he was able to get this orphaned machine back up and running.
The first and most obvious problem was that the printer’s Z axis didn’t work properly. When the printer tried to home the axis, one of the motors made a terrible noise and the coupler appeared to be spinning backwards. From his experience with other printers, [digitalrice] knew that the coupler can slip on the shaft, but that didn’t appear to be the case here. Removing the stepper motor and testing it in isolation from the rest of the machine, he was able to determine it needed replacing.
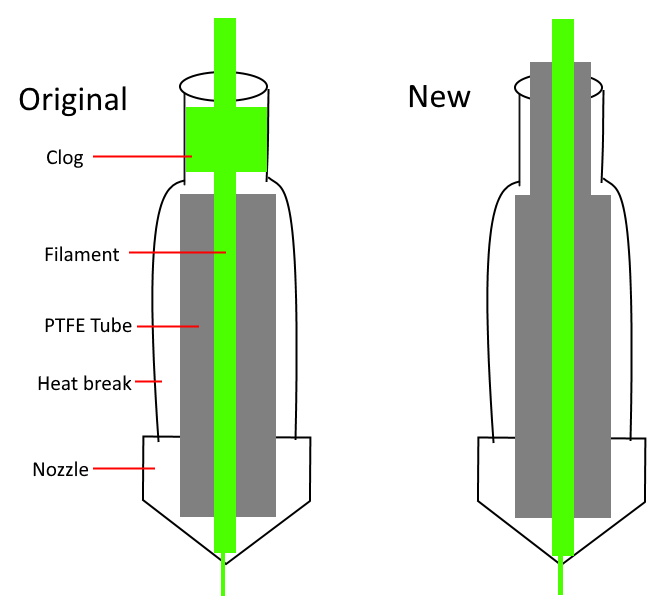
Improving the printer’s filament path.
Unfortunately, the spare steppers he had weren’t actually the right size. Rather than waiting around for the proper one to come in the mail, he took an angle grinder to the stepper’s shaft and cut off the 5 mm needed to make it fit, followed by a few passes with a file to smooth out any burrs. We’re not sure we’d recommend this method of adjustment under normal circumstances, but we can’t argue with the results.
The replaced Z motor got the printer moving, but [digitalrice] wasn’t out of the woods yet. At this point, he noticed that the hotend was hopelessly clogged. Again relying on his previous experience, he was able to disassemble the extruder assembly and free the blob of misshapen PLA, leading to test prints which looked very good.
But success was short lived. After swapping to a different filament, he found it had clogged again. While clearing this second jam, he realized that the printer’s hotend seemed to have a design flaw. The PTFE tube, which is used to guide the filament down into the hotend, didn’t extend far enough out. Right where the tube ended, the filament was getting soft and jamming up the works. With a spare piece of PTFE tube and some manual reshaping, he was able to fashion a new lining which would prevent the filament from softening in this key area; resulting in a more reliable hotend than the printer had originally.
It’s great to see this printer repaired to working condition, especially since it looks like [digitalrice] was able to fix a core design flaw. But a broken 3D printer can also serve as the base for a number of other interesting projects, should you find yourself in a similar situation. For example, replacing the extruder assembly with a digital microscope can yield some very impressive results.
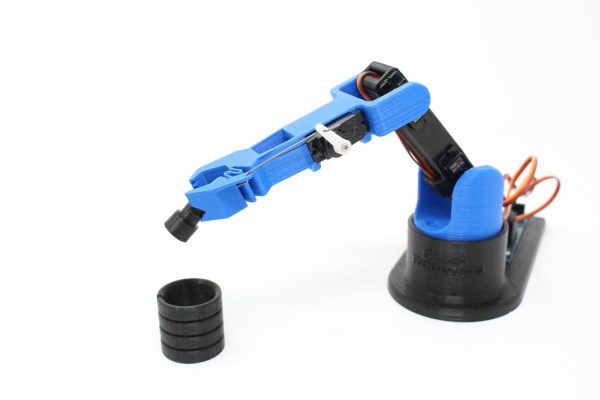
Learning through play is effective for humans of all ages, and since 2016 [slantconcepts] has been designing STEM kits that help teach kids to build their future overlords. They are launching version 3 of their LittleArm robotic arm, and the progression from version 1 is an interesting study in simplification and parts count reduction without sacrificing functionality.
In all of the LittleArm versions the main mechanical components are 3D printed, and driven by 3 servos for motion plus one additional servo to run the gripper. These kits are specifically intended to be built and disassembled repeatedly, and classrooms are a great place for small screws to easily disappear, so reducing the number of screws was a big goal for v3. The gripper/forearm shows the most dramatic improvement from the previous versions, being simplified from 8 separate components to a single 3D printed part by using a compliant mechanism — that squiggly pattern that allows the gripper to flex into place. The gripper tips also feature a simple “cutout” that allow it more easily grasp horizontal objects.
An Arduino Nano based expansion board is used to control the arm, with a HC-06 Bluetooth module to allow it to be controlled via a smart phone app. Various sensors can also be added to expand the kit’s capabilities. Unfortunately the mechanical design is not open source, but it can still be a source of inspiration for your own design projects.
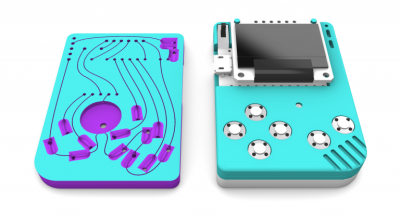
What is part way between a printed circuit board and a rats-nest of point-to-point wiring? We’re not sure, but this is it. [Johan von Konow] has come up with an inspired solution, 3D printing an Arduboy case with channels ready-made for all the wires. The effect with his 3DPCBoy is of a PCB without the PCB, and allows the console to be made very quickly and cheaply.
The Arduboy — which we originally looked at back in 2014 — is a handheld gaming console in a somewhat Gameboy-like form factor. Normally a credit-card sized PCB hosts all the components, including a microcontroller, display, and buttons. Each has a predictable footprint and placement so they can simply be wired together with hookup wire, if you don’t mind a messy result.
Here the print itself has all the holes ready-created for the components, and the path of the wires has a resemblance to the sweeping traces of older hand-laid PCBs. The result is very effective way to take common components — and Arduino pro micro board for the uC, an OLED breakout board, and some buttons — and combine them into a robust package. This technique of using 3D prints as a combination of enclosure and substrate for components and wiring has an application far beyond handheld gaming. We look forward to seeing more like it.
Since most people are carrying a camera-equipped computer in their pockets these days, QR codes can be a great way to easily share short snippets of information. You can put one on your business card so people can quickly access your contact information, or on your living room wall with your network’s SSID and encryption key. The design of QR codes also make them well suited to 3D printing, and thanks to a new web-based tool, you can generate your own custom STL in seconds.
Created by [Felix Stein], the website provides an easy to use interface for the many options possible with QR codes. Obviously you have full control over the actual content of the code, be it a simple URL or a something more specific like a pre-formatted SMS message. But you can also tweak physical parameters like size and thickness.
Once you’re happy with the 3D preview, you can have the website generate an STL for either single or multi-extrusion printers. For those of us who are puttering along with single extruder machines, you’ll need to swap the filament color at the appropriate layer manually. With so many variables involved, you’ll also need figure out which layer the swap should happen on your own.
Incidentally, this is an excellent example of where STL leaves something to be desired. When using a format like 3MF, color and material information could be baked right into the model. Once opened in a sufficiently modern slicer, all the tricky bits would automatically sorted out. Or at least, that’s what Prusa Research is hoping for.
The IBM Selectric changed typewriters as we knew them. Their distinctive ball element replaced the clunky row of typebars and made most people faster typists. When [Steve Malikoff] thought about 3D printing a type ball — colloquially known as a golf ball — it seemed like a great idea.
The problem? It just doesn’t work very well. According to [Steve], it is likely because of the low resolution of the printer. However, it isn’t clear the latitudes of the characters are correct. and there are a few other issues. It is possible that a resin printer would do better and there’s a call for someone out there to try it and report back. We are guessing a finer nozzle and very low layer height might help on an FDM printer.
Judging from the images, it looks like some of the balls do pretty well, but don’t get a full strike at the tilt angle. So it could be something else. However, it does sound like cleaning up the print so it fits is a major problem.
The Selectric was notable for several reasons — you can see an ad for the machine in the video below. The type ball meant you couldn’t jam keys. Since you didn’t have to unjam keys and you had the ribbon in a cartridge, you would have to work really hard to get ink on your fingers, even if you used the cloth ribbon instead of the arguably better carbon film ribbon. The Selectric II could even use a special tape to lift the carbon ribbon off the paper for correcting mistakes. No white-out liquid or fussing with little strips of correction paper. The fact that the ball moves means you don’t have to clear space on the side of the machine for the platen to travel back and forth.
Can you help? If you have a Selectric I or II and a high-quality printer, this would be a fun project to try and report back your results to [Steve]. If you are familiar with the later issue typeballs, you might not have seen the wire clip that [Steve] uses to hold the ball in place. However, you can see them in the video ad below. More modern balls use a plastic lever that acts as a handle so even with cloth ribbons you have less chance of getting ink on your hands.
Although there were Selectrics meant to interface with a computer, you can refit any of them to do it with some work. The Selectric also has a role in one of the great techno spy stories of all time: The GUNMAN project.
A few years ago, [Wayne] managed to blow out the main board of his Flashforge Finder attempting to change the fan. But the death of one tool ended up being the birth of another, as he ended up using its mechanical components and a Raspberry Pi to create an impressive scanning microscope.
Scan of Ulysses S. Grant from a US $50 bill
As you might have guessed from the name, the idea here is to scan across the object with a digital microscope to create an enlarged image of the entire thing. This requires some very precise control over the microscope, which just so happens to be exactly what 3D printers are good at. All [Wayne] had to do was remove the hotend, and print some adapter pieces which let him mount a USB microscope in its place.
The rest is in the software. The Raspberry Pi directs the stepper motors to move the camera across the object to be scanned in the X and Y dimensions, collecting thousands of individual images along the way. Since the focus of the microscope is fixed and there might be height variations in the object, the Z stage is then lifted up a few microns and the scan is done again. Once the software has collected tens of thousands of images in this manner, it sorts through them to find the ones that are in focus and stitch them all together.
The process is slow, and [Wayne] admits its not the most efficient approach to the problem. But judging by the sample images on the Hackaday.io page, we’d say it gets the job done. In fact, looking at these high resolution scans of 3D objects has us wondering if we might need a similar gadget here at the Hackaday Command Bunker.