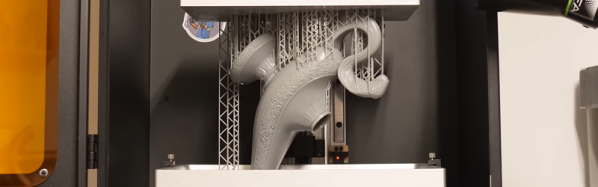
An SLA-Printed Pogo Pin Programming Jig

If you have a microcontroller to program, it can be an easy enough process to hook up a serial lead and perform the task. If however you have hundreds of microcontrollers on PCBs to program, connecting that lead multiple times becomes an impossibility. In manufacturing environments they have pogo pin jigs, an array of spring-loaded pins carrying the programming signals that line up perfectly with the appropriate pads on a PCB places on top of it.

[Conor Patrick] is working on an upgrade to the U2F Zero 2-factor authentication token, and he faces exactly this problem of needing to program a lot of boards. His pogo pin jig is very nicely executed, and he’s taken us through his design and manufacture process for it.

Starting with his PCB design in Eagle, he exported it to Fusion 360 in which he was able to create a jig to fit it. Into the jig model he placed the holes for his chosen pogo pins in the appropriate places, before printing it with an SLA 3D printer. He is particularly complementary about the pins themselves, a solder bucket design that comes from mill-Max, and was sourced via DigiKey.

The proof of the pudding is in the eating, and happily when his completed jig received its first board, everything worked as planned and the programming proceeded flawlessly. We’ve shown you other pogo pin jigs, but this one is particularly nicely executed.

Turn A Cheap 3D Printer Into A Cheap Laser Cutter

We know it’s hard to hear it, but the days of you being a hotshot at the local Hackerspace because you’ve got a 3D printer at home are long gone. While they’re still one of the most persnickety pieces of gear on the hacker’s bench, they’re certainly not the rarest anymore. Some of these printers are so cheap now they’re almost impulse buys. Like it or not, few people outside of your grandmother are going to be impressed when you tell them you’ve got a personal 3D printer anymore; and we wouldn’t be surprised if even granny picked up a Monoprice Mini during the last open box sale.

But while 3D printer ownership isn’t the pinnacle of geek cred it once was, at least there’s a silver lining: cheap motion platforms we can hack on. [squix] writes in to tell us about how he added a laser to his $200 USD Tevo Tarantula 3D printer, greatly expanding the machine’s capabilities without breaking the bank. The information in his write-up is pretty broadly applicable to most common 3D printer designs, so even if you don’t have a Tarantula it shouldn’t be too hard to adapt the concept.

The laser is a 2.5 W 445 nm module which is very popular with low-cost laser cutter setups. It’s a fully self-contained air cooled unit that just needs a source of 12 V to fire up. That makes it particularly well suited to retrofitting, as you don’t need to shoehorn in any extra support electronics. [squix] simply connected it to the existing power wires for the part cooling fan he added to the Tarantula previously.

You may want to check the specs for your 3D printer’s control board before attaching such a high current device to the fan connector. Best case it just overloads the board’s regulator and shuts down, worst case the magic smoke might escape. A wise precaution here might be to put a MOSFET between the board’s fan output the and the laser, but we won’t tell you how to live your life. As far as laser safety, this device should probably work inside an opaque box, or behind closed doors.

Once the laser is hanging off the fan port of your printer’s controller, you can turn it on with the normal GCode commands for fan control, M106 and M107 (to turn it on and off, respectively). You can even control the laser’s power level by adding an argument to the “on” command like: M106 S30.

Then you just need to mount the laser, and it’s more or less business as usual. Controlling a laser engraver/cutter isn’t really that different from controlling a 3D printer, so [squix] is still using OctoPrint to command the machine; the trick is giving it a “3D model” that’s just a 2D image with no Z changes to worry about. We’ve seen the process for doing that in Inkscape previously.

With this laser module going for as little as $60 USD (assuming you’ve got a 3D printer or two laying around to do the conversion on), this is a pretty cheap way to get into the subtractive manufacturing game. Next stop from there is getting one of those K40’s everyone’s talking about.

Continue reading “Turn A Cheap 3D Printer Into A Cheap Laser Cutter”

Maker Faire NY: Cocoa Press Chocolate Printer

If you haven’t figured it out by now, the hype over desktop filament printers is pretty much over. But that doesn’t mean there aren’t new avenues worth exploring that use the basic FDM printer technology. If anything, the low cost and high availability of 3D printer parts and kits makes it easier to branch off into new territory. For example, experimenting with other materials which lend themselves to being “printed” layer by layer like a thermoplastic. Materials such as cement, clay, or even chocolate.

[Ellie Weinstein] brought her Cocoa Press printer to the 2018 World Maker Faire in New York, and we have to say it’s a pretty impressive piece of engineering. Hackers have been known to throw a syringe-based paste extruder onto a regular 3D printer and try their luck with squirting out an edible object from time to time, but the Cocoa Press is truly a purpose built culinary machine.

Outwardly it features the plywood case and vaguely Makerbot-looking layout that we’ve seen plenty of times before in DIY 3D printers. It even uses the same RAMPS controller running Marlin that powers your average homebrew printer. But beyond these surface similarities, the Cocoa Press has a number of purpose-built components that make it uniquely qualified to handle the challenges of building with molten chocolate.

For one, beyond the nozzle and the walls of the syringe, nothing physically comes into contact with the chocolate to be printed; keeping the mess and chance of contamination to a minimum. The leadscrew actuated plunger used in common paste extruders is removed in favor of a purely air powered system: a compressor pumps up a small reservoir tank with filtered and dried air, and the Marlin commands which would normally rotate the extruder stepper motor are intercepted and used to trigger an air valve. These bursts of pressurized air fill the empty area above the chocolate and force it out of the 0.8 mm nozzle.

In a normal 3D printer, the “melt zone” is tiny, which allows for the heater itself to be relatively small. But that won’t work here; the entire chocolate load has to be liquefied. It’s a bit like having to keep a whole roll of PLA melted during the entire print. Accordingly, the heater on the Cocoa Press is huge, and [Ellie] even had a couple spare heaters loaded up with chocolate syringes next to the printer to keep them warm until they’re ready to get loaded up.

Of course, getting your working material hot in a 3D printer is only half the battle, you also need to rapidly cool it back down if you want it to hold its shape as new layers are placed on top of it. A normal 3D printer can generally get away with a little fan hanging next to the nozzle, but [Ellie] found the chocolate needed a bit of a chill to really solidify.

So she came up with a cooling system that makes use of water-cooled Peltier units. The cold side of the Peltier array is inside a box through which air is forced, which makes its way through an insulated hose up to the extruder, where a centrifugal fan and 3D printed manifold direct it towards the just-printed chocolate. She reports this system works well under normal circumstances, but unusually high ambient temperatures can overwhelm the cooler.

While “the man” prevented show goers from actually eating any of the machine’s creations (to give out food in New York, you must first register with the city), they certainly looked fantastic, and we’re interested in seeing where the project goes from here.

These 3D Printed Supports Can Take Hard Use, Thanks To Resin Filling

Liquid two-part resins that cure into a solid are normally used for casting, and [Cuddleburrito] also found them useful to add strength and rigidity to 3D printed pillar supports. In this case, the supports are a frame for some arcade-style buttons, which must stand up to a lot of forceful mashing. Casting the part entirely out of a tough resin would require a mold, and it turns out that filling a 3D print with resin gets comparable benefits while making it easy to embed fastener hardware, if done right.

Cap design shows how the nut will be encased and the cap anchored even if the pillar is slightly underfilled with resin. The screw can be backed out after the resin cures.

Filling the inside of an object with some kind of epoxy or resin to reinforce it isn’t a new idea, but [Cuddleburrito] learned how a few small design considerations can lead to less messy and more successful results. The first is that resin can be poured with screws in place without any worry of trapping the screws in the resin, if done correctly. As long as only the threads of the screw are in the resin, they can be backed out after the resin has cured. Embedding nuts into the resin to act as fasteners becomes a much easier task when one can simply pour resin with both nut and screw in place, and remove the screw afterwards. A thin layer of a lubricant on the threads to act as a release may help, but [Cuddleburrito] didn’t seem to need any.

The second thing learned was that, for a pillar that needs a cap and embedded nut on both ends, it can be tricky to fill the object’s void with the perfect amount of required resin before capping it off. On [Cuddleburrito]’s first attempt, he underfilled and there wasn’t enough resin to capture the nut on the top lid of the pillar he was making. The way around this was to offset the nut on a riser, and design in either a witness hole or an overflow relief. A small drain hole or a safe area for runoff allows for filling things right up without an uncontrolled mess in the case of overfilling.

Something worth keeping in mind when experimenting in this area is that in general the faster a resin cures, the more it heats up in the process. It may be tempting to use something like 5 minute epoxy in a pinch, but the heat released from any nontrivial amount of it risks deforming a thin-walled 3D print in the process. For cases where resin would be overkill and the fasteners are small, don’t forget we covered the best ways to add fasteners directly to 3D printed parts.

Gaze Upon This Daft Punk Helmet’s Rows Of Utterly Perfect Hand-Soldered LEDs

The iconic robot helmets of Daft Punk feature prominently as challenging DIY hardware projects in their own right, and the results never disappoint. But [Nathaniel Stepp]’s photo gallery of his own version really sets the bar in both quality and attention to detail. The helmet uses a Teensy 3.2 as the main processor, and the visor consists of 328 hand soldered through-hole APA106 addressable RGB LEDs. A laser cut panel serves as the frame for the LEDs, and it was heat-formed to curve around the helmet and mate into the surrounding frame. Each LED is meticulously hand-soldered, complete with its own surface mount decoupling cap; there’s no wasted space or excess wire anywhere to be seen. It looks as if a small 3D printed jig was used to align and solder the LEDs one or two columns at a time, which were then transferred to the visor for final connections with the power bus and its neighboring LEDs.

After the whole array was assembled and working, the back of each LED appears to have then been carefully coated in what looks like Plasti-Dip in order to block light, probably to minimize the blinding of the wearer. A small amount of space between each LED allows the eyeballs inside the helmet to see past the light show in the visor.

The perfectly done array of LEDs in the visor is just one of the design elements showing the incredible workmanship and detail in [Nathaniel]’s helmet. His website promises more build details are coming, but in the meantime you can drink in the details shown in the aforementioned photo gallery.

With Halloween approaching, you might be interested in rolling your own Daft Punk inspired helmet. Not ready to do everything from scratch? No problem, because it’s never been easier to make your own with the help of a 3D printer and some LED strips.

[via SparkFun Blog]

Maker Faire NY: Infinite Autonomous 3D Printing

Although it’s not an idea that has yet trickled down to $200 printers drop-shipped from China, one of the most innovative ideas in the 3D printing world in the last few years is putting plastic down on a conveyor belt. Yes, MakerBot was doing it back in 2010, but we’re not going to talk about that. Printing on a conveyor belt instead of a static bed allows you to easily print multiples of an object autonomously, without any human interaction. If you’re really clever, you could rotate the hot end 45° and build a piece of plastic that is infinitely long, like the printer [Bill Steele] built, the Blackbelt, or ‘the CAD files might exist somewhere’ Printrbot infinite build volume printer.

At this year’s World Maker Faire, we didn’t see an infinite printer, but we did catch a glimpse of an idea that could reliably take 3D printers into production. It’s a Multiprinter Autonomous 3D Printer, designed and built by [Thomas Vagnini].

The idea of using 3D printers for production and manufacturing is a well-studied problem. Lulzbot has a heated room filled with printers they use to manufacture all their machines. Prusa’s manufacturing facility is similarly well-equipped. However, both of these setups require helper monkeys to remove a part from the bed and set the machine up for the next print.

Instead of a strictly manual process, [Thomas]’ machine uses a sort of cartridge-based system for the printing bed. The glass beds are stored in a cassette, and for the first print, the printer pulls a bed onto the heated build plate through a system of conveyors. When the print is finished, the part and the bed ar fed into a rotating cassette, where it can be removed by a tech, prepped for the next print, and placed back in the ‘bed feeder’. It’s a system that brings the manual intervention cycle time of a 3D printer down to zero. If you’re producing hundreds of parts, this will drastically speed up manufacturing.

While it is a relatively niche idea, this is a very well-designed machine. It’s all laser cut, uses core-XY mechanics, and with the right amount of tuning, it does exactly what it says it will do. It’s not for everybody, but that’s sort of the point of manufacturing parts on a 3D printer.

Prusa Introduces A Resin Printer At Maker Faire NY

For one reason or another, the World Maker Faire in New York has become the preeminent place to launch 3D printers. MakerBot did it with the Thing-O-Matic way back when, and over the years we’ve seen some interesting new advances come out of Queens during one special weekend in September.

Today Prusa Research announced their latest creation. It’s the resin printer you’ve all been waiting for. The Prusa SL1 is aiming to become the Prusa Mk 3 of the resin printer world: it’s a solid printer, it’s relatively cheap (kit price starts at $1299/€1299), and it produces prints that are at least as good as resin printers that cost three times as much.

The tech inside the SL1 is about what you’d expect if you’ve been following resin printers for a while. The resin is activated by a bank of LEDs shining through a photomask, in this case a 5.5 inch, 1440p display. Everything is printed on a removable bed that can be transferred over to a separate ‘curing chamber’ after the print is done. It’s more or less what you would expect, but there are some fascinating refinements to the design that make this a resin printer worthy of carrying the Prusa name.

Common problems with a masked SLA printer that uses LEDs and an LCD are the interface between the LCD and the resin, and the temperature of the display itself. Resin is not kind to LCD displays, and to remedy this problem, Prusa has included an FEP film on the bottom of the removable tank. This is a user-replaceable part (technically a consumable, at least to the same extent as a PEI build plate on a filament printer), and Prusa will be selling those as spare parts on their store. The LCD is also cooled; one of the major drawbacks of shining several watts of UV through an LCD is the lifetime of the display. Cooling the display helps, and should greatly increase the lifetime of the printer. All of this is wrapped up in an exceptionally heavy metal case with the lovely hinged UV-opaque orange plastic lid.

Of course, saying you’ve built a resin printer is one thing, but how do the prints look? Exceptional. The Prusa booth at Maker Faire was loaded up with sample prints from the machine, and they’re of the same high quality you would expect from the Form 3D printers that have been the go-to in the resin printer world. The Prusa SLA also works with big-O Open resins, meaning you’re not tied to a single resin vendor.

This is just the announcement of the Prusa resin printer, but they are taking preorders. The price for the kit — no word on how complex of a kit it is — is $1300, while the assembled printer is $1600, with the first units shipping in January.