My precision mechanism adjuster. NSFW. As in if you use one of these to adjust a precision mechanism at work you'll get fired. Home use is fine tho;)

Fail Of The Week: My 3D Printer Upgrade

After years of cutting my hands on the exposed threads of my Prusa Mendel i2, it was time for a long overdue upgrade. I didn’t want to just buy a new printer because it’s no fun. So, I decided to buy a new frame for my printer. I settled on the P3Steel, a laser cut steel version of the Prusa i3. It doesn’t suffer from the potential squaring problems of the vanilla i3 and the steel makes it less wobbly than the acrylic or wood framed printers of similar designs.

My trusty i2. Very sharp. It... uh.. grew organically.
My trusty i2. Very sharp. It… uh.. grew organically.

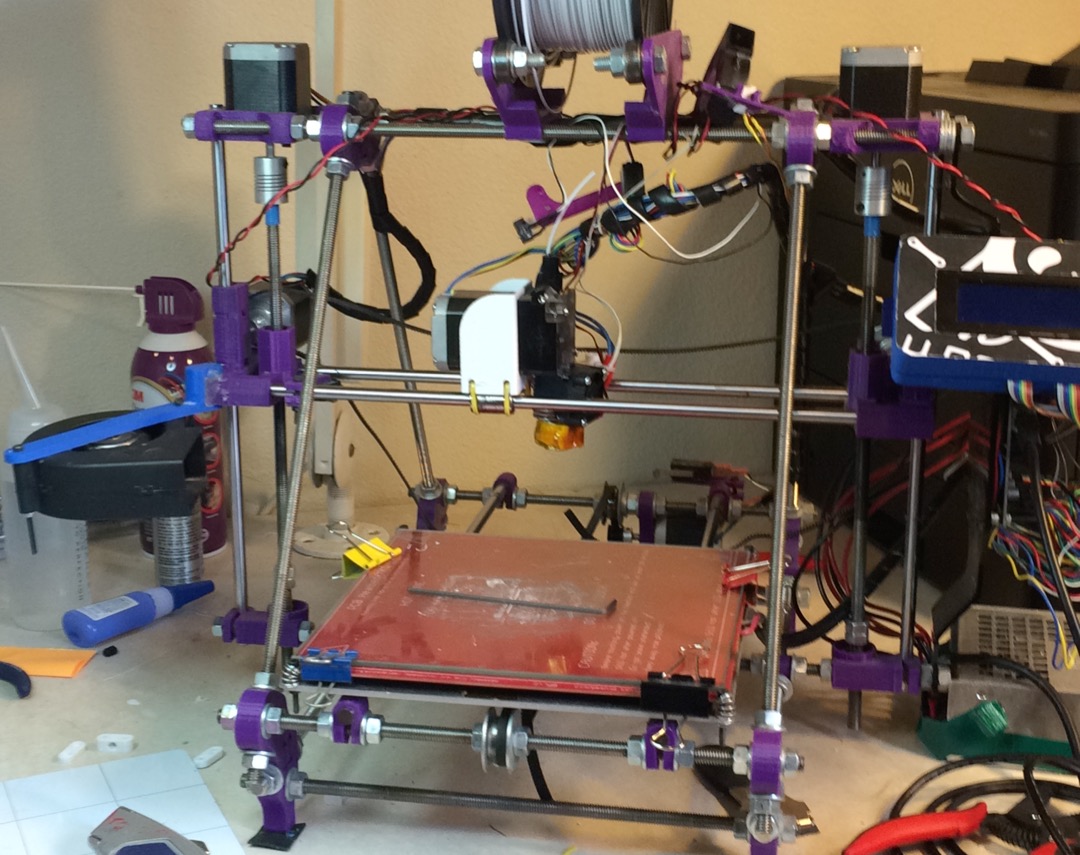
I expected a huge increase in reliability and print quality from my new frame. I wanted less time fiddling with it and more time printing. My biggest hope was that switching to the M5 threaded screw instead of the M8 the i2 used would boost my z-layer accuracy. I got my old printer working just long enough to print out the parts for my new one, and gleefully assembled my new printer.

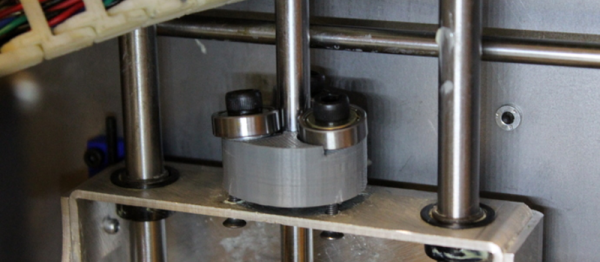
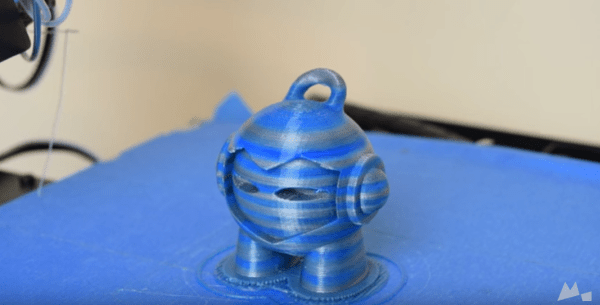
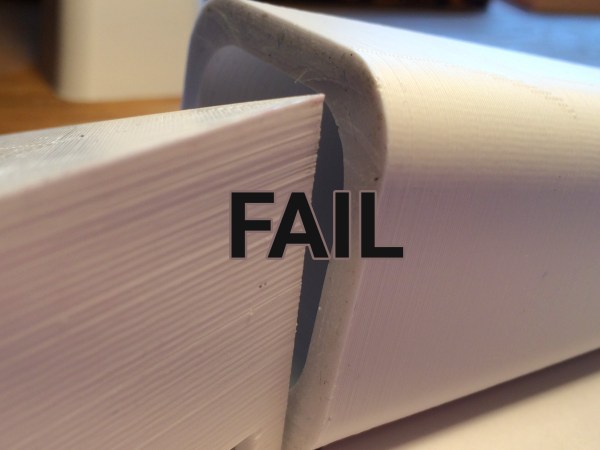
I didn’t wait until all the electronics were nicely mounted. No. It was time. I fired it up. I was expecting the squarest, quietest, and most accurate print with breathtakingly aligned z-layers. I did not get any of that. There was a definite and visible ripple all along my print. My first inclination was that I was over-extruding. Certainly my shiny new mechanics could not be at fault. Plus, I built this printer, and I am a good printer builder who knows what he’s doing. Over-extruding looks very much like a problem with the Z-axis. So, I tuned my extrusion until it was perfect.

Continue reading “Fail Of The Week: My 3D Printer Upgrade”

Japanese Lab Builds 5-Axis 3D Printer

A Japanese lab is investing some time in the possibilities of a 5-axis 3D printer. They show it printing using five axis as well as doing finish machining on a printed part. We’ve covered parts of why this is the right direction to go for 3D printing in another post.

It looks like they have modified an existing industrial machining center for use with a 3D printing nozzle. This feels like cheating, but it’s the right way to go if you want to start playing with the code early. The machines are intensely accurate and precise. After all, building a five axis machine is a well known science, 3D printing with one opens a whole new field of research.

There isn’t too much to show in the video, other than it’s possible and people are doing it. The Five-axis 3D printing and machining is uninteresting, we have been able to machine plastic for a long time.

However, they show one blue part in which the central axis of the part was printed vertically, but revolute splines along its outer perimeter were printed normal to the surface of the already printed 3D part. Which is certainly not commonly done. Video after the break.

Continue reading “Japanese Lab Builds 5-Axis 3D Printer”

The MakerBot Obituary

MakerBot is not dead, but it is connected to life support waiting for a merciful soul to pull the plug.

This week, MakerBot announced it would lay off its entire manufacturing force, outsourcing the manufacturing of all MakerBot printers to China. A few weeks ago, Stratasys, MakerBot’s parent company, released their 2015 financial reports, noting MakerBot sales revenues have fallen precipitously. The MakerBot brand is now worth far less than the $400 Million Stratasys spent to acquire it. MakerBot is a dead company walking, and it is very doubtful MakerBot will ever be held in the same regard as the heady days of 2010.

How did this happen? The most common explanation of MakerBot’s fall from grace is that Stratasys gutted the engineering and goodwill of the company after acquiring it. While it is true MakerBot saw its biggest problems after the acquisition from Stratasys, the problems started much earlier.

Continue reading “The MakerBot Obituary”

Threadless Ballscrew For 3D Printer

[2n2r5] posted up a mechanism that we’d never seen before — a threadless ballscrew that turns rotational into linear motion with no backlash. It works by pressing the edge of three bearings fairly hard up against a smooth rod, at an angle. The bearings actually squeeze the rod a little bit, making a temporary indentation in the surface that works just like a screw thread would. As the bearings roll on, the rod bounces back to its original shape. Watch it in action in the video below.

Continue reading “Threadless Ballscrew For 3D Printer”

Colored Filament From A Can

On the last day of MRRF, the guys from Lulzbot were printing a vase with some clear Taulman t-glase on their TAZ 6 prototype. It was probably the third or fourth one they had printed, but I was compelled to go over there because they were painting the filament with a blue Sharpie right before it went into the extruder.

It immediately made me think of this video that hit our tips line last fall and fell through the cracks—a short one from [Angus] at Maker’s Muse about creating your own colored filament by spraying clear PLA with cheap spray paint. This is a neat alternative to painting a finished print because the color isn’t going to rub off. The pigment fuses with the PLA in the hot end, providing consistent coloring.

Disclaimer time: [Angus] ran his spray-painted PLA through a WANHAO i3, which is a cheap, modified Prusa that actually has pretty good reviews. The point is, he doesn’t care if the nozzle gets clogged. But the nozzle didn’t clog. Nothing bad happened at all, and the prints turned out great. As you can see in the video after the break, he tried silver and blue separately on short lengths of filament, and then alternated the colors to make the striped Marvin in the main image. [Angus]’ main concern is that the paint probably affects the strength of the print.

Have you tried spray painting filament? How did it go? Let us know in the comments. If you long to print in any color on the cheap but don’t want to seriously risk clogging your hot end, there’s always the drilled-out Sharpie method.

Continue reading “Colored Filament From A Can”

Using Rapid Prototyping To Make A Clock

[Markus] is attending the Royal Institute of Technology in Stockholm. For his Advanced Prototyping class he had to make something using rapid prototyping technology — i.e. 3D printers, laser cutters, and breadboards. He chose to make a fantastic looking clock.

He started by designing the entire thing in CAD. The base is 3D printed on a Ultimaker. The world clock display is a piece of laser engraved acrylic which he heated up and curved to fit. Using an Arduino and a 16×2 LCD matrix he created a simple clock program with the ability to show different time zones. The way you select them is very clever.

Continue reading “Using Rapid Prototyping To Make A Clock”

Milk-Based 3D Scanner

3D scanners don’t have to be expensive or high-tech because all of the magic goes on in software. The hardware setup just needs to gather a bunch of cross-sections. In perhaps the lowest-tech of scanners that we’ve seen, [yenfre]’s GotMesh scanner uses milk.

Specifically, the apparatus is a pair of boxes, one with a hole drilled in it. You put the object in the top box and fill it with milk to cover the object. A camera takes pictures of the outline of the object in the milk as it drains out the hole, these get stitched together, and voilà.

There are limitations to this method. The object gets soaked in milk, so it won’t work for scanning sand-castles. (It’s optimally suited for chocolate-chip cookies, in our opinion.) If the camera is located directly above, the objects have to get wider as the milk drains out. You can do multiple takes with the object rotated at different angles or use multiple cameras to solve this problem. The edge-detection software will have issues with white objects in milk, so maybe you’ll want to scan that porcelain figurine in coffee, but you get the idea. More seriously, the rate of milk drain will slow down a bit as the amount of milk in the upper box decreases. This could also be handled in software.

In all, we’re not surprised that we don’t see commercial versions of this device, but we love the idea. It’s based on this experiment where they dip a guy in a tank of ink! If you just drank all your milk, but still have a line-laser lying around, maybe this build is more your speed. What’s your cheapest 3D scanner solution?