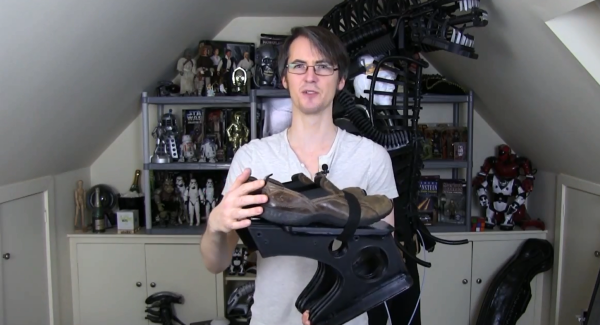
3D printed Chivalry Medieval Warfare Mace

3D Printing Models From Computer Games

Wouldn’t it be cool to extract 3D models from your favorite video games and then 3D print them? As it turns out, it’s pretty easy to do!

In the following video tutorial he shows us how to extract the 3D meshes from a video game called Chivalry, Medieval Warfare. The game is based on the unreal engine which makes it super easy to get the files.

Quick note on legality: If you choose to rip 3D models from your video games and print them, make sure you’re just printing them for yourself, not to sell. 

To start, you’ll need a few pieces of software to help you out. First up is something called Umodel, which is an Unreal Engine Resource Viewer, which allows you to view and extract files from any game that uses the Unreal Engine. Once you find your model in the game directory, you can open it up in Umodel and save it as a .PSK file. From there you can open .PSK files with another program called Milkshape 3D, and then export in .OBJ file. Finally you can use MeshMixer to import .OBJ files, repair the mesh by removing the extra shells (you can use the cloud NetFabb service to help repair files for 3D printing as well), and then finally save as .STL ready to print.

Continue reading “3D Printing Models From Computer Games”

Flying Bird RC

Mechanical Bird Actually Flies By Flapping Its Wings

Turns out you don’t have to be a multi-million dollar corporation like Festo to create a remote controlled, flapping bird robot. [Kazuhiko Kakuta] is a medical Doctor of Allergy, and in his free time he likes to build flying mechanical birds with his son.

It has just over a meter wingspan, weighs 193 grams, and it flies by flapping its wings. The majority of its components are 3D printed. If that’s not impressive enough for you as is, consider this. It it has no sensors, no gyroscopes or anything — it’s all manually controlled by [Kazuhiko].

And this isn’t even the only ornithopter he’s done. He’s also created something out of an anime film, Castle in the Sky. He even sells the designs for one of them, to be printed via Shapeways.

Continue reading “Mechanical Bird Actually Flies By Flapping Its Wings”

Paper Plane Machine Gun

Paper Plane Folding Machine Gun Is A Mechanical Marvel

A German man has just finished a very impressive Paper Airplane Machine Gun, or a Papierflieger-Maschinenpistole, which just sounds so much cooler. It actually takes a stack of paper, folds it into paper air planes and shoots them.

The device takes a stack of what looks like post-card size paper in the “clip”, forms them into paper air planes by a series of rollers and folding edges and then launches them out of the end. A cheap electric screwdriver powers the entire drive train, which allows him to shoot around 20 planes per minute (PPM?).

Sadly there’s really not too much information on how it works, nor the files to reproduce it. [Papierfliegerei], as he goes by on YouTube, decided to build this awesome contraption to show off just what 3D printers are capable of these days. He designed the whole thing in 3D CAD and had many of the parts printed off at a 3D printing company called fabberhouse.de, while the rest of the components are off the shelf.

Continue reading “Paper Plane Folding Machine Gun Is A Mechanical Marvel”

CNC Router Converted to 3D Printer

CNC Router Converted To 3D Printer

3D Printers have come down significantly in price over the past few years. Nowadays it is even possible to get a 3D printer kit for between $200-300. It’s arguable how well these inexpensive printers perform. [Jon] wanted a printer capable of quality prints without breaking the bank. After researching the different RepRap types that are available he concluded he really wasn’t up for a full machine build. He had previously built a CNC Router and decided it was best to add a hot end and extruder to the already built 3 axis frame.

The CNC Router frame is made from aluminum, is very rigid and has a 2′ by 2′ cutting area. All axes glide smoothly on THK linear bearings and are powered by NEMA 23 motors driven by Gecko 540 stepper drivers. The router was removed from the machine but the mounting bracket was left on. The bracket was then modified to hold the extruder and hot end. With 3D Printers there is typically a control board specifically designed for the task with dedicated outputs to control the temperature of the hot end. Since [Jon] already had the electronics set up for the router, he didn’t need a specialized 3D Printer control board. What he does need is a way to control the temperature of the hot end and he did that by using a stand-alone PID. The PID is set manually and provides no feedback to the computer or control board.

Huge Whistle[Jon] used liked Mach3 for controlling his CNC Router so he stuck with it for printing. He’s tried a few slicers but it seems Slic3r works the best for his setup. Once the g-code is generated it is run though Mach3 to control the machine. [Jon] admits that he has a way to go with tweaking the settings and that the print speed is slower than most print-only machines due to the mass of the frame’s gantry and carriage. Even so, his huge whistle print looks pretty darn good. Check it out in the video after the break…

Continue reading “CNC Router Converted To 3D Printer”

Printer bed leveling with a solenoid probe

Bed Leveling With A Solenoid Actuator

Ah, the woes of printer bed leveling. Unless you have a fancy 3D printer, bed leveling is a tedious task. [Rupin] got tired of messing around with his printer, so he decided to make his very own bed leveling sensor.

The goal was to create a Z-axis probe that works as both an auto-leveling sensor and as an end stop. He originally was trying to design something using a servo motor probe, but ended up chucking the idea since the motor was noisy and calibration was difficult.

He’s since switched over to use a solenoid actuator with an optoisolator to determine the position. The actuator extends an M3 screw which will touch the bed — as the position is adjusted, it is possible to adjust the bed using software for a perfectly level bed, every time.

Continue reading “Bed Leveling With A Solenoid Actuator”

THP Hacker Bio: Neil Jansen

If we were running a contest to give away a trip to space for building the most innovative open hardware project a few years ago, the winner would inevitably be a 3D printer. Times have changed, 3D printing is reaching the limits of what can be done with simple plastic extrusion, and there are new hardware challenges to be conquered. One of the challenges facing hardware designers is the ability to create and assemble electronic circuits quickly. For that, there are a few pick and place machines being developed, the lowest cost being the FirePick Delta. It sells itself as a $300 pick and place machine borrowing heavily from the RepRap project, enabling tinkerers and engineers to assemble PCBs quickly.

[Neil Jansen] is the project lead for the FirePick Delta, and along with team members ranging from software developers in the bay area, to electronics technicians and high school students, they’ve created what will become the lowest cost and most capable pick and place machine available. Already the machine has tape feeders, tray feeders, a vision system, and modules to dispense solder paste. It’s an astonishing accomplishment, and were it not for some damage in shipping, we would have a video of [Neil] demoing the FirePick at Maker Faire NY.

In lieu of that, we do have a bio on [Neil] and what challenges he’s faced in building the FirePick. You can read that below, or check out their second demo video for The Hackaday Prize:

https://www.youtube.com/watch?v=46pLeLBYVTs

Continue reading “THP Hacker Bio: Neil Jansen”

3D Printing Of Parameterized Speaker Enclosures

Despite what you would gather from looking at a mess of wires, carpet, and MDF in the back of a Honda Civic hatchback, building speaker enclosures is a pretty complex business. To get the right frequency response, you’ll need to take into account the driver’s resonant frequency, the volume of any internal components, and how well the speaker works when it reaches the resonant frequency. Heady stuff, but when [Rich] at NothingLabs started 3D printing his own speaker enclosures, he realized he could calculate an ideal enclosure automatically. Ah, the joys of OpenSCAD.

[Rich] wrote a bit of OpenSCAD and put it up on the Thingiverse Customizer, allowing anyone to manually enter a box volume, height and width ratio, size for a speaker hole, and even bass ports.

There are a few really cool features for this way of constructing speaker enclosures; assembly is a snap, and it’s most likely air tight right out of the printer. [Rich] printed an enclosure for a 3″ driver that has a frequency response down to 66Hz – an extremely impressive piece of work. Video below.

Continue reading “3D Printing Of Parameterized Speaker Enclosures”