MH-Z19-like NDIR CO2 Sensor HC8 Found And Explored

While on the search for an alternative to directly buying the fairly expensive MH-Z19 CO2 sensor, [spezifisch] came across a ‘BreeRainz’ branded gadget (also found under other brands) that claimed to use an NDIR (Non-Dispersive Infrared) sensor for measuring CO2 levels, while costing only €25. This type of sensor allows for CO2 levels to be measured directly, rather than inferred, making them significantly more precise.

The BreeRainz DM1308A device cracked open.

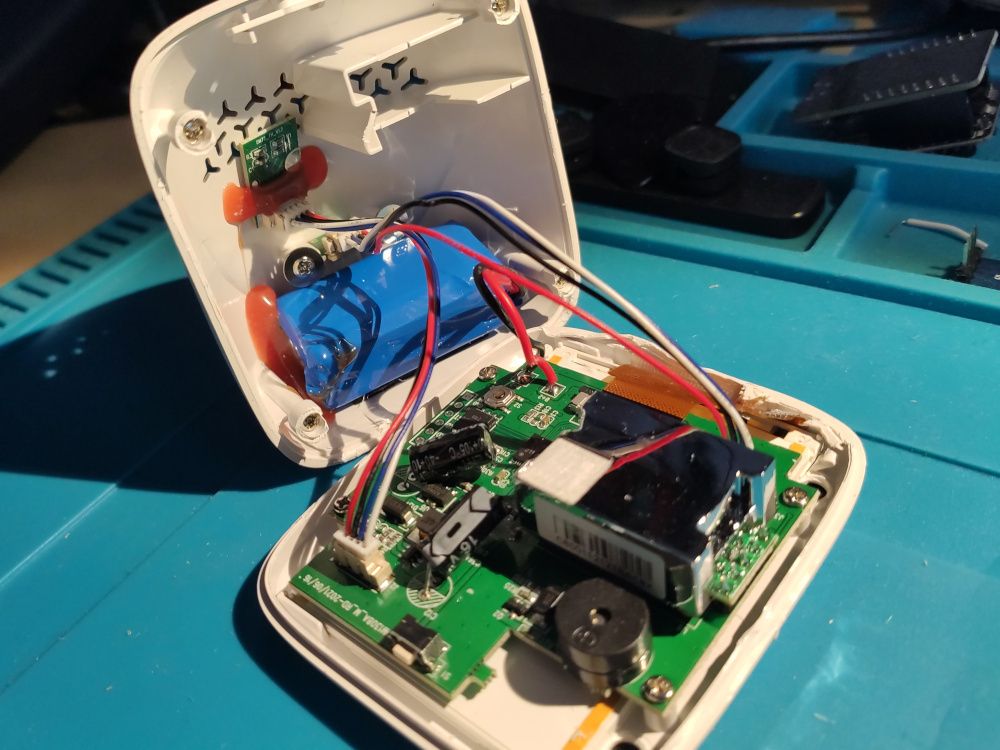
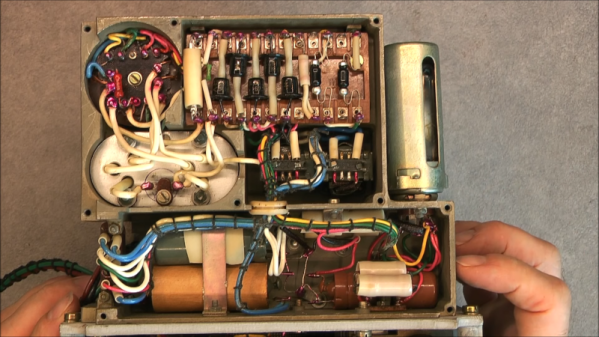
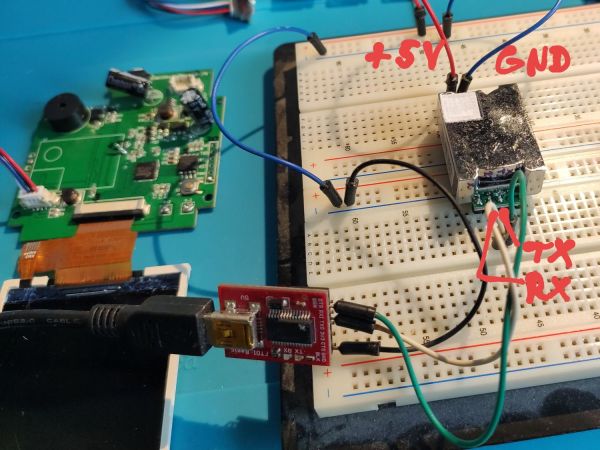
After cracking the gadget open (literally, due to the hidden screws), the CO2 sensor is clearly visible. While superficially identical to an MH-Z19, the NDIR sensor is actually called ‘HC8’, is produced by 广州海谷电子科技有限公司 (Guangzhou Haigu Electronic Technology Co., Ltd.). While being pin-compatible with the MH-Z19, its UART protocol is not the same. Fortunately there is a datasheet to help with implementing it, which is what [spezifisch] did.

This raises the question of whether harvesting NDIR CO2 sensors like this is worth it to save a few Euros. A quick look on German Amazon shows that the device in question currently costs €35, while a genuine MH-Z19 can be bought for €25 or less. There are also many MH-Z19 models (B, C and D), which cover an even wider price range. All of which points to finding an NDIR sensor-containing device can be interesting when it’s on sale, but if all you care about is the sensor itself, it’s probably best to just buy them directly.

Frequency Counter Restoration Impeded By Kittens

We think of digital displays as something you see on relatively modern gear. But some old gear had things like nixies or numitrons to get cool-looking retro digital displays. The HP 521A frequency counter, though, uses four columns of ten discrete neon bulbs to make a decidedly low-tech but effective digital display. [Usagi Electric] has been restoring one of these for some time, but there was a gap between the second and third videos as his workshop became a kitten nursery. You can see the last video below.

In previous videos, he had most of the device working, but there were still some odd behavior. This video shows the final steps to success. One thing that was interesting  is that since each of the four columns are identical, it was possible to compare readings from one decade to another.

However, in the end, it turned out that the neon bulbs were highly corroded, and replacing all the neon bulbs made things work better. However, the self-check that should read the 60 Hz line frequency was reading 72 Hz, so it needed a realignment. But that was relatively easy with a pot accessible from the back panel. If you want to see more details about the repair, be sure to check out the earlier videos.

We love this old gear and how clever designers did so much with what we consider so little. We hate to encourage your potential addiction, but we’ve given advice on how to acquire old gear before. If you want to see what was possible before WS2812 panels, you could build this neon bulb contraption.

Continue reading “Frequency Counter Restoration Impeded By Kittens”

Soviet-Era Test Gear Defects To YouTube

If you want to work on communication gear — especially in the 1960s — you probably wanted a VTVM (a vacuum tube voltmeter), a way to generate frequencies, and a way to measure frequencies and power. The Soviet military had a piece of portable gear that could do all of this, the IK-2, and [msylvain59] shows up how one looked on the outside and the inside in the video below. Be warned, though. The video is hard to stop watching and it runs for over an hour, so plan accordingly.

We don’t read Russian, but based on the video, it looks like the lefthand piece of gear is a frequency generator that runs from 20 to 52 MHz and a power meter. The right-hand instrument is a VTVM that has some way to measure frequency and the center section is a quartz crystal frequency standard.

Continue reading “Soviet-Era Test Gear Defects To YouTube”

Fridge Compressor Teardown Reveals Engineering Compromises

Probably one of the most reliable devices you will have in your house is the refrigerator, as its compressor has the minimum of moving parts and carries its own lubrication. It’s not uncommon to find fridges many decades old still in use, and fridges are far more likely to be discarded due to broken fittings rather than a failed compressor. An interesting teardown of a failed fridge compressor comes from [turbokinetic], who gives us a professional analysis of how shortcomings in its construction caused it to fail. It’s both an opportunity for a look at the inside of a fridge compressor, and a commentary on the quality of consumer grade hardware.

Electrically the unit seemed unhurt, but the motor wouldn’t pump anything. Cutting the lid off revealed the motor, and it was soon established that the bearing had failed. As the teardown proceeded the conclusion was that the fault lay in the oil being too low viscosity. The designer had picked a very light oil in pursuit of low friction for lower energy consumption, but had ended up with one too light to provide adequate coverage within the bearing. The compressor has a lifetime of around ten years baked into it from manufacture, whether the designer intended it to or not.

You can see the full video below the break, but meanwhile this isn’t the first fridge compressor we’ve seen.

Continue reading “Fridge Compressor Teardown Reveals Engineering Compromises”

Mapping Out The LEDs On An Outlet Tester

The concept of an outlet tester is pretty simple: plug the gadget into a suspect wall receptacle, and an array of LEDs light up in various patterns to alert the user to any wiring faults. They’re cheap, reliable, and instantaneous. Most people wouldn’t give them much more thought than that, but like any good hacker, [Yeo Kheng Meng] wanted to know how these devices worked.

After picking up a relatively advanced model that featured an LCD display capable of showing various stats such as detected voltage in addition to the standard trio of LEDs, he started by using some test leads to simulate various fault conditions to understand the basic principle behind its operation. The next step was to disassemble the unit, which is where things went briefly sideways — it wasn’t until [Yeo Kheng Meng] and a friend had nearly cut through the enclosure that they realized it wasn’t ultrasonically welded liked they assumed, and that the screws holding it together were actually hidden under a sticker. Oops.

The write-up includes some excellent PCB shots, and [Yeo Kheng Meng] was able to identify several components and ascertain their function. He was even able to find some datasheets, which isn’t always such an easy task with these low-cost devices. Unfortunately the MCU that controls the device’s more advanced features is locked away with a black epoxy blob, but he was able to come up with a schematic that explains the rather elegant logic behind the LED display.

This isn’t the first time [Yeo Kheng Meng] has taken apart an interesting piece of hardware for our viewing pleasure, and given the fine job he does of it, we hope it’s not the last either.

Teardown: How Many Teddy Ruxpins Does It Take To Start A Coven?

Well, I did it. I conquered my childhood fear of talking bears and brought a vintage Teddy Ruxpin animatronic stuffed bear into my home. There were and still are plenty of his brethren both young and old to choose from on the auction sites, and when I saw this particularly carefree barefoot Teddy in his Hawaiian shirt and no pants, I was almost totally disarmed. Plus, the description promised a semi-working unit with a distorted voice, and who among us could resist a specimen in such condition? Maybe the tape deck motor is going out, or it just needs a new belt. Maybe the tape itself messed up, and Teddy is fine. I had to find out.

But let me back up a bit. If you don’t know what I’m talking about, Teddy Ruxpin was a revolutionary toy that dropped in 1985. It’s a talking teddy bear that reads stories aloud, all the while moving his eyes and mouth to the sounds. Along with Teddy came special cassette tapes, corresponding story books, and outfits. I wanted one when I was a kid, but was also kind of scared of them. Since they were so expensive — about $250 inflation-adjusted for the bear and a single tape / book / outfit, plus another $15 for four D cells — I never did get one in my youth.

Continue reading “Teardown: How Many Teddy Ruxpins Does It Take To Start A Coven?”

A VCR with NICAM support.

Remembering NICAM: Deep-Dive Into A Broadcasting Legacy

Although for many the introduction of color television would have seemed to be the pinnacle of analog broadcast television, the 1970s saw the development of stereo audio systems to go with TV broadcasts, including the all-digital NICAM. With NICAM broadcasts having ceased for about a decade now, the studio equipment for encoding and modulating NICAM can now be picked up for cheap. This led [Matthew Millman] to not only buy a stack of Philips NICAM studio gear, but also tear them down and set up a fully working NICAM encoding/decoding system with an Arcam Delta 150 as receiver and Philips PM5687 encoder.

Philips PM5687 with lid off.

Finally, the Philips PM5688 test receiver is analyzed. This is the component that studios would have used to ensure that the NICAM encoding and modulating systems were working properly. Although public NICAM broadcasts started in the late 1980s, the system was originally developed to enable point to point transfers of audio data within a transmission system. This was made very easy due to the digital nature of the system, and made enabling it for public broadcasts relatively straightforward once receivers became affordable enough.

Of note is that NICAM was only ever used in Europe and some Asian-Pacific countries, with others using the German Zweikanalton. This was a purely analog (two FM channels) system, and the US opted to use its MTS system, that was quite similar to the German system in terms of transmitting multiple FM channels alongside the TV signal. With digital TV gradually overtaking analog TV transmissions, the future of NICAM, MTS and others was sealed, leaving us with just these time capsules we can build up using old studio equipment.