Classroom Gadget Turned Arduino Compatible

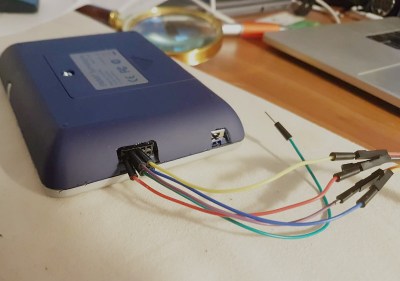
Cheap second-hand hardware is usually a fertile ground for hacking, and by looks of this project, the digital classroom aids that were all the rage a few years back are no exception. [is0-mick] writes in to tell us how he managed to hack one of these devices, a SMART Reponse XE, into an Arduboy compatible game system. As it turns out, this particular gadget is powered by an ATmega128RFA, which is essentially an Arduino-compatible AVR microcontroller with a 2.4GHz RF transceiver tacked on. This makes it an extremely interesting platform for hacking, especially since they are going for as little as $3 USD on eBay.

There’s no USB-Serial converter built into the SMART Response XE, so you’ll need to provide your own external programmer to flash the device. But luckily there’s a labeled ISP connector right on the board which makes it pretty straightforward to get everything wired up.

Of course, getting the hardware working was slightly more complicated than just flashing an Arduino Sketch onto the thing. [is0-mick] has provided his bootloader and modified libraries to get the device’s QWERTY keyboard and ST7586S controlled 384×160 LCD working.

Playing games is fun, but when his friend [en4rab] sent him the SMART Response XE to fiddle with, the goal was actually to turn them into cheap 2.4 GHz analyzers similar to what was done with the IM-ME. It seems they’re well on their way, and [is0-mick] invites anyone who might be interested in filling in some of the blanks on the RF side to get involved.

Continue reading “Classroom Gadget Turned Arduino Compatible”

Open Source Laboratory Rocker Is Super Smooth

Lab equipment is often expensive, but budgets can be tight and not always up to getting small labs or researchers what they need. That’s why [akshay_d21] designed an Open Source Lab Rocker with a modular tray that uses commonly available hardware and 3D printed parts. The device generates precisely controlled, smooth motion to perform automated mild to moderately aggressive mixing of samples by tilting the attached tray in a see-saw motion. It can accommodate either a beaker or test tubes, but since the tray is modular, different trays can be designed to fit specific needs.

Source code and schematics are available from [akshay_d21]’s Google Drive and the 3D models are also available from the National Institute of Health’s 3D Print Exchange. A demonstration video is embedded below, in which you can see how smooth and controlled the motions are.

Continue reading “Open Source Laboratory Rocker Is Super Smooth”

Arduino Powered Arcade Button Lighting Effects

As if you already weren’t agonizing over whether or not you should build your own arcade cabinet, add this one to the list of compelling reasons why you should dedicate an unreasonable amount of physical space to playing games you’ve probably already got emulated on your phone. [Rodrigo] writes in to show off his project to add some flair to the lighted buttons on his arcade controller. (Google Translate)

The wiring for this project is about as easy as you’d expect: the buttons connect to the digital inputs on the Arduino, and the LEDs on the digital outputs. When the Arduino code sees the button getting pressed, it brings the corresponding LED pin high and starts a fade out timer using the SoftPWM library by [Brett Hagman].

It’s worth noting that the actual USB interface is being done with a stand-alone controller, so the Arduino here is being used purely to drive the lighting effects. The more critical reader might argue that you could do both with a single microcontroller, but [Rodrigo] was in a classic “Use what you’ve got” situation, and already had a USB controller on hand.

Of course, fancy lit arcade buttons won’t do you much good without something to put them in. Luckily we’ve covered some fantastic looking arcade cabinets to get you inspired.

Continue reading “Arduino Powered Arcade Button Lighting Effects”

Teensy Hat Controls Games

[Carson] didn’t know how to use an accelerometer until he wired one up to a Teensy and put it all in a hat. The result is a joystick that will probably cause you neck problems if you play video games for very long. You can see a video of how the device came to be and how it works, below.

We liked the approach of building up the circuit and testing it before integrating it with the hat. He used a small breadboard with half the Teensy pins hanging off. That seems to work, although we’d be worried about something shorting or floating pins causing issues. Of course, if you drove the disconnected pins as outputs or inputs with pullups that might not be a big deal.

Continue reading “Teensy Hat Controls Games”

Stepper Motor? Encoder? It’s Both!

We always think it is interesting that a regular DC motor and a generator are about the same thing. Sure, each is optimized for its purpose, but inefficiencies aside, you can use electricity to rotate a shaft or use a rotating shaft to generate electricity. [Andriyf1] has a slightly different trick. He shows how to use a stepper motor as an encoder. You can see a video of the setup below.

It makes sense. If the coils in the stepper can move the shaft, then moving the shaft should induce a current in the coils. He does note that at slow speeds you can miss pulses, however. Again, the device isn’t really optimized for this type of operation.

The circuit uses an opamp-based differential amplifier to read the pulses from the coil. Two opamps on two coils produce a quadrature signal just like a normal encoder. When the shaft turns in one direction, one pulse will lead the other. In the other direction, the lead pulse will be reversed.

There’s code to let an Arduino read the pulses. And here’s plenty of code that will read quadrature on an Arduino or other processors. We’ve seen similar hacks done with hard drive motors which are quite similar, by the way.

Continue reading “Stepper Motor? Encoder? It’s Both!”

Mademoiselle Pinball Table Gets Rock ‘n Roll Makeover

Once upon a time, there was a music venue/artist collective/effects pedal company that helped redefine industry in Williamsburg, Brooklyn. That place was called Death By Audio. In 2014, it suffered a death by gentrification when Vice Media bought the building that DBA had worked so hard to transform. From the ashes rose the Death By Audio Arcade, which showcases DIY pinball cabinets made by indie artists.

Their most recent creation is called A Place To Bury Strangers (APTBS). It’s built on a 1959 Gottlieb Mademoiselle table and themed around a local noise/shoegaze band of the same name that was deeply connected to Death By Audio. According to [Mark Kleeb], this table is an homage to APTBS’s whiz-bang pinball-like performance style of total sensory overload. Hardly a sense is spared when playing this table, which features strobe lights, black lights, video and audio clips of APTBS, and a fog machine. Yeah.

[Mark] picked up this project from a friend, who had already cut some wires and started hacking on it. Nearly every bit of the table’s guts had to be upgraded with OEM parts or else replaced entirely. Now there’s a Teensy running the bumpers, and another Teensy on the switches. An Arduino drives the NeoPixel strips that light up the playfield, and a second Uno displays the score on those sweet VFD tubes. All four micros are tied together with Python and a Raspi 3.

If you’re anywhere near NYC, you can play the glow-in-the-dark ball yourself on July 15th at Le Poisson Rouge. If not, don’t flip—just nudge that break to see her in action. Did we mention there’s a strobe light? Consider yourself warned.

Want to get into DIY pinball on a smaller scale? Build yourself a sandbox and start playing.

Continue reading “Mademoiselle Pinball Table Gets Rock ‘n Roll Makeover”

Supersize DIY R/C Servos From Windscreen Wipers

We’re all familiar with the experience of buying hobby servos. The market is awash with cheap clones which have inflated specs and poor performance. Even branded servos often fail to deliver, and sometimes you just can’t get the required torque or speed from the small form factor of the typical hobby servo.

Enter [James Bruton] and his DIY RC servo from a windscreen wiper motor. Windscreen wiper motors are cheap as chips, and a classic salvage. The motor shaft is connected to a potentiometer via a pulley and some string, providing the necessary closed-loop feedback. Instead of using the traditional analog circuitry found inside a servo, an Arduino provides the brains. This means PID control can be implemented on the ‘duino, and tuned to get the best response from different load characteristics. There’s also the choice of different interfacing options: though [James]’ Arduino code accepts PWM signals for a drop-in R/C servo replacement, the addition of a microcontroller means many other input signal types and protocols are available. In fact, we recently wrote about serial bus servos and their numerous advantages.

We particularly love this because of the price barrier of industrial servomotors; sure, this kind of solution doesn’t have the precision or torque that off-the-shelf products provide, but would be sufficient for many hacks. Incidentally, this is what inspired one of our favourite open source projects: ODrive, which focuses on harnessing the power of cheap brushless motors for industrial use.

Continue reading “Supersize DIY R/C Servos From Windscreen Wipers”