WiFi and Bluetooth were never meant to be the radios used by a billion Internet of Things hats, umbrellas, irrigation systems, or any other device that makes a worldwide network of things interesting. The best radio for IoT is something lightweight which operates in the sub-Gigahertz range, doesn’t need a lot of bandwidth, and doesn’t suck down the power like WiFi. For the last few years, a new low-power wireless communication standard has been coming on the scene, and now this protocol — LoRa — will soon be available in an Arduino form factor.
The Primo, and NRF


It’s not LoRa, but the Arduino Primo line is based on the ESP8266 WiFi chip and a Nordic nRF52832 for Bluetooth. The Primo comes in the ever-familiar Arduino form factor, but it isn’t meant to be an ‘Internet of Things’ device. Instead, it’s a microcontroller for devices that need to be on the Internet.
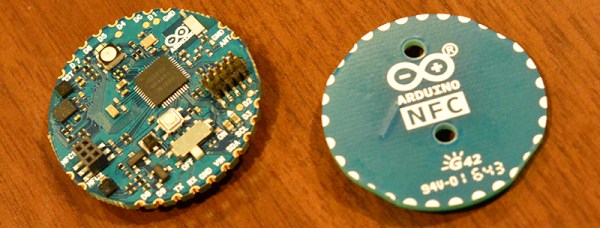
Also on display at CES this year is the Primo Core which we first saw at BAMF back in May. It’s a board barely larger than a US quarter that has a few tricks up its sleeve. The Primo Core is built around the nRF52832, and adds humidity, temperature, 3-axis magnetometer and a 3-axis accelerometer to a square inch of fiberglass.
The Primo Core has a few mechanical tricks up its sleeve. Those castellated pins around the circumference can be soldered to the Alice Pad, a breakout board that adds a USB port and LiPo battery charger.
LoRa


Also on deck at the Arduino suite were two LoRa shields. In collobration with Semtech, Arduino will be releasing the pair of LoRa shields later this year. The first, the Node Shield, is about as simple as it can get — it’s simply a shield with a LoRa radio and a few connectors. The second, the Gateway Shield, does what it says on the tin: it’s designed to be a gateway from other Arduino devices (Ethernet or WiFi, for example) to a Node shield. The boards weren’t completely populated, but from what I could see, the Gateway shield is significantly more capable with support for a GPS chipset and antenna.
A partnership with Cayenne and MyDevices
Of course, the Internet of Things is worthless if you can’t manage it easily. Arduino has struck up a partnership with MyDevices to turn a bunch of low-bandwidth radio and serial connections into something easy to use. Already, we’ve seen a few builds and projects using MyDevices, but the demos I was shown were extremely easy to understand, even if there were far too many devices in the room.
All of this is great news if you’re working on the next great Internet of Things thing. The Primo Core is one of the smallest wireless microcontroller devices I’ve seen, and the addition of LoRa Arduino shields means we may actually see useful low-bandwidth networks in the very near future.