Prototyping A Low-resolution Handheld Gaming Rig

low-res-arduino-gaming

[Jason] has been hard at work on this Arduino-based low-res gaming platform. He even had a fab house deliver circuit boards to pull everything together. It’s a little small in his hands, and the graphics are limited to the 8×8 pixels provided by the display. But it still looks like a lot of fun and the code was written to make adding new games quite painless.

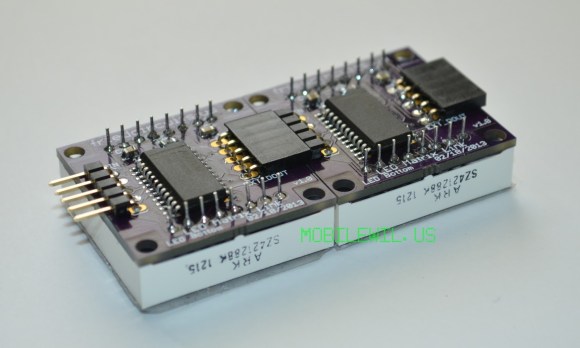
The board hosts an ATmega328 which drives the bi-color LED display using a pair of TPIC6B595 shift registers. Control is provided by a collection of buttons to either side of the display. The unit is powered by three AAA batteries held in a pack soldered to the back side of the PCB.

The image above shows [Jason] giving a Space Invaders game a try. The clip after the break shows respectable action, sound from a piezo buzzer, and it even scrolls your score at the end of the game. But you’re not limited to just one title. Adding new games is as easy as implementing a class in a new header file. You can get a feel for how this is set up by viewing the source code repo.

This reminds us of the Pixel Bros low-res system.

Continue reading “Prototyping A Low-resolution Handheld Gaming Rig”

The PICnDuino Review

picnduino

For those of you that can’t make a decision between buying an Arduino and a PIC processor, [Brad] has come up with a novel solution, the PICnDuino. We’ve featured him before with his [Retroball] project, but this time Brad has been full funded on Kickstarter, and is pre-selling boards for delivery in March.

[HAD], specifically I, was fortunate enough to be sent one of the boards to try out early. I’ve worked with an Arduino before, but never a PIC processor, so read on to see if it was actually as easy as the tutorial video (at the end of the article) would have you believe it is to get started. Continue reading “The PICnDuino Review”

Garage Parking Monitor Guides You In Every Time

THEPARKINGSPOTTER2

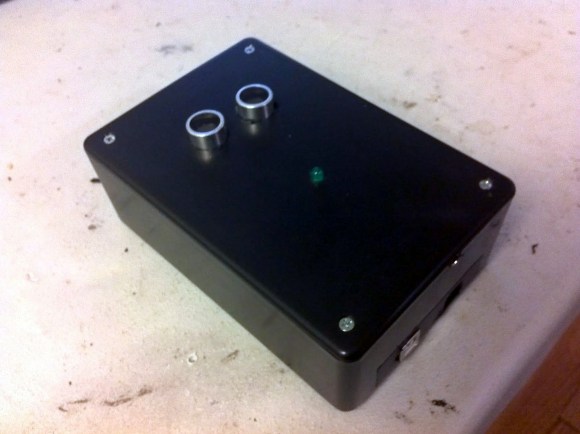
The live Adafruit Show and Tell stream from last weekend featured this project put together by [Silent Jeff]. He’s called “Silent” because when it came time to present his project on the show his microphone wasn’t working. As you can see in the video after the break, [PT] and [Ladyada] worked together to explain the project (of which they had no prior knowledge) using a game of charades. This is one of the follow-up images he sent them which details his parking spotter project.

[Ladyada] compliments [Jeff] on the finished look of the device and we agree. Not only does this do a great job of letting a driver know if they have pulled far enough into the garage, but it’s finished appearance ensures it won’t ever look out-of-place. The two silver discs near the lower end of the box are the sensors of an ultrasonic rangefinder. You mount this box so that the sensor is measuring distance between itself and the bumper of your vehicle. As the distance decreases the LEDs change to let you know when to stop. Inside the case you’ll find a voltage regulator and single-chip running the Arduino bootloader. [Jeff] says this is just his second Arduino project and we hope that at this rate we’ll be looking for big things from him in the not too distant future!

This is basically the same idea as cars that use parking assist sensors in the bumper. It’s just attached to the building instead of to the vehicle itself.

Continue reading “Garage Parking Monitor Guides You In Every Time”

New Year’s Eve Countdown Clock Included SMS Interactivity

We remember several years back, when text messaging was first becoming popular, we went to a bar which had a huge television that would display text messages sent to a particular number. This sounds like a novelty, but in a large group of folks who know one another it’s the sandbox of social games. Wanting to tap in on that fun for his New Year’s Eve party, [James] built this countdown timer that includes an element of SMS interactivity (link dead, try the Internet Archive version).

The rig is projector based. A computer using Processing does the majority of the work but [James] needed a way to accepts text messages (the locale of the party had no Internet connection so this was the best bet). He grabbed a GSM shield and his Arduino Leonardo. The bulk of the evening the display showed the last few messages received, with a small countdown timer in the lower corner. As the countdown approached zero the time was given prominence as in the image above. We guess he was lucky to find a prepaid SIM card that allowed free incoming text messages. Our cell provider charges us 20¢ for each.

You might give this one a whirl next year. If it’s not quite your thing take a look around. We’ve seen a lot of fun setups like this mini ball drop.

Building A Rather Rudimentary Arduino Tank Bot

building-an-arduino-tankbot

The tank robot builds that we see are often quite complex. This lets them do great things, but makes the platform scary for beginners. Here’s a tank build that would be a great first project, especially if you’re more interested in the programming side of robotics than you are in the hardware itself. [Paul Bleisch] combined several different commercially available products to fabricate this Arduino-powered tank robot base.

Locomotion is provided by a double geared-motor module. This unit, the plastic wheels and treads, as well as the wooden mounting platform are all made by Tamiya. They cost very little and are already designed to work with one another. To this base he adds the Arduino and a motor shield which makes the connections dead simple. The black case on one end of the chassis holds four AA batteries which provide power for everything.

These components are all that’s really needed to start, but they provide no interactivity. So [Paul] picked up a used wireless PlayStation 2 controller. There’s a library (written by regular reader [Bill Porter]) that allows him to connect the receiver to the Arduino in order to pick up commands from the controller. He also plans to add an ultrasonic range finder to the build sometime in the future.

If you’re don’t need to do things the easy way you should consider fabricating your own tank treads.

Solar Powered Wifi Radiation Sensor

Solar Radiation Detector

[Manish] packed lots of functionality into this radiation sensor module. The device is completely solar powered and weatherproof, so it can be mounted anywhere. It uses a Geiger Muller tube to monitor radiation and connects to the internet using wifi network to report the readings.

The design uses an Arduino Pro Mini to perform the monitoring and reporting. Wifi connectivity is provided by a RN-XV wifi module. A solar panel, Adafruit’s solar charger, and a LiPo battery are used to provide power to the device. It’s enclosed in Adafruit’s IP-66 rated weatherproof enclosure.

A custom Geiger Muller tube interface is used to interface with the tube. The interface is simple and cheap. It provides the high voltage required to drive the tube, and circuitry needed to detect the ionization events.

Once the device is connected to the internet, it uploads data directly to Cosm. This service lets the data be shared using Twitter, or accessed using an API. The project shows how to build a wireless networked sensor that directly connects to the internet for about $100.

Ringing In The New Year With An Arduino And Calcium Carbide

carbide

It’s the first we’ve heard of it, but a New Year’s Eve tradition in The Netherlands called Carbidschieten sounds like it’s just up our alley. Basically, a small chunk of calcium carbide and a little bit of water is placed in a metal milk churn. The carbide decomposes into acetylene and a flame is held up to a small hole in the milk churn. The resulting explosion sends the lid of the milk churn across a field and much fun is had by all.

[Edwin Eefting],  [Johan Postema], [Elger Postema] are exploding 1000 liters of acetylene this New Years and needed a safe way to detonate their celebration. They came up with an electronic ignition system based on an Arduino that probably makes just as much noise as the explosion itself.

The build is basically an Arduino with a few relays. When a pair of buttons are pressed for longer than a second, the Arduino goes into countdown mode with the requisite alarms and ringing bells. When it’s time to fire the carbide cannon, a power supply is turned on that heats up a glow plug, igniting the acetylene. It’s a great build, and adds an adequate amount of safety for an event involving exploding 1000 liters of acetylene.

You can check out the videos of the countdown timer after the break, or check out the Facebook group here.

Continue reading “Ringing In The New Year With An Arduino And Calcium Carbide”