Humans have always drawn lines in the sand, whether it’s to communicate a plan of attack or to indicate metaphorically a very real boundary. It’s also something we do just for the aesthetic pleasure, and this plotter from [aidenvigue] is great at performing in just that role.
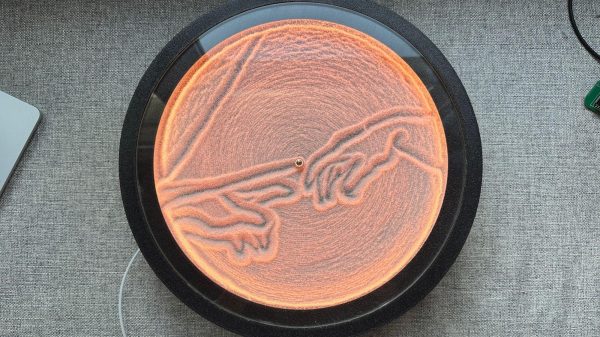
The plotter traces patterns in the circular sand tray by dragging a small marble with a magnet. This is achieved with a pair of NEMA 17 stepper motors, set up in a polar coordinate fashion. One stepper motor controls the angle, while another motor controls the marble’s distance from the center point of the circle. It’s a simple way to build a circular plotter, and works far better than a Cartesian setup would for this geometry. The build uses an ESP32 as the brains of the operation. It hosts a web interface that allows various patterns to be selected and run on the device. It also runs a set of addressable SK6812 LEDs that light the sand rather nicely.
We’ve seen some great sand plotters before, and have always been particular fans of the larger variety. Video after the break.
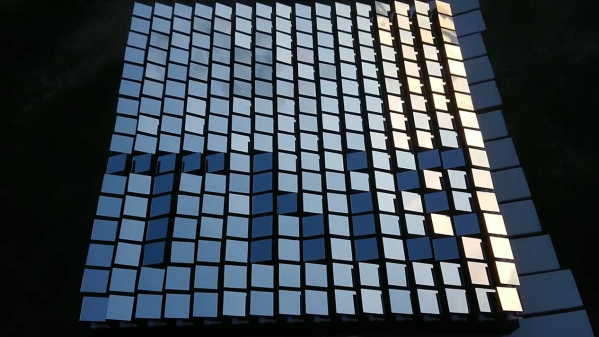
Mechanical displays use a variety of different methods to represent data with physical objects, and [AIRPOCKET]’s Mechanical Display aims to be a platform anyone can use. Each “pixel” in this display is a panel of some kind, and different effects can be had by moving individual panels to different angles. Not only can images be represented, but the patterns of the movements themselves can be beautiful as well.
The panels are an important part of how the display presents, so the design makes them easy to change out.
These sorts of displays are fertile ground for artistic expression (one memorable implementation of this basic idea was the wooden mirror, which used varnished tiles of wood) but anyone looking to use the concept has usually been on their own when it comes to implementation.
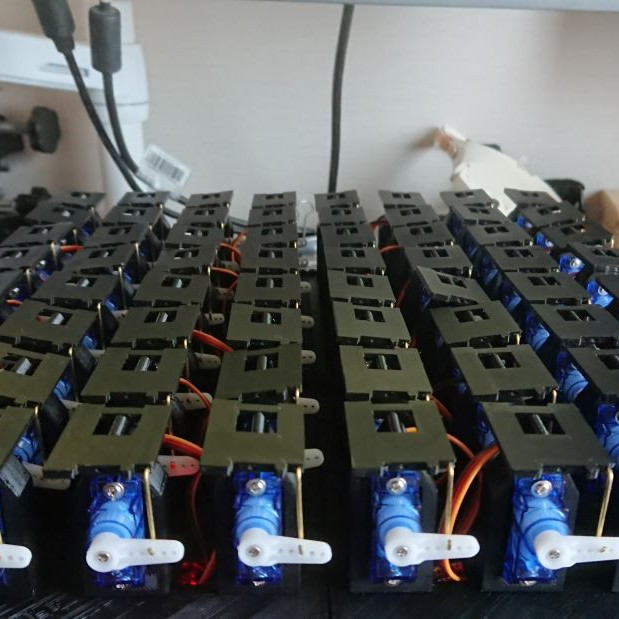
The idea [AIRPOCKET] has is to make this kind of installation easier to implement. This method uses economical mini RC servos and 3D-printed pieces to create modular segments that can be assembled into whatever configuration one may need.
The material of the panels matters, too. Just below the page break, you can see a large unit with each “pixel” consisting of a mirrored square that reflects daylight. There’s also a video of an earlier prototype that uses some ridged two-color pieces to create a simple 4×4 three-level greyscale display.
There are a lot of possibilities if [AIRPOCKET] can make this sort of display more easily accessible, and that makes it a contender in the 2023 Hackaday Prize.
Break out your tuxedo or your evening gown, we’re going to take in some highbrow culture. A night at the opera perhaps, some Tchaikovsky from the symphony orchestra, or maybe a bit of Shakespeare? No, we’re going to a demo party, because the demoscene is the latest art form to be accepted as officially a part of the national cultural heritage of the Netherlands. This builds on successes adding the scene to the cultural heritage registers of Finland, Germany, and Poland, and should provide a boost to other bids in countries such as Switzerland and eventual UNESCO world acceptance.
It’s all very cool that one of our wider community’s art forms is at last being taken seriously rather than being dismissed by the establishment, because along with greater recognition comes other benefits. Sadly we don’t expect any cities to shell out for a demo auditorium next to the shiny new opera house any time soon, but we can see that it could be used to the benefit of for example a hackerspace chasing grants. meanwhile, feast your eyes on a bit of cultural heritage courtesy of the Dutch Centre For Intangible Cultural Heritage (Dutch language, English translation).
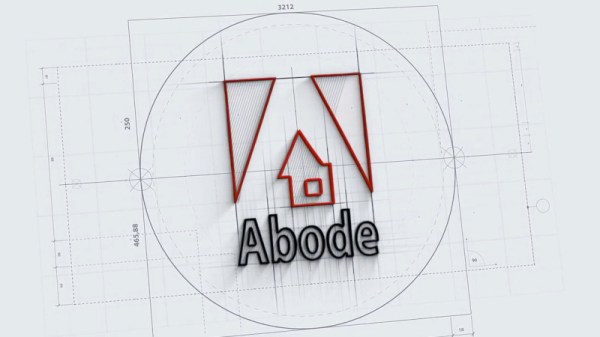
It’s been a distressing trend over the last decade, that of taking commercial software from a paid-for licence model and moving into the cloud and onto a rental model. In out line, we’ve seen this with CAD packages and notably with EAGLE PCB CAD, but it’s hit other sectors in exactly the same way. The art and design communities, in particular, are feeling the pinch from Adobe Suite going towards a rental model, and now the artist and perennial thorn in the side of anyone who seeks to own a colour, [Stuart Semple] is doing something about it. He’s launching a competing suite called provocatively, Abode, which will follow an affordable paid-for licence model. It’s a development that raises interesting questions for the open source community, so it’s definitely worth a second look from that perspective.
Taking on software rental can only be a good thing, and we hope that the new package gains a foothold for that reason. But since we’re sure that there will be open-source enthusiasts asking the question: why are the established open-source equivalents such as GIMP and Inkscape not the obvious alternatives to the Adobe suite? In there may be some uncomfortable moments of soul searching for the software libre world around usability and interfaces.
Whatever your take on open source versus paid software, it’s extremely encouraging to have somebody mount a high-profile challenge to the software rental model. We hope that Abode makes it to market and that it succeeds in making the graphics software market a little more open. Meanwhile, we’ve mentioned [Stuart Semple] before for his colour activism over the blackest of blacks, and for previously taking on Adobe over Pantone pricing.
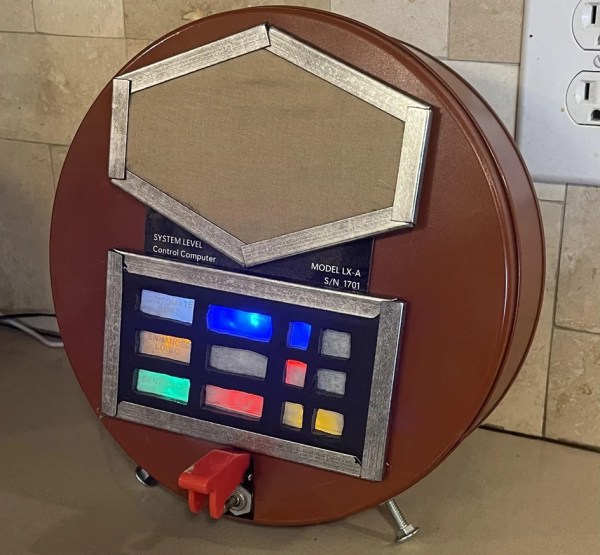
Back in the last century, especially in the ’40s to the ’60s, one of the major home decor trends was to install various home appliances, like the television or stereo, into its own piece of furniture. These were usually bulky, awkward, and incredibly heavy. And, since real life inspires art, most of the futuristic sci-fi technology we saw in movies and TV of the time was similarly conspicuous and physical. Not so with modern technology, though, where the trend now is to hide it out of the way and forget it exists. But [dermbrian] wanted some of his modern technology to have some of the mid-century visibility aesthetic so he made some modifications to his Amazon Echo.
The Echo itself remains largely unmodified, other than placing it inside a much larger cookie tin with some supporting electronics. For that, [dermbrian] found a relay board with a built-in microphone which switches the relay off when it detects sound so that when the Echo is activated, the sound from its speaker activates the module. From there it drives a series of blinkenlights which mimic the 60s computer aesthetic. Some custom fabrication and light diffusion methods were needed to get it to look just right, and a switch on the outside can disable the mechanism if it is getting triggered by background noise like music from his stereo.
While the appeal of this style may be lost on anyone who wasn’t a fan of the original Lost in Space, Star Trek, or Jetsons, it certainly holds a special significance for those who grew up in that era. It’s certainly not the first project we’ve seen to take a look back at the aesthetics of bygone eras, either. Take a look at this project which adds lenses to modern displays to give them the impression of antiquated CRT displays.
New angles and concepts in 3D printing are always welcome, and we haven’t seen anything quite like [Horn & Rhode]’s 3D prints that do not look anything like 3D prints, accomplished with an experimental tool called HueForge. The concept behind it is simple (though not easy), and the results can be striking when applied correctly.
3D prints that really don’t look 3D-printed.
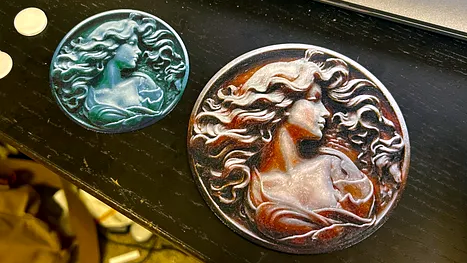
The idea is this: colored, melted filament is, in a sense, not that different from colored paint. Both come in various colors, are applied in thin layers, and blend into new colors when they do so. When applied correctly, striking imagery can emerge. An example is shown here, but there are several more both on the HueForge project page as well as models on Printables.
Instead of the 3D printer producing a 3D object, the printer creates a (mostly) flat image similar in structure to a lithophane. But unlike a lithophane, these blend colors in clever and effective ways by printing extremely thin layers in highly precise ways.
Doing this effectively requires a software tool to plan the color changes and predict how the outcome will look. It all relies on the fact that even solid-color filaments are not actually completely opaque — not when printed at a layer height of 0.08 mm, anyway — and colors will, as a result, blend into one another when layered. That’s how a model like the one shown here can get away with only a few filament changes.
Of course, this process is far from being completely automated. Good results require a solid amount of manual effort, and the transmissivity of one’s particular filament choices plays a tremendous role in how colors will actually blend. That’s where the FilaScope comes in: a tool to more or less objectively measure how well (or how poorly) a given filament transmits light. The results plug into the HueForge software to better simulate results and plan filament changes.
Print result, showing results of filament blending.
Tilted to catch the light, giving an idea of how the print is structured.
When done well, it’s possible to create things that look nothing at all like what we have come to expect 3D-printed things to look. The cameo proof-of-concept model is available here if you’d like to try it for yourself, and there’s also an Aztec-style carving that gives a convincing illusion of depth.
[Horn & Rhode] point out that this concept is still searching for a right-sounding name. Front-lit lithophane? Reverse lithophane? Filament painting? Color-blended bas-relief? If you have a better idea, we urge you not to keep it to yourself because [Horn & Rhode] absolutely want to hear from you.
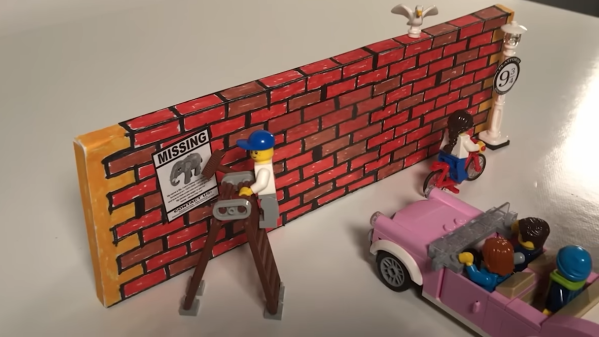
Illusions are perceptual experiences that do not match physical reality, and the 2023 Illusion of the Year contest produced a variety of nifty ones that are worth checking out. A video for each is embedded below the break, but we’ll briefly explain each as well.
Some of the visual illusions play with perspective. One such example happens to be the contest winner: Platform 9 3/4 has a LEGO car appear to drive directly through a wall. It happens so quickly it’s difficult to say what happened at all!
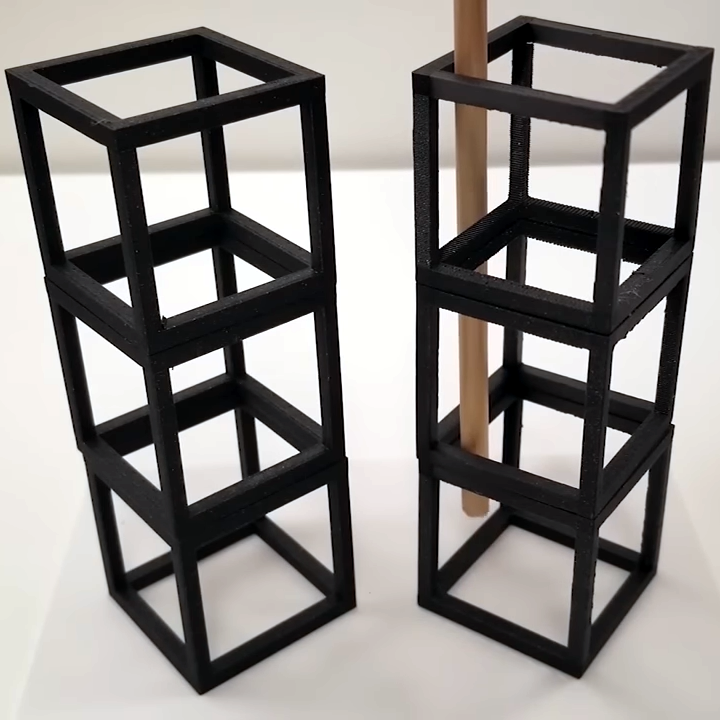
Another good one is the Tower of Cubes, which appears as two stacks of normal-looking hollow cubes, but some of the cubes are in fact truly bizarre shapes when seen from the side. This is a bit reminiscent of the ambiguous cylinder illusion by Japanese mathematician and artist [Kokichi Sugihara].
Cornelia is representative of the hollow face illusion, in which a concave face is perceived as a normal convex one. (Interestingly this illusion is used to help diagnose schizophrenia, as sufferers overwhelmingly fail to perceive the illusion.)
The Accelerando Illusion is similar to (but differs from) an auditory effect known as the Risset Rhythm by composer Jean-Claude Risset. It exploits ambiguities in sound to create a dense musical arrangement that sounds as though it is constantly increasing in tempo.
The Buddha’s Ear Illusion creates the illusion of feeling as though one’s earlobe is being stretched out to an absurd length, and brings to mind the broader concept of body transfer illusion.
While it didn’t appear into the contest, we just can’t resist bringing up the Thermal Grill Illusion, in which one perceives a painful burning sensation from touching a set of alternating hot and cold elements. Even though the temperatures of the individual elements are actually quite mild, the temperature differential plays strange tricks on perception.
A video of each of the contest’s entries is embedded below, and they all explain exactly what’s going on for each one, so take a few minutes and give them a watch. Do you have a favorite illusion of your own? Share it in the comments!