Rainbow Cats Announce Engagement

[ANTALIFE] is going to tie the knot sometime in 2017. Instead of sending out paper announcements or just updating his Facebook status, he wanted to give their family members something lasting and memorable, like a small trinket with a pair of light-up cats.

This project is pretty simple in theory. A pair of RGB LEDs cycle through the colors of the rainbow with the help of an ATtiny25 and resistors carefully chosen for each LED. But there are several challenges at play here. [ANTALIFE] wanted to design something quite small that would last at least a day on a single CR2032 coin cell. This project was his first foray into SMD/SMT design and construction. We think that this warrants its own congratulations, especially since it looks as though he made at least a dozen of these things.

[ANTALIFE] made things much easier for himself with the purchase of a cheap hot air rework station and used a chip clip to program the ‘tiny. The cats are a design from Thingiverse, which he modified to turn them into bride and groom. Watch a whole line of them glow after the break. We sincerely hope that a larger version of these cats end up on top of the wedding cake.

For anyone with an undying love blinkenlights and impending nuptials, don’t forget the light-up invitations, wedding attire, and centerpieces.

Continue reading “Rainbow Cats Announce Engagement”

One Dollar Board Targets Students

The Raspberry Pi was made to be inexpensive with an eye toward putting them into schools. But what about programs targeted at teaching embedded programming? There are plenty of fiscally-starved schools all over the world, and it isn’t uncommon for teachers to buy supplies out of their own pockets. What could you do with a board that cost just one dollar?

That’s the idea behind the team promoting the “One Dollar Board” (we don’t know why they didn’t call it a buck board). The idea is to produce a Creative Commons design for a simple microcontroller board that only costs a dollar. You can see a video about the project, below.

Continue reading “One Dollar Board Targets Students”

Simple Fuel Pressure Alarm Averts Diesel Disaster

If you could spend a couple of bucks on a simple project that might prevent a $2000 repair bill on your vehicle, you’d probably build it, right? That’s the idea behind this simple low-pressure alarm for a diesel fuel system, and it’s so simple it makes you wonder why the OEM didn’t do it.

We normally see [Bob Johnson] coming up with nifty projects (like this claw or this camera slider) that more often than not combine woodworking and electronics. But no tree carcasses were harmed in the making of this project. [Bob]’s goal is just to sound a warning and flash a light if the output of a pressure switch goes to ground. That indicates the lift pump in his Dodge Ram’s fuel tank has failed, which could lead to the sudden failure of the downstream injector pump for lack of lubrication by the fuel itself. His simple ATtiny85 circuit lives on a small perfboard in a 3D printed case and taps into a $30 fuel pressure switch. The microcontroller code enables a short delay to prevent nuisance alarms, and if the pressure drops below 5 PSI, [Bob] gets a chance to shut down the engine and disappoint his mechanic to the tune of $2000.

Maybe it’s planned obsolescence on the OEM’s part, or maybe it’s not. But kudos to [Bob] for a simple hack that averts a potentially expensive problem.

Continue reading “Simple Fuel Pressure Alarm Averts Diesel Disaster”

TinyDriver – ATtiny84 Platform Without Arduino

You don’t need an Arduino for everything! Or do you? This is an argument that plays out here quite often. Whatever the outcome, most folks agree that once you’ve dipped your feet in the shallow end of the pool, the real fun is when you dive into the deep end.

[Mahesh Venkitachalam] designed tinyDriver, an experimental Open Source breakout board for the Atmel ATtiny84 chip. His idea was to create a convenient platform which can be used to understand microcontrollers in-depth, by letting users dive under the hood and make use of the various features of the chip such as timers, PWM, interrupts, ADC, and digital I/O. The ATtiny84 is cheap and simple enough for starters. Add a low-cost AVR programmer, install the free and cross-platform avr-gcc and avrdude tool chain, read up the data sheet, learn some C programming and start experimenting. Rinse and repeat and you’ll be a pro at it soon. He’s got a few starter projects documented on his website to get you going.

The hardware is open source, and the Git repository contains the hardware source and example code. If you’re a hardware noob, he’s thoughtfully added a PTC resettable fuse and reverse polarity protection on the board to make sure you don’t release the magic blue smoke prematurely. All of the I/O’s are broken out on a header, and the motor driver and RGB LED can be disabled when not needed. The board isn’t hand-assembly friendly, but he plans to crowd fund it shortly. If you want to move beyond the Arduino platform, projects like the tinyDriver are the way to go.

The HackadayPrize2016 is Sponsored by:

Tiny ATtiny85 Game Console

[Ilya Titov] has made a game console. Not just any game console, but an extremely small ATtiny85-based console suitable for putting on a key ring and assembled into a very professional product with PCB and 3D printed case. This is a project that has been on the go since 2014, but the most recent update is a new version designed for tighter and more easy assembly.

All construction is through-hole rather than SMD, and aside from the ATtiny85 the console uses an OLED screen, piezo buzzer, tactile switches and a handful of passive components. Power comes from a single CR2032 coin cell which sits under the screen. Best of all the PCB design is available as a PDF and the 3D printed case can be found on Thingiverse.

There are two games for the console, as well as the Breakout clone whose code is in the 2014 piece linked above he’s written UFO Escape, an obstacle-avoiding side-scroller. You’ll have to burn both game and 8MHz internal clock bootloader to the ATtiny85 yourself. There are no cartridges with this console, though if the processor sits in a DIP socket the game can be changed over simply by swapping processors programmed with the appropriate game.

He’s produced a full assembly video with some UFO Escape gameplay thrown in, shown here below the break.

Continue reading “Tiny ATtiny85 Game Console”

Reverse-Engineering DebugWire

Has this ever happened to you? You start out on a reverse-engineering project, start digging in, and then get stumped. Then you go looking on the Internet for help, and stumble across someone who’s already done exactly what you’re trying to do?

[Geekabit] wrote us with a version of this tale of woe. In his case, the protocol to be reversed was Atmel’s debugWire protocol for debugging on low-pin-count parts. There are a number of websites claiming it’s “secret” or whatever, but it actually looks like it’s just poorly documented. Anyway, [RikusW] seems to have captured all of the signals way back in 2011. Good job!

The best part of [geekabit]’s story is that he had created the Wikipedia page on debugWire himself to inspire collaboration on reverse-engineering the protocol, and someone linked in [RiskusW]’s work. When [geekabit] picked up the problem again a bit later, he did a bit of web research and found it solved — on the page that he started.

Maybe it’s not a tale of woe after all, but a tale of unintentional collaboration. Anyway, it serves as a reminder that if you’re interested in the destination more than the voyage of discovery, it never hurts to do your research beforehand. And now we all know about the low-level details of the debugWire protocol. Anyone written up a driver yet?

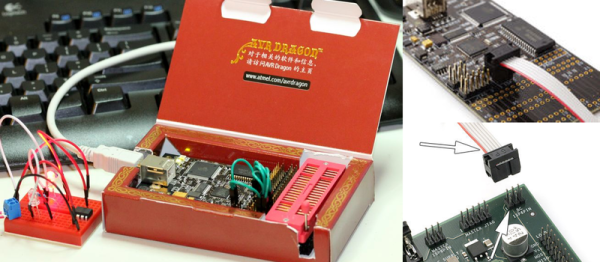
Thanks [geekabit] for the tip and the story! Image from ATmega32-AVR, which explains nicely how to use the Dragon in debugWire mode.

The ATtiny MIDI Plug Synth

MIDI was created over thirty years ago to connect electronic instruments, synths, sequencers, and computers together. Of course, this means MIDI was meant to be used with computers that are now thirty years old, and now even the tiniest microcontrollers have enough processing power to take a MIDI signal and create digital audio. [mitxela]’s polyphonic synth for the ATtiny 2313 does just that, using only two kilobytes of Flash and fitting inside a MIDI jack.

Putting a MIDI synth into a MIDI plug is something we’ve seen a few times before. In fact, [mitxela] did the same thing a few months ago with an ATtiny85, and [Jan Ostman]’s DSP-G1 does the same thing with a tiny ARM chip. Building one of these with an ATtiny2313 is really pushing the envelope, though. With only 2 kB of Flash memory and 128 bytes of RAM, there’s not a lot of space in this chip. Making a polyphonic synth plug is even harder.

The circuit for [mitxela]’s chip is extremely simple, with power and MIDI data provided by a MIDI keyboard, a 20 MHz crystal, and audio output provided eight digital pins summed with a bunch of resistors. Yes, this is only a square wave synth, and the polyphony is limited to eight channels. It works, as the video below spells out.

Is it a good synth? No, not really. By [mitxela]’s own assertion, it’s not a practical solution to anything, the dead bug construction takes an hour to put together, and the synth itself is limited to square waves with some ugly quantization, at that. It is a neat exercise in developing unique audio devices and especially hackey, making it a very cool build. And it doesn’t sound half bad.

Continue reading “The ATtiny MIDI Plug Synth”