Recently I spent an enjoyable weekend in Canterbury, staying in my friend’s flat with a superb view across the rooftops to the city’s mediaeval cathedral. Bleary-eyed and in search of a coffee on the Sunday morning, my attention was immediately drawn to one of her abode’s original built-in features. There on the wall in the corner of the room was a mysterious switch.
Housed on a standard-sized British electrical fascia was a 12-position rotary switch, marked with letters A through L. An unexpected thing to see in the 21st century and one probably unfamiliar to most people under about 40, I’d found something I’d not seen since my university days in the early 1990s: a Rediffusion selector switch.
If you have cable TV, there is probably a co-axial cable coming into your home. It is likely to carry a VHF signal, either a series of traditional analogue channels or a set of digital multiplexes. “Cable ready” analogue TVs had wideband VHF tuners to allow the channels to be viewed, and on encrypted systems there would have been a set-top box with its own analogue tuner and decoder circuitry.
Your digital cable TV set-top box will do a similar thing, giving you the channels you have subscribed to as it decodes the multiplex. At the dawn of television transmission though, none of this would have been possible. Co-axial cable was expensive and not particularly high quality, and transistorised wideband VHF tuners were still a very long way away. Engineers designing the earliest cable TV systems were left with the technology of the day derived from that of the telephone networks, and in Britain at least that manifested itself in the Rediffusion system whose relics I’d found.
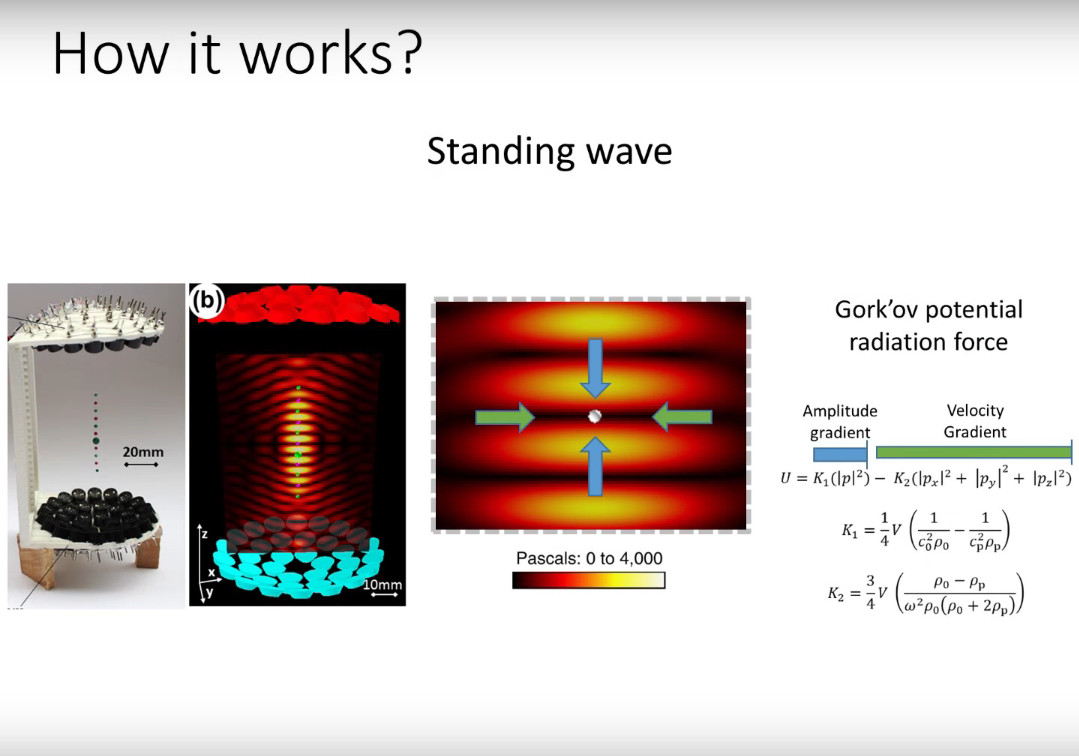
We’ve all seen acoustic levitation, it’s one of the scientific novelties of our age and a regular on the circuit of really impressive physical demonstrations of science to the public. The sight of arrays of ultrasonic speakers causing small objects and beads of liquid to float in mid-air without any suspension is magical, captivating people of all ages. Thus a lecture at Hackaday Belgrade on the subject from Asier Marzo, a research scientist with a speciality in the field of ultrasonics at the UK’s University of Bristol, was a particularly fascinating and informative one.
He started by explaining acoustic levitation as a concept, and its mechanism. As an idea it’s one with a long history, he tells us that hundreds of years ago people tried mass ranks of the loudest musical instruments at their disposal to move rocks, all to no avail. The array of musicians of yore lacked the ability to control their individual phase, and of course their combined output would have balked at a pea-sized piece of gravel, let alone a boulder.
Explaining the standing wave produced by an ultrasonic array.
The Power of Standing Waves
Given that we can now create standing waves between phased arrays of ultrasonic speakers, he explained the mechanism that allows the levitation. The standing wave creates patterns of high intensity and “quiet” low intensity sound, and the object nestles in one of these quiet areas. There is thus a size limit dictated by the wavelength of the sound in question, which for the ultrasound he’s using is in the order of a few millimetres.
Having explained how it all works, we were then taken into the fields in which it finds an application. This was particularly interesting, because it’s the side we never see in the for-the-kids demos where it’s all about “Look, we can make the water droplet float!”. The number of fields that can find a use for it was a surprise, and formed the next phase of the talk.
Real World Uses for Acoustic Levitation
The first example given was in the field of spectroscopy, when reflecting light from a droplet of liquid on a substrate a certain amount of the reflected light comes from the substrate. If the sample is levitated, all the reflection comes from it and nothing else. Microgravity experiments are another interesting application, where it is possible to replicate some of the work that has previously required the environment of a space craft such as the International Space Station. This was a particularly unexpected twist.
Manipulating a solid particle with a wearable array.
The technique can be used for tiny particles in a liquid medium with a much higher frequency — a demonstration involves moving a single blood cell in a pattern. But Asier has more tricks up his sleeve. This technique can be used in human interactions with computers and with the real world. We saw a display in which the pixels were small plastic balls suspended in a grid, they could even be flipped in colour by being rotated under an electric field. A successive display used the balls not in a grid but as a point cloud in a graph, proving that rasters are not the only means of conveying information. Finally we saw the arrays applied to wearable devices, a handheld tractor beam, and a set of standing wave tweezers. He gave the example of picking up an SMD component, something that we can see would be invaluable.
Levitation is Within Our Grasp
The good news for us is that this is a piece of cutting-edge science that is accessible to us at our level too. He’s made a selection of designs available online through the Acoustic Levitator site. There is an ultrasonic array, an acoustic levitator, and an acoustic tractor beam, and the components are such run-of-the-mill parts as Arduinos and motor driver boards. Even schoolchildren building them from kits, with an experimenter using one for Schlieren photography of the acoustic field. Finally we’re shown Ultraino, an ambitious project providing software and driver hardware for large arrays in which every transducer is individually driven, before a tantalising look at future work in fluid ultrasonics and the promise of an ultrasonic audio speaker project.
Hackaday covers a huge array of projects and topics from all corners of our community. Each one is exciting in its own way, from a simple-looking Arduino project that encapsulates a cool hack to a multi-year labour of love. It’s not often though that we can say we’ve seen a genuinely cutting-edge piece of science, while simultaneously having it explained in terms we understand and being given an accessible version that we can experiment with ourselves. We are really looking forward to the projects that will come from this direction, as acoustic levitation becomes yet another known quantity in the hardware hacker’s armoury.
When working on classic vehicles, and especially when modifying them outside of their stock configurations, things can get expensive. It’s a basic principle in economics: the rarer something is the more money somebody can charge you for it. But if you’ve got the skills and the necessary equipment, you can occasionally save yourself money by custom-fabricating some parts yourself.
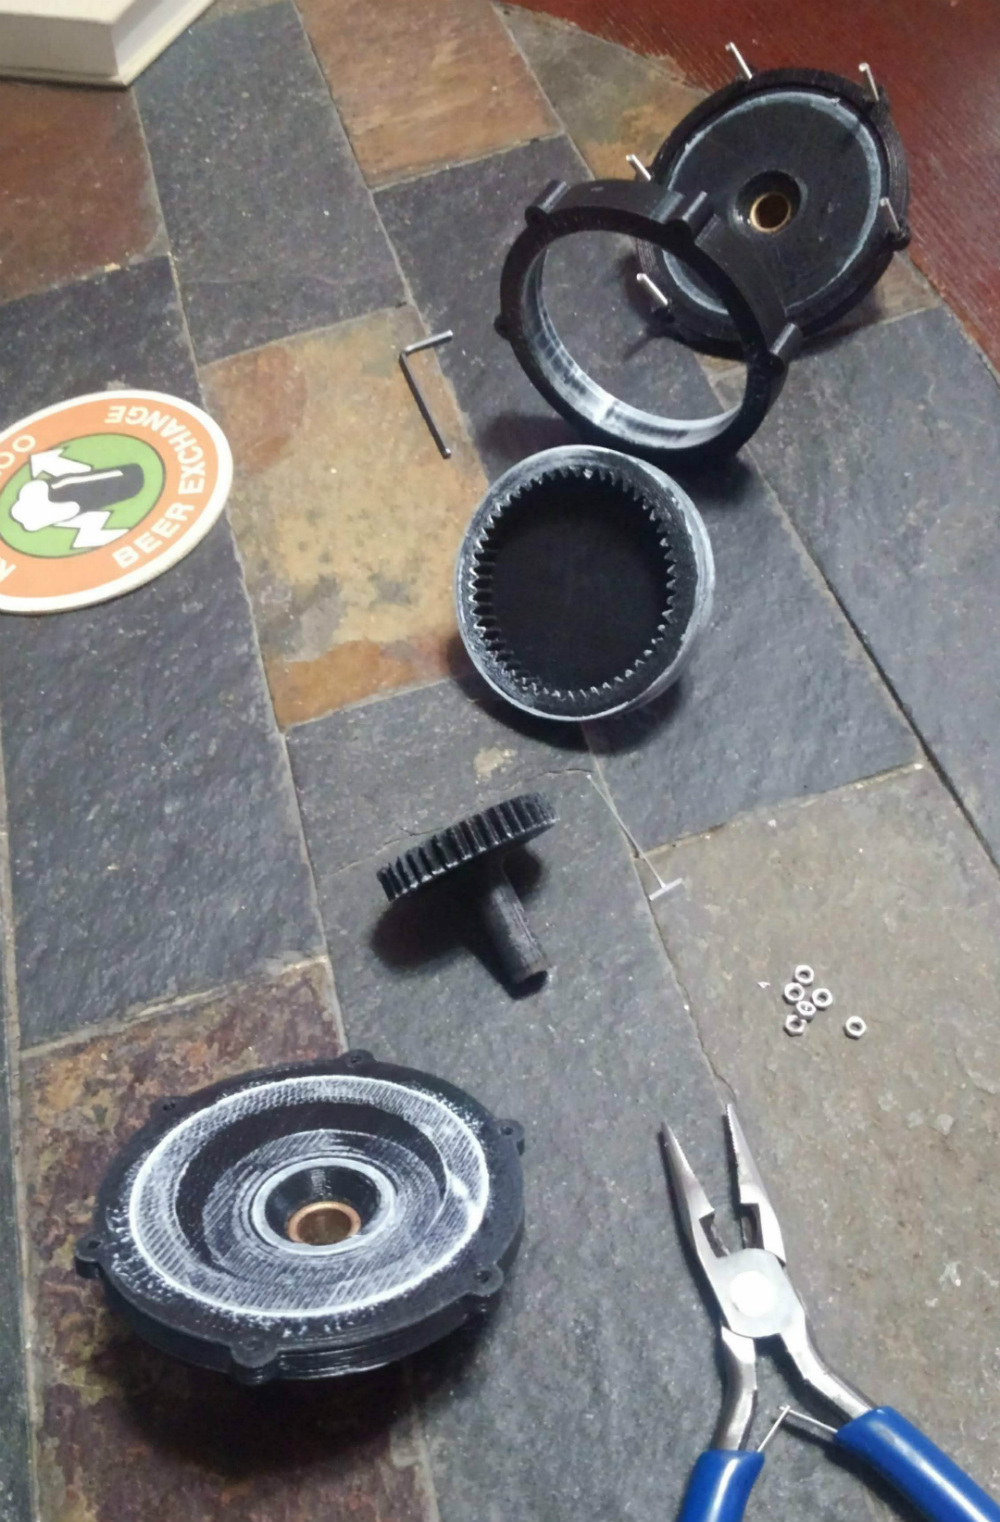
After changing the gear ratio in his 1971 Ford F100, [smpstech] needed to adjust his speedometer to compensate. Unfortunately, a commercial speedometer reducer and the new cables to get it hooked up to his dash would have run into the hundreds of dollars, so he decided to try designing and 3D printing his own gearbox. The resulting development process and final product are a perfect example of how even a cheap desktop 3D printer, in the hands of a capable operator, can do a lot more than print out little toy boats.
The gearbox contains a large ring gear driven by a smaller, offset, spur gear. This compact inline package drops the speed of the input shaft by 25.5%, which [smpstech] mentions is actually a bit slower than necessary, but it does give him some wiggle room if he decides to change his tire size.
Even if you’re not looking for a speedometer reducer for a nearly 50 year old truck, there are some lessons to be learned here in regards to 3D printed car parts. The first version of his gearbox, while functional initially, ended up looking like a deflated balloon after being exposed to the temperatures inside the F100’s engine bay. His cheapo PLA filament, which is probably fine for the aforementioned toy boats, simply wasn’t the right material for the job.
[smpstech] then reprinted the gadget in HTPLA, which needs to be annealed after printing to reach full strength. Usually this would involve a low-temperature bake in the oven, but he found that simmering the parts in a pot of water on the stove gave him better control over the temperature. Not only did the HTPLA version handle the under-hood conditions better, it was also strong enough that he was able to use a standard die on the connections for the speedometer cables to create the threads instead of having to model and print them. Definitely a material to keep an eye on if regular PLA isn’t cutting it for you.
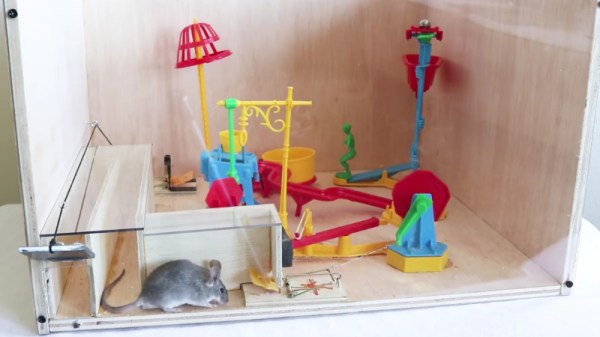
Just when you thought you had explored all the weird stuff on YouTube, along comes [Shawn Woods] with his channel dedicated to testing different types of mouse traps. His weekly videos demonstrate the construction and ultimate effectiveness of everything from primitive traps that can be made in the field from sticks and rocks to 3D printed creations sent in from viewers. But his latest video might just be the weirdest one yet, as he found a way to use the classic “Mousetrap” board game to capture an actual rodent.
Well, sort of. For one, [Shawn] admits the “trap” is completely impractical and is just for fun. Which should be pretty obvious considering the thing is enclosed in a box the size of a small refrigerator. Second, the lucky rodent that gets to test drive this Milton Bradley-powered gadget is actually the family’s pet chinchilla which is obviously rather calm and we dare say accustomed to these sort of shenanigans.
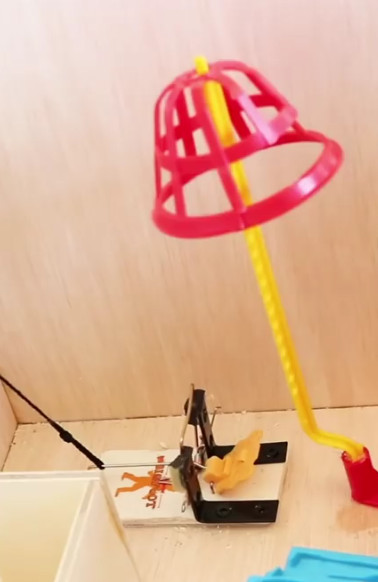
The key to the whole contraption comes via two traditional mousetraps, one on either end of the game’s more fanciful rendition of the same device. The first trap is used to pull the crank which gets the board game going when the mouse steps on the pad (a piece of wood with padding prevents the bar from actually hitting the animal). The game goes through its nostalgic routine featuring metal balls rolling down tracks and figurines on jumping boards, eventually triggering the second real mouse trap. In this case, the trap pulls a rope which closes a door at the opening of the box.
Assuming your target rodent is very patient and not startled by the cacophony of plastic machinery, the whole thing works perfectly. To use the parlance of his channel, this is what’s known as a “Live Catch” trap as it doesn’t hurt the mouse and lets you easily remove them after the fact. Which is the least you could do after humiliating it like this.
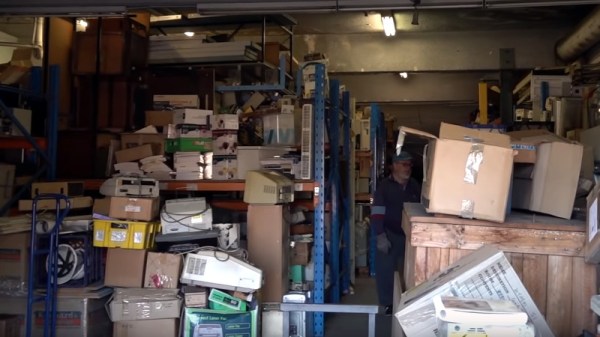
The ever-effusive Dave from EEVblog has posted a video in which he takes a tour, and like us he’s continually exclaiming over the items he finds. An EAI analog computer, a full set of DEC PDP-11 technical documentation, a huge Intel development system, Tektronix printers, huge DEC racks, memory cards for VAXen, piles and piles of boxes of documentation, and much, much more.
So, if you are an Aussie within reach of Sydney who happens to have a currently-unused warehouse, barn, or industrial unit that could house some of this stuff, get in touch with them quickly. Some of it may well be junk, but within that treasure trove undoubtedly lies a lot of things that need to be saved. We’d be down there ourselves, but are sadly on the other side of the world.
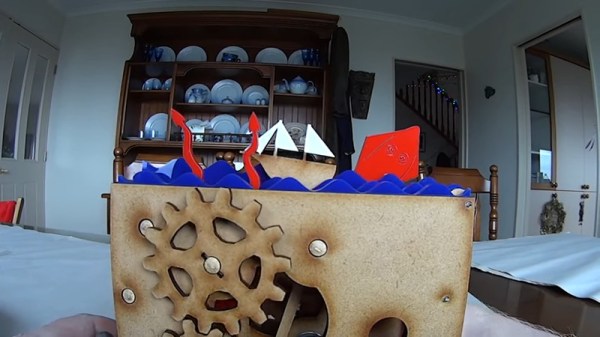
Lasercutters are fantastic tools: they’re highly useful for making flat things, or even flat things that you later bend! This makes them particularly well suited for making gears out of flat stock. [sharvfish] needed to get his hands dirty with producing some gears for his automaton, and decided to share what he learned in the process.
The gears in question are cut out of MDF board, which is readily usable on all but the feeblest lasercutters you’ll find in the average makerspace. The first problem faced was when producing gears with low tooth counts – depending on the exact geometry used, teeth with lower counts can tend to jam easily. For [sharvfish]’s gears, 6 teeth seems to be just a touch too small to work well. Other issues cropped up around the kerf of the cuts affecting the gear mesh and the use of pins to improve the coupling of the gears to the shaft, which [sharvfish] expands upon in the video. There’s also a cheeky cephalopod cameo, too.
It’s always interesting to see the unique challenges faced in the undertaking of a project; we could see six more lasercut projects this week, and we’d likely see six unique problems the builders faced as well. It’s a great insight into the build process and it’s great when makers share their journey as well as the finished product. Video after the break.
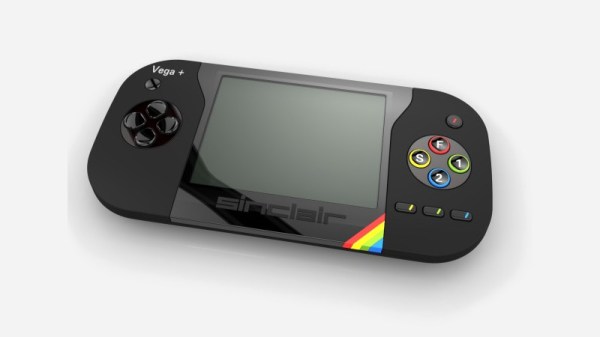
It’s not a good time to be a backer of the crowdfunded Sinclair ZX Vega retro console. After raising a record sum on Indiegogo, a long series of broken promises and missed dates, and a final loss of patience from the crowdfunding site, it has emerged that the owner of the Sinclair and ZX brands is to withdraw the right to use them from the console.
The Vega itself should have been a reasonable proposition, a slick handheld running the FUSE Spectrum emulator rather than Z80 hardware, and from Retro Computers Limited, a company that boasted a 25% ownership from Sinclair Research and thus Sir Clive himself. The sorry tale of its mishandling will probably in time provide enough information for a fascinating book or documentary in itself, but one thing that has come to light in the BBC’s reporting is the fate of those Sinclair brands. They famously passed to Amstrad in the 1980s, a move that gave us the Spectrum +2 and +3 with decent keyboards and built-in tape and disk drives, but long after the last Spectrum had rolled off the production line they passed with Amstrad’s set-top-box business to the satellite broadcaster Sky, who are now responsible for pulling the plug.
This is a general news story as much as a hardware story as there is little by way of a hack to be found beyond the realisation that you could almost certainly roll your own with a Raspberry Pi, a copy of FUSE, and a 3D-printed case. But it’s a fitting follow-up to our previous reporting, and unless something unexpected happens in the Retro Computers boardroom it’s probably the last we’ll hear of the product. In an unexpected twist though they are reported to have shipped a few Vegas to backers in recent days, and we’ll leave the final word to the BBC’s quote from [David Whitchurch-Bennett], one of those recipients.
“The buttons are absolutely awful, You have to press so hard and they intermittently stop working unless you apply so much pressure.”
From where we’re sitting, remembering the dubious quality of some of the keyboards on original Spectrum products, we think that it might have more in common with the original than anyone is willing to admit.

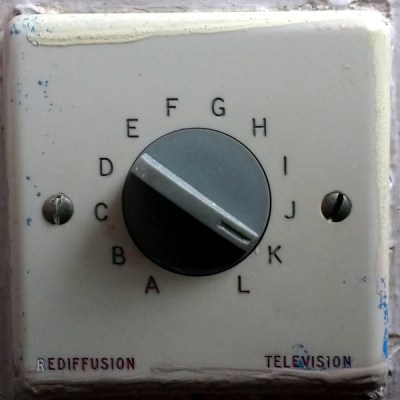 Housed on a standard-sized British electrical fascia was a 12-position rotary switch, marked with letters A through L. An unexpected thing to see in the 21st century and one probably unfamiliar to most people under about 40, I’d found something I’d not seen since my university days in the early 1990s: a Rediffusion selector switch.