[Will Scott] and [Gabe Edwards] shed some light on the current state of consumer computing technology at 34C3 in their talk DPRK Consumer Technology. The pair has also created a website to act as a clearinghouse for this information — including smartphone OS images up at koreaComputerCenter.org.
Not a whole lot is known about what technology North Korean citizens have available to them. We have seen Red Star OS, the Mac-like Linux based operating system used on PC based desktops. But what about other systems like smartphones?
[Will] and [Gabe] found that cell phones in North Korea are typically manufactured by Chinese companies, running a custom version of the Android Operating system. The phone hardware is common — the phone sold as the Pyongyang 2407 in North Korea is also sold in India as the Genie v5. If you can get your hands on the Genie, you can run the Korean version of the Android OS on that hardware.
For all the hustle and bustle of the holiday season, people still find ways to make time for their passions. In the lead up to Christmas, [Edwin Mol] and a few co-workers built themselves an LED Christmas tree that adds a maker’s touch to any festive decor.
Before going too far, they cut out a cardboard mock-up of the tree. This an easy step to skip, but it can save headaches later! Once happy with the prototype, they printed off the design stencils and cut the chunks of clear acrylic using power tools — you don’t need a laser cutter to produce good stuff — and drilled dozens of holes in the plastic to mount LEDs, and run wires.
A Raspberry Pi 3 and Arduino Uno make this in league with some pretty smart Christmas trees. MAX6968 5.5V constant-current LED driver chips and MOFSETs round out the control circuit. During the build, the central LED column provided a significant challenge — how often do you build a custom jig to solder LEDs? That done, it’s time for a good ol’-fashioned assembly montage! The final product can cycle through several different lighting animations in a rainbow of colours — perfect for a festive build. Continue reading “A Clear Christmas Tree Means More Lights!”→
Early in November we took a look at a one of the best Raspberry Pi laptops we had ever seen, using the shell of a Sony VAIO. Laptops used to be hulking beasts, and that played into [Frank Adams’] hands as he got rid of the motherboard and had enough space to replace it with a Raspberry Pi and a few other support boards. This took advantage of the laptop’s screen, keyboard, LEDs, etc. But what’s a laptop without battery power? [Frank] hadn’t cracked that nut until now.
VAIO battery and charging PCB seen to lower left
Adding battery power is trickier that it sounds, but [Frank] managed to get the Raspberry Pi to talk to the original Sony VAIO internal battery. His work on the project is shared, but this part of the story is best found starting on page 29 of his PDF project details.
Using the original battery is a good move since it’s designed to fit and has a charger ready to interface with the port on the laptop case. But these batteries have logic inside them, and there’s the rub. Communications use the 2-wire System Management Bus (SMBus) which is well documented. But the when trying to use the Pi’s I2C [Frank] couldn’t figure out to send a repeated start command.
He ended up writing his own C program that bit-bangs the communications he needed and now has the Pi speaking to the battery and listening to what it hears coming back. Reading through his description of this is fun since he includes his observations from a logic analyzer captures. He suspects an occasional bad read is due to Linux interrupting code execution. He watches for and catches these bad reads in software and can now reliably read all the battery vitals.
The hack leaves him with a system that functions in much the same way the original computer did: plug it in and it charges. He did add some hardware that lets him take a voltage reading from the battery using an ADC on the Teensy that was already present to control the keyboard and case LEDs. This adds a small constant draw on the battery, but for now he doesn’t leave the battery connected when the laptop is not in use.
If you’d like to read our original coverage of this laptop, here it is.
Despite the presence of human drivers, modern cars are controlled by computers. In his talk at the Chaos Communication Congress [Guillaume Heilles] and [P1kachu] demonstrate the potential of taking control of a car’s computer. This of course leads to the natural conclusion of emulate an Xbox controller and using the car to play computer games.
His research was limited by the fact that the only cars they had access to were the daily drivers of different members of [P1kachu]’s family, which meant that all tinkering had to be strictly non-destructive. Despite this, they achieved impressive results and deliver a great introduction into reverse engineering.
[P1kachu] used a RasPi and an OBD-II adapter to access the car’s CAN bus and begins the presentation with a quick overview of the protocol. He then briefly touches on security measures that he ran into, which are optional and their implementation varies widely between manufacturers. His first attempt to access the CAN bus was successfully blocked by a challenge-response algorithm doing its work. His mother’s convertible however provided no such obstacles and gaining access allowed him to map the position of the steering wheel and pedals to a game controller, using the car to play video games.
After this, [Guillaume] steps in and walks us through the teardown of a gadget that plugs into the OBD-II port and claims to do amazing things for your car’s mileage by reprogramming the ECU. The device was not brand specific and after having seen the variations in the ways different manufacturers implement the protocol, [Guillaume] and [P1kachu] doubted that the gadget was capable of even holding the information required to modify every known implementation out there. Listening to the output of the device, along with a quick analysis of the circuit followed by decapping the single chip they found, showed that their doubt was justified. The lecture closes with an extended Q&A that adds more information on car hacking. Those that don’t have access to a car can instead tear down hot glue guns, doppler modules or antique calculators.
Have you ever been too busy to attend to the proper cooking of a steak? Well, lament no more, and warn your cardiologist. A trio of students from Cornell University have designed and built the steak-grilling BeefBot to make your delicious dinner dreams a reality.
[Jonah Mittler], [Kelsey Nedd], and [Martin Herrera] — electrical and computer engineering students — are the ones you should thank for this robot-chef. It works as follows: after skewering the steak onto the robot’s prongs, BeefBot lowers it onto the grill and monitors the internal temperature in a way that only the well-seasoned grillmaster can replicate. Once a set temperature is reached, the steak is flipped — sorry, no crosshatch grillmarks here — and cooked until a desired doneness. A small screen displays the temperature if you want to babysit BeefBot — some manual adjustment may be needed after the steak flip to ensure it is cooking evenly — but it is otherwise a hands-off affair. If you don’t mind salivating over your screen, check out the project demonstration after the break.
At first glance you might think this a YouTube stunt, but this is real science. The writeup is exquisite, from the design and fabrication, to the math behind temperature calibration and regulation. Kudos to the hungry Cornell students who slaved over a hot griddle bringing this one to life!
We’re always happy to see hackers inspired to try something different by what they see on Hackaday. To [SimpleTronic] has a project that will let you stretch your analog electronics skills in a really fun way. It’s an electromagnet pendulum analog circuit. Whether you’re building it, or just studying the schematics, this is a fun way to brush up on the non-digital side of the craft.
The pendulum is a neodymium magnet on the head of a bolt, dangling on a one foot aluminium chain. Below, a Hall Effect sensor rests atop an electromagnet — 1″ in diameter, with 6/8″ wire coiled around another bolt. As the pendulum’s magnet accelerates towards the electromagnet’s core, the Hall effect sensor registers an increase in voltage. The voltage peaks as the pendulum passes overhead, and as soon as the Hall Effect sensor detects the drop in voltage, the electromagnet flicks on for a moment to propel the pendulum away. This circuit has a very low power consumption, as the electromagnet is only on for about 20ms!
The other major components are a LM358N op-amp, a CD4001B quad CMOS NOR gate, and IRFD-120 MOSFET. [SimpleTronic] even took the time to highlight each part of the schematic in order to work through a complete explanation.
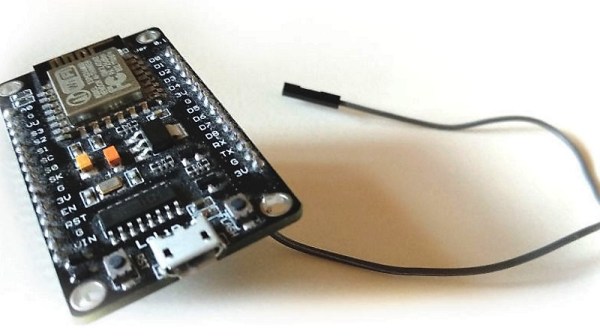
The Apple 1 was one of the three big hobbyist computers that burst onto the scene in 1977. Unlike the PET 2001 and the TRS-80, only a couple hundred Apple 1s were ever produced, and with only a handful in existence today, you’ll have to fork out some serious money to get a Wozniak original for yourself.
The Apple 1 experience is easily emulated, of course, but this ESP8266 emulates the Apple 1 on hard mode. Dubbed the Espple by its creator [Hrvoje Cavrak], it emulates the 6502-based original in all its 1-MHz glory, while providing 20-kB of RAM, a considerable upgrade over the 4-kB standard. The complete original character set is provided for that old-timey feel, and there’s a BASIC interpreter ready to go. The kicker here, though, is that the emulator is completely wireless. You telnet into the 8266 rather than connecting a keyboard directly, and video is transmitted over-the-air using a GPIO pin as a 60-MHz PAL transmitter. A short length of wire is all you need to transmit to an analog PAL TV on channel 4; the video below shows a little BASIC code running and a low-res version of Woz himself.
You’ll find Apple emulators aplenty around these parts, everything from an Apple ][ on an Arduino Uno to a tiny Mac on an ESP32. There hasn’t been much in the way of Apple 1 emulations, though, at least until now.


 Before going too far, they cut out a cardboard mock-up of the tree. This an easy step to skip, but it can save headaches later! Once happy with the prototype, they printed off the design stencils and cut the chunks of clear acrylic using power tools — you don’t need a laser cutter to produce good stuff — and drilled dozens of holes in the plastic to mount LEDs, and run wires.