Is it something in the water, or have there been a lot of really cool servo projects lately? Mechaduino is a board that sits on a regular stepper motor and turns it into a servo with a closed loop control of 0.1degree.
Whenever we post something about using cheap brushless motors for precision control, someone comments that a stepper is just a brushless motor with a lot of poles, why not just control it like one. That’s exactly what the Mechaduino does. They also hint at doing something very clever with a magnetic encoder on the board which allows them, after a calibration routine, to get the accuracy they’ve promised.
[Christian] wrote and sells some CAM/CNC controller software. We’re kinda sticklers for open source, and this software doesn’t seem to be, so “meh”. But what we do like is the Easter egg that comes included: the paths to mill out the base for a clock, and then the codes to move steel ball-bearings around to display the time.
Of course we’d like to see more info (more, MORE, MOAR!) but it looks easy enough to recreate. We could see redesigning this with marbles and a vacuum system, for instance. The seats for the ball bearings don’t even need to be milled out spheres. You could do this part with a drill press. Who’s going to rebuild this for their 3D printer? You just have to make sure that the machine is fast enough to move the balls around within one minute.
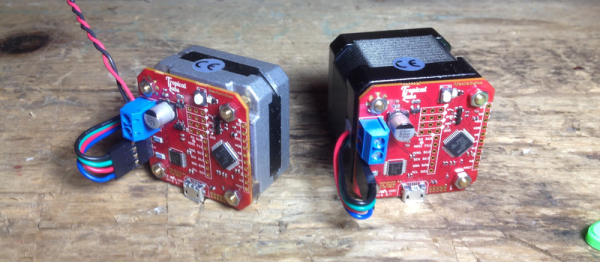
[Oscar] wonders why hobby projects ignore all the powerful brushless motors available for far less than the equivalent stepper motors, especially with advanced techniques available to overcome their deficiencies. He decided it must be because there is simply not a good, cheap, open source motor controller out there to drive them precisely. So, he made one.
Stepper motors are good for what they do, open-loop positioning along a grid, but as far as industrial motors go they’re really not the best technology available. Steppers win on the cost curve for being uncomplicated to manufacture and easy to control, but when it comes to higher-end automation it’s servo control all the way. The motors are more powerful and the closed-loop control can be more precise, but they require more control logic. [Oscar]’s board is designed to fill in this gap and take full advantage of this motor control technology.
The board can do some pretty impressive things for something with a price goal under $50 US dollars. It supports two motors at 24 volts with up to 150 amps peak current. It can take an encoder input for full closed loop control. It supports battery regeneration for braking. You can even augment a more modest power supply to allow for the occasional 1 KW peak movement with the addition of a lithium battery. You can see the board showing off some of its features in the video after the break.
Have you ever wanted to own a full-sized ShopBot? What if some geniuses somewhere made a tool the size of a coffee maker that had the same capabilities? Does an augmented reality, real-time feedback, interactive, handheld CNC router that can make objects ranging in size from a pillbox to an entire conference room table sound like a thing that even exists? It didn’t to me at first, but then I visited the Shaper Tools office in San Francisco and they blew my mind with their flagship tool, Shaper Origin.
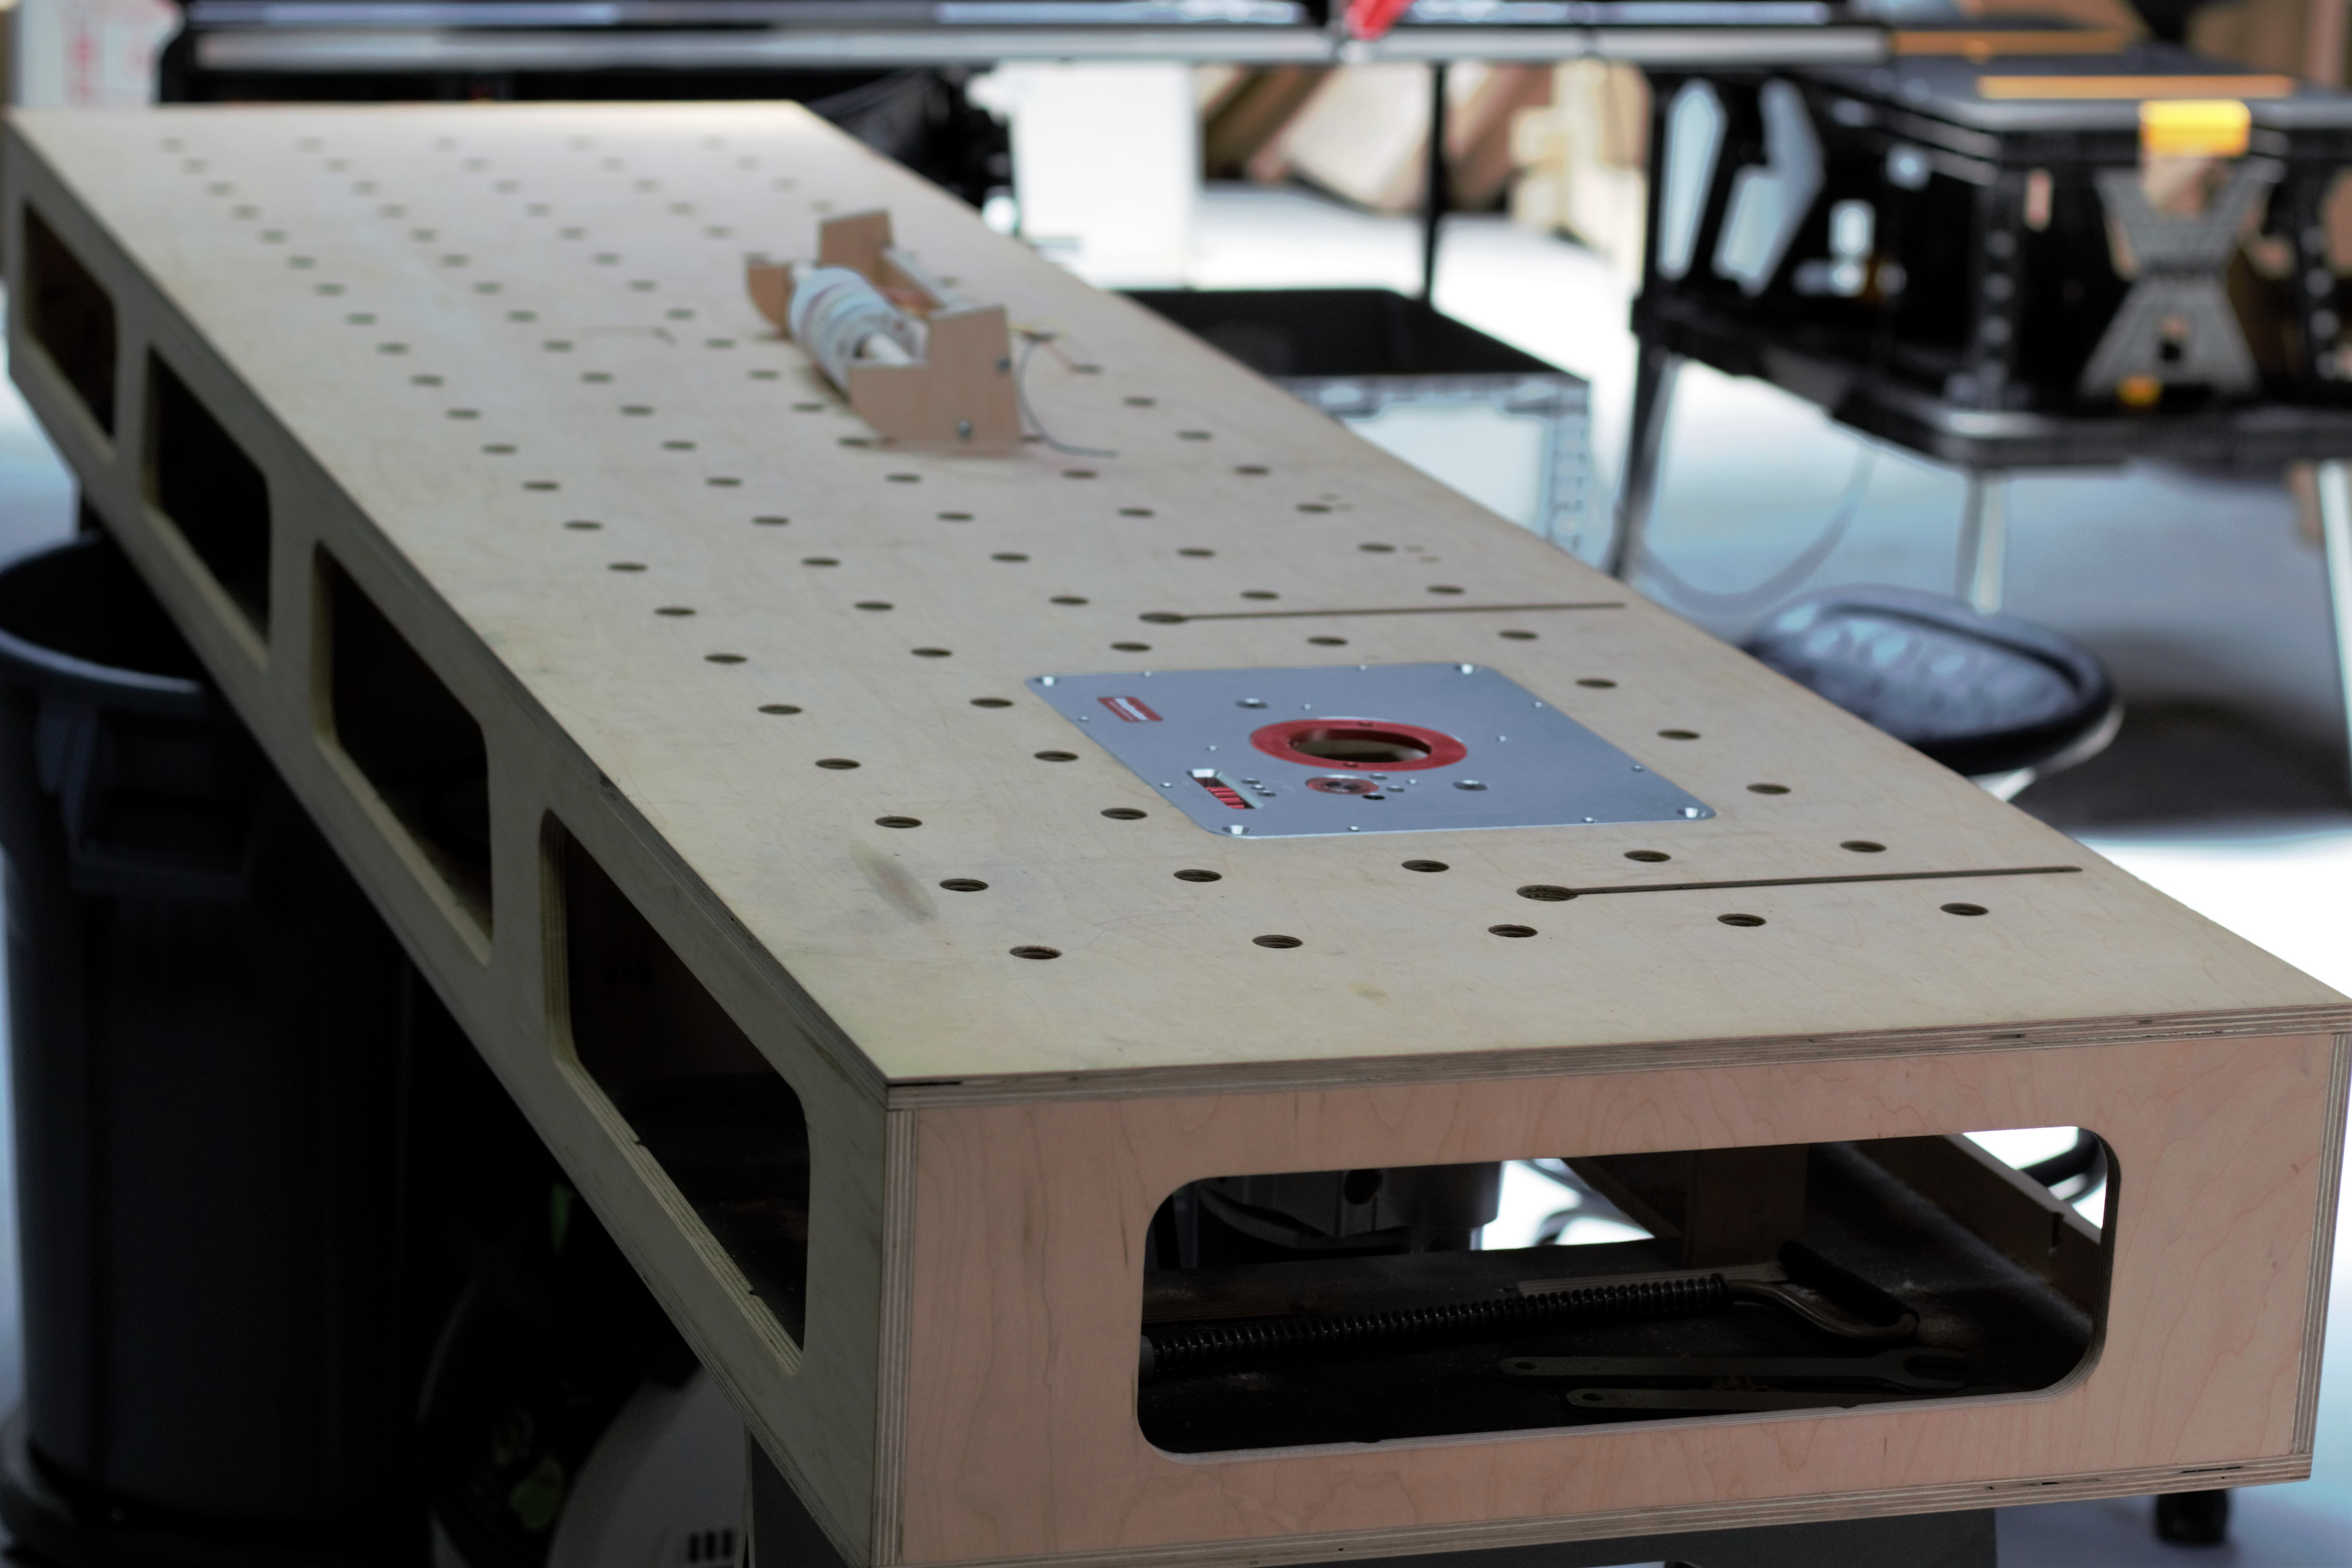
This table and the spool holder sitting on it was made with a machine the size of a coffee maker.
It’s impossible for me not to sound like a fan boy. Using Shaper Origin was one of those experiences where you just don’t know what to say afterwards. This is what the future looks like.
I’ve used a lot of CNC tools in my life, from my first home-built CNC conversion, to 1980s monstrosities that ran off the floppy kind of floppy disks, and all the way over to brand new state-of-the-art vertical machining centers. I had to shake a lot of that knowledge off when they demoed the device to me.
Origin is a CNC router built into the form factor of a normal wood router. The router knows where it is on the work piece. You tell it where on the piece you would like to cut out a shape, drill a hole, or make a pocket. It tells you where to go, but as you move it keeps the cutting bit precisely on the path with its three axes of control.
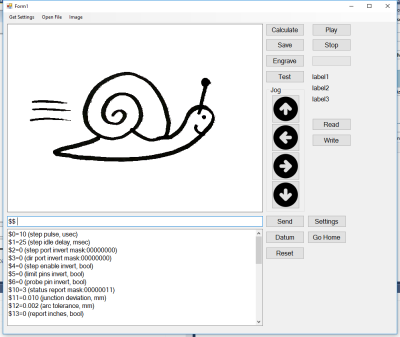
[Martin Raynsford] wrote a program that converts a black-and-white 2D image to G-code so that his laser printer could then etch the image. Not satisfied with just that, he used his laser printer to make a scanner that consists of a stand for his webcam and a tray below it for positioning the paper just right. The result was something he took to a recent Maker Faire where many kids drew pictures on paper which his system then scanned and laser etched.
Martin’s scanning and G-code maker program
[Martin’s] program, written in C#, does the work of taking the image from the webcam using OpenGL and scanning it line by line looking for pixels that surpass a contrast threshold. For each suitable pixel the program then produces G-code that moves the laser to the corresponding coordinate and burns a hole. Looking at the source code (downloadable from his webpage) it’s clear from commented-out code that he did plenty of experimenting, including varying the laser burn time based on the pixel’s brightness.
While it’s a lot of fun writing this code as [Martin] did, after the break we talk about some off-the-shelf ways of accomplishing the same thing.
Epoxy granite is an overlooked material when it comes to making home CNC builds. As far as time and money goes, when you add in all the equipment it comes out cheaper than an aluminum casting set-up. Epoxy granite has mechanical properties better than cast iron, increased dimensional stability, better vibration damping, and looks awesome when done right. Also, you can cast precision surfaces and threaded holes into your design, which is pretty cool.
In these two videos by [Jørgen Hegner] we get to watch him and a friend make a matching set of precision CNC machines. It’s built in a similar style to other nice builds we’ve featured. This way of making it needs a bigger footprint than a gantry mill and can’t be built as large. However, it solves a lot of mechanical issues and squaring with the gantry design while not being as difficult to get right as a box or knee mill.
After casting they machined the material embedded in the granite to mount the ways. The ways are linear bearings and ball screws. Expensive, but as the footage shows, very accurate. The rest of the machine is assembled and tuned. Then it gets installed in a home made 80/20 enclosure. We really like the LCD panel that’s incorporated into the front shield of the machine. They really went all out with the CNC control panel. It looks like they can do anything from jog the axis to monitor and control the water cooling for the spindle.
It appears that all the precision work is put to good use as there are some shots at the end of video two of a beautiful clock CNC’d on this machine. Videos after the break.
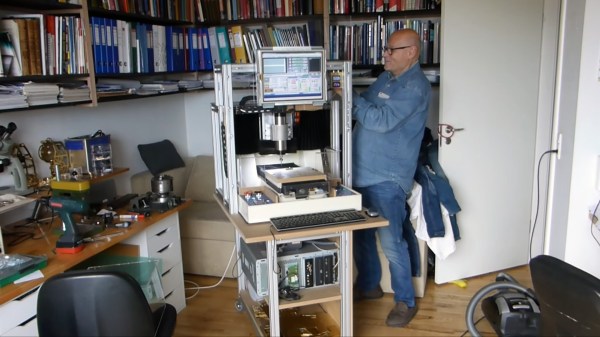
A Japanese lab is investing some time in the possibilities of a 5-axis 3D printer. They show it printing using five axis as well as doing finish machining on a printed part. We’ve covered parts of why this is the right direction to go for 3D printing in another post.
It looks like they have modified an existing industrial machining center for use with a 3D printing nozzle. This feels like cheating, but it’s the right way to go if you want to start playing with the code early. The machines are intensely accurate and precise. After all, building a five axis machine is a well known science, 3D printing with one opens a whole new field of research.
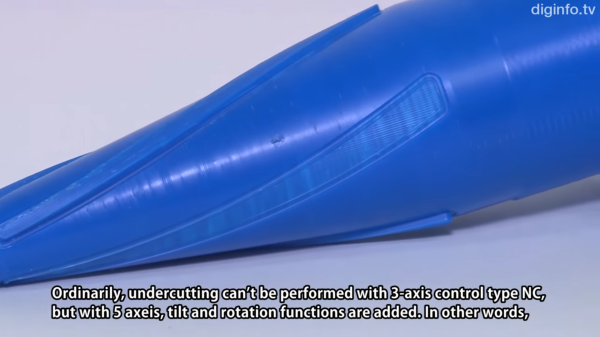
There isn’t too much to show in the video, other than it’s possible and people are doing it. The Five-axis 3D printing and machining is uninteresting, we have been able to machine plastic for a long time.
However, they show one blue part in which the central axis of the part was printed vertically, but revolute splines along its outer perimeter were printed normal to the surface of the already printed 3D part. Which is certainly not commonly done. Video after the break.