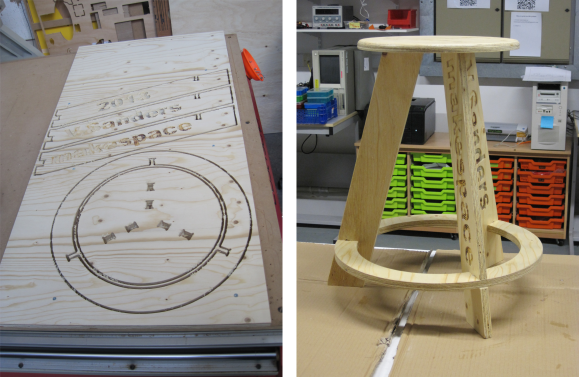
Cyclone PCB Factory: 3d Printable Circuit Board Mill

printable-cyclone-pcb-factory

If you can 3D print most of the parts for another 3D printer, why not also for a PCB mill? That’s the question answered by the Cyclone PCB Factory. It will help you kiss those toner transfer or photo resist days goodbye.

Homemade circuit boards tend to be rather small, which really helps keep the cost and scope of this project down. Most of the mounting parts, as well as the gears, are 3D printed. Of course there’s the usual machine tool items which you pretty much have to purchase: the ball screws, precision rod, stepper motors, and a motor to spin the routing tool.

Check out the video below to see where the project is right now. One of the crucial aspects of PCB milling is to have a level build table. The cutter head tends to be ‘V’ shaped so cutting just a bit too deep can blow out the traces you’re trying to isolate. The demo shows that this can automatically calibrate the software to account for any variances in the height of the copper clad.

We remember seeing a snap-together PCB mill. But we’re pretty sure that that one used parts milled from HDPE rather than 3D printed components.

Continue reading “Cyclone PCB Factory: 3d Printable Circuit Board Mill”

Predator Suit For Monsterpalooza Includes Over-engineered Shoulder Cannon

off-the-hook-predator-suit

This Predator suit was premiered at this year’s Monsterpalooza conference. It’s nothing short of incredible. But the shoulder cannon is really what caught our attention. The thing is fully motorized and includes sound and light firing effects.

We saw a glimpse of what [Jerome Kelty] is capable of about two years ago. He was showing off an Arduino-based animatronics platform he put together for a Predator shoulder cannon that tracked based on where the predator’s helmet was pointing. But other than a video demonstration there wasn’t much info on the that actual build. This post makes up for that and then some.

A replica of this quality is rarely the work of just one person. A team of fans joined in to make it happen. After getting the molded parts for the backpack and canon from another team member [Jerome] set out to fit the support structure, motors, and control electronics into the space available. That meant a ton of milling, cutting, and shaping parts like the support arm seen above which integrates a servo motor into its rectangular outline. All of the controls fit in the backpack, with cables running to the helmet, as well as the cannon.

Continue reading “Predator Suit For Monsterpalooza Includes Over-engineered Shoulder Cannon”

DIY Pick And Place Just Getting Under Way

diy-pick-and-place

It’s not totally fair to say that this project is just getting under way. But the truth is it neither picks nor places so there’s a long road still to travel. But we’re impressed with the demonstrations of what [Daniel Amesberger] has achieved thus far. Using the simplest of CNC mills he’s finished the frame and gantry for the device. You can see some of the parts on the left after going though an anodizing process that leaves them with that slick black finish.

The demo video shows off the device by driving it with a joystick. It’s fast, which gives us hope that this will rival some of the low-end commercial pick and place machines. He’s already been working on the software, which runs on a mini ITX form factor computer. This includes a gerber file interpreter and some computer vision for a visual check on part placement. He hasn’t gotten around to building the parts feeders but we’ll keep you updated as we hear back from him.

Continue reading “DIY Pick And Place Just Getting Under Way”

Water Cooled Raspberry Pi

If your Raspberry Pi is running a bit hot you can add a few hunks of salvaged heat sink, or you can go all out and machine your own water cooling system.

Remember when everyone had a giant desktop computer which was a perfect receptacle for cool lighting effects and somewhat ridiculous cooling systems? Relive that experience with [Phame’s] multi-page forum post that serves as the build log. With the exception of the tiny pump itself, this one’s a fully custom job.

The image on the left shows the machined parts being tried on for side. There is a slug which contacts the ICs on the RPi board, conducting the heat to the chambers inside through which the liquid will flow. The upright rectangular enclosure serves as the reservoir which dissipates the collected heat as the water flows through it. The image on the right shows the finished project. It uses the power pins on the GPIO header to drive the pump.

[Thanks PL via Bit-Tech]

Super-precise Light Painting From A Delta Robot

delta-robot-light-painting

The points of those geometric shapes line up perfectly thanks to the delta robot arm controlling the light source. The source is a simple LED that can be switched on and off as it moves. A camera is set up in a dark room to keep the shutter open while the arm moves. We’re assuming that all of the light for the stationary objects in this image comes from the LED as well.

[Sick Sad] built the delta bot for just for this purpose. Check out the video below to see, and perhaps more importantly hear, the thing in motion. Seriously, the whine of the stepper motors is pretty awesome on this one.

The delta concept uses a central head on three arms angled down from above. If the LED is also pointed down it won’t light up the hardware and that’s why it doesn’t show up in the image. We’ve seen similar accuracy when using this style of machine for 3D printing. But if you don’t want to build a complicated machine you can try this out with a simple string plotter.

Continue reading “Super-precise Light Painting From A Delta Robot”

Briefcase Mill

briefcase-mill

Take the machine shop with you; that’s the mantra which drove [Ryan] to build this CNC mill in a briefcase. That album will give you a taste of the final product. But you’ll want to dig through two pages of his forum thread starting with this post in order to behold the build process.

The image above is only part way through the fabrication, but we thought it gave the best overall view of his work. It’s missing the cables which connect to the control circuitry in the lid. The bed has also not been installed and this was before he fabricated the protective case for the PCBs.

Getting everything to fit inside of a folding case was quite a trick. Of course he used CAD to make sure it was possible. There are several places where the clearance when closed is about 2mm. We’re shocked by the build quality of the mill itself. It’s a novel idea to make it portable, but the accuracy and reliability of the machine didn’t suffer for the concept.

If you need a desktop mill that’s not quite as portable here’s a project which will dish out some inspiration.

ShapeOko Build Log — It’s A CNC Mill In A Box

shapeoko-build-log

We’re not blatantly trying to promo this product. It’s just that the build log covering a ShapeOko assembly process taken on by [Anool] is like crack for those of us who have yet to acquire our own desktop CNC mills.

Like the title says, this thing is basically a mill in a box. But [Anool] decided to order the version of the kit that doesn’t come with any motors or control electronics. He also planned for future upgrades by ordering additional extruded rail to increase the size of the ShapeOko. After assembling the frame his decision to source stepper motors locally bit him as they were out of stock. But there was still plenty to do preparing control electronics during the wait. He based his system on a Raspberry Pi which talks to an Arduino to address the motors and monitor the sensors.

Once all the parts were finally accounted for he tested the rig as a pen plotter. The pen was eventually replaced with the router motor and that ring light PCB seen above was the first thing he milled with it.

[Thanks Justin]