[Sande24] needed a gift for his father’s birthday. He decided that rather than simply give his father the gifts, he would present his father with a unique challenge. The gifts are locked inside of a multi-stage puzzle box. This isn’t your average puzzle box though. This one is rigged to blow.
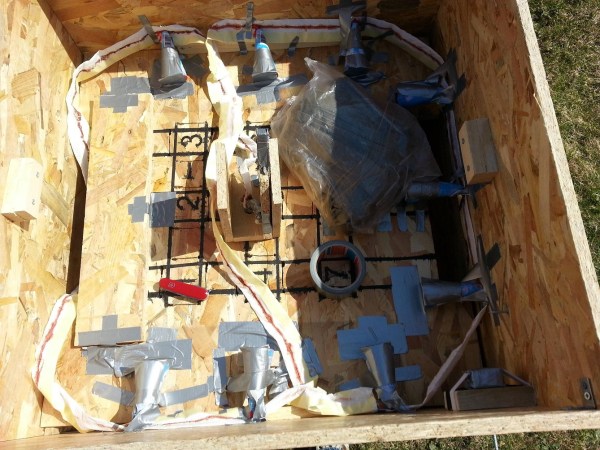
The puzzle box was designed to test his father’s reflexes, mind, and luck. The finished product looks sort of like a wooden crate made from particle board. The box contains three levels, each with its own gift and its own task to be completed.
With the lid opened, the first compartment and puzzle is revealed. Inside of the compartment were a new pair of gloves, meant to protect the father’s hands when working on the puzzles. The first puzzle is built into a sheet of wood with several custom-made levers. The levers must be moved into position in order to remove the wooden sheet and reveal the next level.
The first lever triggers a home-made detonator that eventually lights a series of fireworks placed around the box. You need to solve the puzzle box fast enough to prevent the fireworks from destroying the gifts that lay inside. [Sande24] was unable to legally purchase fuses where he lived, so he had to make his own.
The second level held a gas mask, also meant to protect the father from the booby traps of this mysterious box. This level, also made from a sheet of wood, has nine squares drawn on it. Each square is labeled with a different number which goes into solving a mathematical function (x^5-25x^4+233x^3-995x^2+1866x-1080 = 0). The solution to the function would reveal the safe path to be used to cut the wooden platform in half. Unfortunately [Sande24’s] father cut the wrong squares and released a huge amount of vinegar into the box. Oops.
The bottom level contained the final puzzle and the locked treasure compartment locked with an ordinary padlock. To find the key, another puzzle had to be solved based on a series of wooden levers labeled with different shapes. The shapes provided clues to the order in which the levers should be pulled. Once the levers were moved into position, two compartments were unlocked. One of them contained the key to the treasure box. The other contained another booby trap which would set off more fireworks, destroying the final gift of four cans of Kuld beer. That’s a lot of work to get a a few cans of frothy beverage!
[Thanks Ellery]