The aptly-named [chip-red-pill] team is offering you a chance to go down the Intel rabbit hole. If you learned how to build CPUs back in the 1970s, you would learn that your instruction decoder would, for example, note a register to register move and then light up one register to write to a common bus and another register to read from the common bus. These days, it isn’t that simple. In addition to compiling to an underlying instruction set, processors rarely encode instructions in hardware anymore. Instead, each instruction has microcode that causes the right things to happen at the right time. But Intel encrypts their microcode. Of course, what can be encrypted can also be decrypted.
Using vulnerabilities, you can activate an undocumented debugging mode called red unlock. This allows a microcode dump and the decryption keys are inside. The team did a paper for OffensiveCon22 on this technique and you can see a video about it, below.
What do you do when you have a whole warehouse sized facility and an industrial sized CNC foam cutter? Clearly, the only choice is to build giant RC aircraft, and that’s exactly what the folks at [FliteTest] teamed up with the illustrious [Peter Sripol] to accomplish. Did it work? Yes. Did it work well? We’ll let you be the judge after taking a gander at the video below the break.
[Peter Sripol], known for building manned ultralight electric aircraft from foam, was roped in as the designer of the aircraft. A very light EPS foam is used to cut out the flying surfaces, while a denser green foam board is sourced from the local home building store to construct the fuselage.
The build is anything but ordinary, and kids are involved in the construction, although the video doesn’t elaborate on it very much. You can see evidence of their excitement in the graffiti on the wings and fuselage- surely a huge success on that front! As for flying? Four large motors provide locomotion, and it’s barely enough to keep the beast flying. A mishap with the Center of Gravity demands a last minute design change which renders the rudder almost useless. But, it does fly, and it is a great step toward the next iteration. Just like every good hack!
In case you’re not closely following Egyptian Machinist YouTube, you may have missed [Hydraulic House]. It’s gotten even harder to find him since he started posting under[بيت الهيدروليك]. Don’t let the Arabic put you off, he delivers it all in pantomime.
A recent drop is “How To Turn Irregular Shapes On The Lathe“. We’re not sure, but think the part he’s working on is the front suspension of a 3 wheeled auto-rickshaw. The first metal at the center is over 30cm from the bottom. No problem, he just makes a long driven dead center from a bit of scrap material and goes on with his business.
If you’re into machinist-y things, don’t miss him. Every video is full of pretty nifty tricks, sometimes made with a zany disregard of some basics like “maybe better to have done the welding before mounting in the lathe”, turning with a cutoff tool (I think), and occasionally letting go of the chuck key. It’s definitely ‘oh, get on with it’ machine shop work.
We love videos from professionals in the developing world making with relatively simple tools. Often hobby hackers are in the same position, milling with a lathe and some patience instead of a giant Okuma. Not long ago we posted this article about making helical parts , with the same ‘imagination and skill beats more machinery any day’ vibe.
[DDRBoxman] wanted to control Elgato Stream Deck much like the offical pedal sold by the company. Thus, some hacking was in order. Using Wireshark with the Elgato pedal helped to determine the communication method of the real hardware.
Once the protocol was figured out, it was just a task of getting the Raspberry Pi Pico to replicate the same functionality. With the help of the tinyusb library, [DDRBoxman] was able to emulate the real Elgato device successfully. Paired with a 3D-printed footswitch design from Adafruit, and the project was functional and complete.
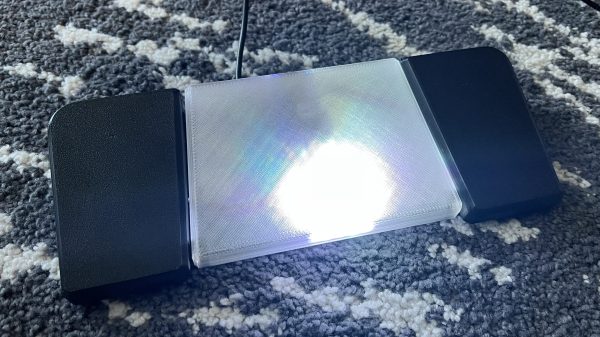
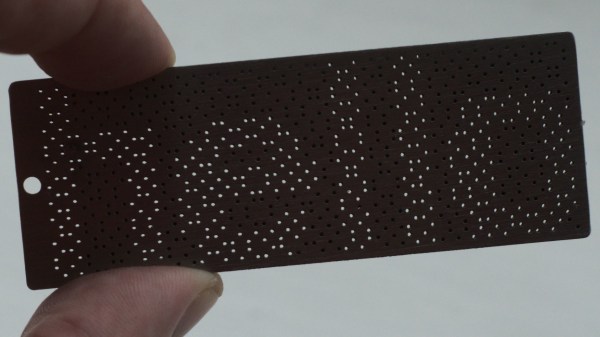
Visual cryptography is one of those unusual cases that kind of looks like a good idea, but it turns out is fraught with problems. The idea is straightforward enough — an image to encrypt is sampled and a series of sub-pixel patterns are produced which are distributed to multiple separate images. When individual images are printed to transparent film, and all films in the set are brought into alignment, an image appears out of the randomness. Without at least a minimum number of such images, the original image cannot be resolved. Well, sort of. [anfractuosity] wanted to play with the concept of visual cryptography in a slightly different medium, that of a set of metal plates, shaped as a set of keyrings.
Two image ‘share pairs’ needed as a minimum to form an image when combined
Metal blanks were laser cut, with the image being formed by transmitted light through coincident holes in both plate pairs, when correctly aligned. What, we hear you ask, is the problem with this cryptography technique? Well, one issue is that of faking messages. It is possible for a malicious third party, given either one of the keys in a pair, to construct a matching key composing an entirely different message, and then substitute this for the second key, duping both original parties. Obviously this would need both parties to be physically compromised, but neither would necessarily notice the substitution, if neither party knew the originally encrypted message. For those interested in digging in a little deeper, do checkout this classic paper by Naor and Shamir [pdf] of the Wiezmann Institute. Still, despite the issues, for a visual hack it’s still a pretty fun technique!
Want to learn a little more about crypto techniques you can do at home? Here’s our guide. Encryption too hard to break, but need a way to eavesdrop? Just punt out a flawed system, and you’re good to go.
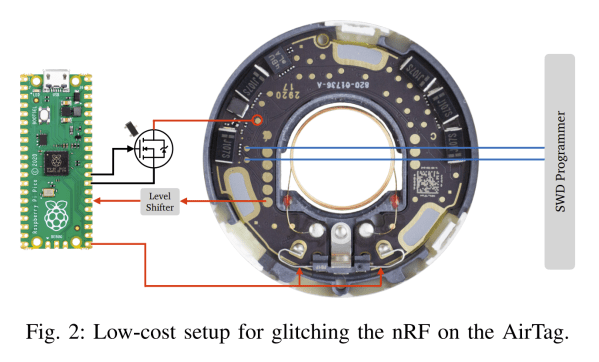
Apple AirTags are useful little devices. They essentially use iPhones in the wild as a mesh network to tell the owner where the AirTag is. Now, researchers have shown that it’s possible to clone these devices.
The research paper explains the cloning process, which requires physical access to the hardware. To achieve the hack, the Nordic nRF52832 inside the AirTag must be voltage glitched to enable its debug port. The researchers were able to achieve this with relatively simple tools, using a Pi Pico fitted with a few additional components.
With the debug interface enabled, it’s simple to extract the microcontroller’s firmware. It’s then possible to clone this firmware onto another tag. The team also experimented with other hacks, like having the AirTag regularly rotate its ID to avoid triggering anti-stalking warnings built into Apple’s tracing system.
As the researchers explain, it’s clear that AirTags can’t really be secure as long as they’re based on a microcontroller that is vulnerable to such attacks. It’s not the first AirTag cloning we’ve seen either. They’re an interesting device with some serious privacy and safety implications, so it pays to stay abreast of developments in this area.
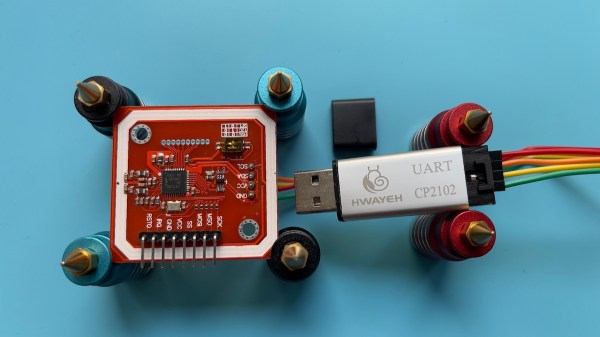
[Guillermo] started a new job a while back. That job came with an NFC access card, which was used for booking rooms and building access. The card also served as a wallet for using the vending machines. He set about hacking the card to see what he could uncover.
Initial scans with NFC Tools revealed the card was an Infineon MIFARE Classic Card 1k. These cards are considered fairly old and insecure by now. There’s plenty of guides online on how to crack the private keys that are supposed to make the card secure. Conveniently, [Guillermo] had a reader/writer on hand for these very cards.
[Guillermo] was able to use a tool called mfoc to dump the keys and data off the card. From there, he was able to determine that the credit for the vending machines was stored on the card itself, rather than on a remote server.
This means that it’s simple to change the values on the card in order to get free credit, and thus free snacks. However, [Guillermo] wisely resisted the urge to cash in on candy and sodas. When totals from the machine and credit system were reconciled, there’d be a clear discrepancy, and a short investigation would quickly point to his own card.
He also managed to successfully clone a card onto a “Magic Mifare” from Amazon. In testing, the card performed flawlessly on all systems he tried it on.