Reading Game Boy Carts With I2C

rasgame

After seeing a Game Boy emulator for the first time, [Thijs] was amazed. A small box with just a handful of electronics that turns a Game Boy cartridge into a file able to be run on an emulator is simply magical. [Thijs] has learned a lot about GB and GBC cartridges in the mean time, but still thinks the only way to really learn something is to roll up your sleeves and get your hands dirty. Thus was born [Thijs]’ Game Boy cartridge dumper, powered by a pair of I2C port expanders and a Raspberry Pi.

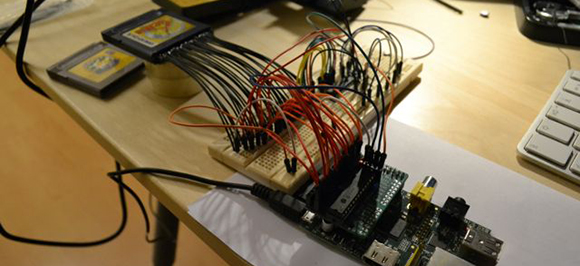
Inspired by a build to dump ROMs off Super Nintendo games with the help of a Raspberry Pi, [Thijs] grabbed all the hardware necessary to create his own GB cart dumper. A DS Lite cartridge adapter provided the physical connection and a pair of MCP23017 I/O expanders – one soldered to a Slice of PI/O board – provided the electrical connections.

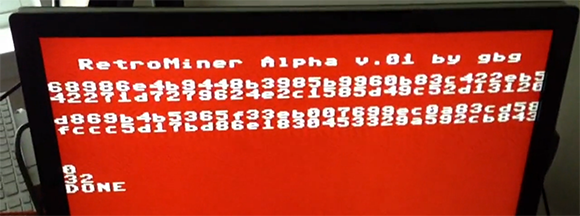
In the end, [Thijs] managed to dump the ROMs off the Japanese editions of Pokemon Yellow and Gold in about 13 minutes. This is a much slower transfer rate of 26 minutes per SNES cart in the post that gave [Thijs] the inspiration for this build. Still, [Thijs] will probably be the first to say he’s learned a lot from this build, especially after some problems with dumping the right banks from the cartridge.

One Game Controller Connects To Many Consoles

multi-controller-for-several-gaming-consoles2

[Dave Nunez] wanted arcade quality controls when gaming at home. The problem was he couldn’t decide on just one console to target with his build, so he targeted them all. What you see above is a single controller that connects to many different gaming rigs.

He took a simple-is-best approach, keeping the main goal of high-quality inputs at the forefront. To start, he built the face plate out of thick MDF to ensure it wouldn’t flex or bounce as he mashed the buttons. To keep the electronics as simple as possible he soldered connections to actual controller PCBs (well, reproductions of controllers), breaking each out to a separate DB9 connector on the back of the case. These connectors interface with one of the three adapter cables seen to the right. This lets the controller work with NES, SNES, and an Atari 2600 system.

To pull the enclosure together [Dave] designed the rounded corner pieces and cut them out with a CNC mill. These connect with flat MDF to make up the sides. To give it that professional look he filled the joints with Bondo and sanded them smooth before painting.

6 Foot Tall Fire Breathing Piranha Plant From Super Mario Brothers


I always thought it would be cool to build a giant fire breathing piranha plant. I never really came up with an excuse to do it though. Eventually, I just decided I didn’t really need an excuse, and thus it was born.

The plant itself is pretty much just foam and cardboard. You can see the construction process in the video, it was really easy, but a little time consuming. I wanted to go with a bit of a crazy, hyper stylized look, so it is covered in veins and has these insane looking wrinkly lips.  The plant itself would be a fun thing just to have around the house. Actually, I may turn it into a lamp.

The fire systems were very much trial and error.

Continue reading “6 Foot Tall Fire Breathing Piranha Plant From Super Mario Brothers”

Beautiful Modded NES For The 25th Anniversary Of Mega Man, Plus Bonus Interview!


Today I had the pleasure of interviewing [PlatinumFungi] about this fantastic NES mod he did. This year is the 25th anniversary of the first Mega Man video game. Unhappy with the current celebratory actions of capcom, [PlatinumFungi] set out to create something he felt was worthy. He managed to pull that off pretty well.

The NES you can see in the video is fantastic looking. It has a beautiful shiny automotive finish, supplied by [Custom NES Guy] and a pixel perfect backlit Mega Man on top. Additional enhancements are stylized decals on the front of the game bay and matching labels on the sides and back. The cartridge is even illuminated while it is in place.

Check out some pictures after the break!

Continue reading “Beautiful Modded NES For The 25th Anniversary Of Mega Man, Plus Bonus Interview!”

Drop-in Pcb Makes Nintendo Four Score A USB Joystick

The Nintendo Four Score was a controller attachment for the original Nintendo Entertainment System which allowed you to use four controllers at one time. [Simon Inns] wanted to use some original NES controllers on his computer so he developed a drop-in replacement board that converts the device to USB.

As we’ve seen with other NES controller hacks, the hardware uses a simple parallel to serial shift register to deliver key-presses to the console. This means that reading four controllers at a time is no different than shifting in data to a microcontroller from the four different sources. The remaining portion of the problem is providing a USB connection that enumerates the device as a joystick. We’ve seen a bunch of USB projects from [Simon] so it’s no surprise that he was able to pull it off.

He went with the ATmega16U2 which has built-in support for USB. [Simon] wrote the code so that although there is only one USB cable, each of the four controller ports will appear as a separate USB joystick on the computer. To button up the project he carefully measured the original board and laid out his own version so that it fits the footprint of all the original components as well as the mounting brackets on the case. Top notch [Simon]!

SNES Headphones Scream Out For Bluetooth Control

Here’s a build that just exudes nerd cred. It’s an SNES controller modified into a pair of headphones, straight from the workshop of [lyberty5].

The build began by stealing a controller from a PAL SNES and carefully dremeling the buttons and d-pad loose from their plastic frame. The PCB was cut in half, and the remaining plastic was carefully crafted into round speaker enclosures with the help of some epoxy. hot glue, and possibly a few pieces of styrene.

The result is a perfectly formed pair of SNES headphones, with a build quality right up there with the best case mods we’ve seen. Unfortunately, while the buttons are still attached to the PCB, they don’t do anything. We’re thinking a small Bluetooth adapter – or even repurposing a set of Bluetooth headphones with volume and play controls – would be a wonderful use for the 20-year-old, candy-like buttons.

Still, an awesome build, and [lyberty5] really shows off his craft by constructing these wonderful headphones. You can see the time-lapse of the build after the break.

Continue reading “SNES Headphones Scream Out For Bluetooth Control”

Mining Bitcoins On A Nintendo

NES

His friends know [gbg] as an aficionado of just about anything with a 6502 processor in it. He’s also interested in bitcoins. A while back, a friend asked if it would be possible to mine bitcoins with an old Nintendo Entertainment System. While this suggestion was made in jest, it’s not one of those ideas anyone can let go of easily. Yes, it is possible to mine bitcoins with an NES, and [gbg] is here to show us how.

Mining bitcoins is simply just performing a SHA256 hash on a random value from the bitcoin network and relaying the result of that calculation back to the Internet. Of course this requires an Internet to NES bridge; [gbg] brought in a Raspberry Pi for this task. There’s the problem of actually getting data into an NES, though, and that’s something only a USB CopyNES can handle. After doing some 32-bit math, the NES sends this out to the Raspberry Pi and onto the bitcoin network.

When you consider that even a high-end gaming computer has little chance of mining a bitcoin in any reasonable amount of time, there’s little chance RetroMiner will ever be able to mine a bitcoin. It’s all random, though, so while it’s possible, we’ll just appreciate the awesome build for now.