Custom 40% Model F Keyboard Is 100% Awesome

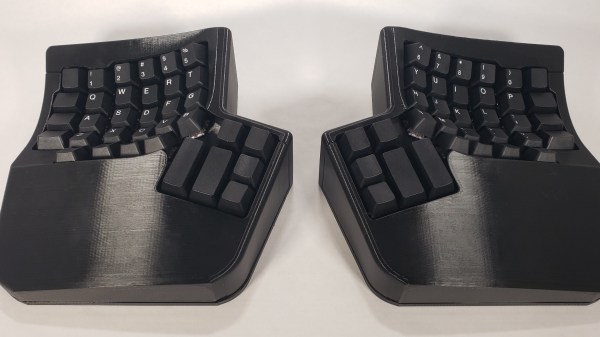
Look closely at this beauty. No, that’s not a chopped IBM Model M or anything — it’s a custom 40% capacitive buckling spring keyboard with an ortholinear layout made by [durken]. Makes it easy to imagine an alternate reality where IBM still exists as IBM and has strong keyboard game, or one where Unicomp are making dreams come true for those who don’t need anywhere near 101 or 104 keys.

Buckling what now? This lovely board uses capacitive buckling spring switches from an old IBM Model F. Basically, every time you press a key, a little spring is bent over (or buckled) in the name of connectivity. In the capacitive version, the spring pushes a hammer onto a pair of plates, causing a change in capacitance that gets recognized as a key press. In this case, those key presses are read by a TH-XWhatsit controller.

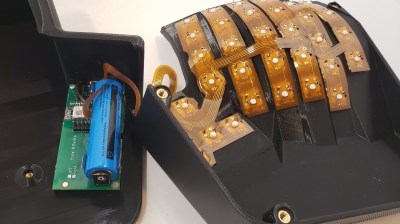
Using a Model F XT’s PCB as a guide, [durken] made a field of capacitive pads on one PCB, and made a second, ground plane PCB to avoid interference. In a true homage to these keyboards, [durken] decided to curve the PCB slightly, which naturally complicated almost everything, especially the barrel plate.

The solution was to make a separate barrel plate that slides into the case and gets screwed to the top via mounting bracket. For an extra bit of fun, [durken] mounted an SKCL lock switch under the IBM logo which enables solenoid mode. Be sure to check that out in the (updated!) video after the break.

One of the best things about a buckling spring keyboard is that each key sounds slightly different. Not so in solenoid mode, unless you were to use multiple solenoids.

Continue reading “Custom 40% Model F Keyboard Is 100% Awesome”

Odd Inputs And Peculiar Peripherals: A Joystick Like They Used To Make

With the rise of the gamepad courtesy of several generations of game consoles, the joystick has become an almost forgotten peripheral, sidelined into the world of flight simulators with its design tending towards copying that of aircraft joysticks. Classic joysticks from the 8- and 16-bit eras were far more workaday devices, more suitable for Space Invaders than Microsoft Flight Simulator, and it’s one of these that [Rob Smith] has recreated in 3D printed form.

The design he’s come up with bears a strong resemblance to the Zipstik, a classic stick that he already owned. It’s a fairly simple device that uses microswitches for all contacts, and is thus very tough. He’s produced a 3D-printed shaft but didn’t trust its strength, so copied the original by using a metal shaft with a pair of circlips. We remember our Zipstik as having a steel shaft; he replaces that with aluminium. A handy jig and a hacksaw allows him to create grooves for circlips, resulting in a sturdy ZipStik clone that should satisfy any retro gamer.

The stick is wired for an Amiga and includes a 555-based rapid-fire circuit, but that’s not the end of the electronics as he’s also created a USB interface for Amiga joysticks to go with it. Not everyone has a classic machine, so now everyone can enjoy the retro peripheral experience! Both builds can be seen in the videos below the break.

This isn’t the first Amiga joystick we’ve brought you, but it’s more sophisticated than some previous designs.

Continue reading “Odd Inputs And Peculiar Peripherals: A Joystick Like They Used To Make”

Odd Inputs And Peculiar Peripherals: The Morse Keyboard

When it comes to rendering text input into an electronic form,the newest keyboards use USB for wired interfacing, while the oldest Morse keys use a single conductor. Shall the two ever meet? For [Matthew Sparks] the answer is yes, with his “The Gadget” Morse-to-USB HID interface which presents a Morse key to a computer as though it were a USB keyboard.

At its heart is a Seeduino Arduino clone, upon which the Morse key waggles a pin, and which through the extensive magic of software recognizes the keyed characters and converts them into USB key presses for the computer. It’s thus a surprisingly simple project, and the write-up spends far more time proselytizing the art of the carrier wave than it does on Arduino code.

Morse is simultaneously a manual art form, an efficient means of communicating through congested radio bands, and an anachronism, which probably explains its continued appeal in the radio amateur fraternity. We’re not sure how many keyboard warriors will switch to the single key with this project, but we can see that it might be a useful aid to learning as well as a pretty quick input method for the owner of an experienced fist.

Morse has featured in many projects here before, not least in this assistive Morse keyboard.

Odd Inputs And Peculiar Peripherals: Touch This Macro Pad

The need to provide custom controls for complex software packages has been satisfied in many ways, the most usual of which is to have a configurable keypad. It’s a challenge [Meir Michanie] has taken up in a slightly different way, by creating a custom touch-screen macro pad. Unlike the buttons, this allows entirely custom layouts with different shaped keys in any configuration.

At its heart is a versatile ESP32 touch screen development board of the type that can be found easily among the pages of your favorite online electronics mart. The Arduino IDE has been used to program the device, and configuration is as simple of providing it with a PNG of the desired layout, and a CSV file to define the buttons. The whole then connects via BLE where it’s presented to the host computer as a keyboard. The result is one of the coolest macro pads we’ve ever seen, with a limitless number of options.

With such a neat idea it’s perhaps no surprise among the numbers of macro pads that have made it to these pages there might be another take on the same idea.

Odd Inputs And Peculiar Peripherals: A MacroPad With A Handy Layout Screen

The idea of a macro keypad is a great one, a set of keys programmable with frequent but complex tasks. But once programmed, how can the user keep track of which key does what? To save the world from grubby, hand-written sticky labels, here’s [Andreas Känner] with the Badger 2040 keypad — a macro pad with a display to show keymap info that’s fully programmable using CircuitPython.

At its heart is a Pimoroni Badger 2040 e-ink screen and RP2040 board which sits in a 3D-printed enclosure which in turn magnetically attaches to a 3D-printed keyboard enclosure. Inside is an I/O expander board, which is hand-wired to the switches. The firmware allows for easy configuration and even extension of the keypad itself, and presents itself to the host computer through USB. It’s even possible to have multiple different layouts on the same device.

Full details can be found in a comprehensive write-up on his website, and all the files are in a GitHub repository. If this doesn’t satisfy your need for customisable input goodness, then it’s not the first macro keypad we’ve shown you.

DIY Keyboard Can’t Get Much Smaller

The PiPi Mherkin really, really can’t get much smaller. The diminutive keyboard design mounts directly to the Pi Pico responsible for driving it, has a similar footprint, and is only about 9 mm thick. It can’t get much smaller since it’s already about as small as the Pi Pico itself.

Running on the Pi Pico is the PRK firmware, a keyboard framework that makes the device appear as a USB peripheral, checking the “just works” box nicely. The buttons here look a little sunken, but the switches used are available in taller formats, so it’s just a matter of preference.

We have to admit the thing has a very clean look, but at such a small size we agree it is perhaps more of a compact macropad than an actual, functional keyboard. Still, it might find a place in the right project. Design files are online, if you’re interested.

If you like small, compact keyboards but would prefer normal-sized keys, check out the PiPi Mherkin’s big brother, the PiPi Gherkin which gets clever with dual-function tap/hold keys to provide full functionality from only 30 keys, with minimal hassle.

Keyboards are important, after all, and deserve serious attention, as our own [Kristina Panos] knows perfectly well.

Wooden Keycaps Minus The CNC

What’s the most important part of the keycap? The average user-who-cares might tell you it’s the look and feel, but a keyboard builder would probably say the mounting style. That’s where the rubber meets the road, after all. For anyone trying to make their own keycaps, ‘the mount itself’ is definitely the correct answer. Try printing your own keycaps, and you’ll learn a lot about tolerances when it comes to getting the mount right.

Conversely, you could use a subtractive process like a wood mill to make keycaps. Sounds easy enough, right? But what about all of us who don’t have access to one? [cbosdonnat], who has no CNC, has blazed a cellulose trail, combining hand-tooled wooden keycaps with 3D-printed mounts to create fully-customized keycaps. It’s a great project with concise how-to, especially when it comes to building the jigs needed to keep the keycaps consistently sized and shaped.

It makes a whole lot of sense to start by hollowing out the bottom instead of shaping the business side first or even cutting out the key shape, since the mount is mechanically vital. Why waste time on the look and feel if the foundation isn’t there yet?

Hardwood is a must for DIY keycaps, because the walls need to be thin enough to both fit over the switch and within the matrix, and be sturdy enough not to break with use. We love the look of the varnish-transferred laser-printed logo, and only wish there was a video so we could hear the clacking.

There are all kinds of ways to put legends on DIY keycaps, like waterslide decals for instance.