Put In Pocket Change, Get Bitcoins

bitcoin

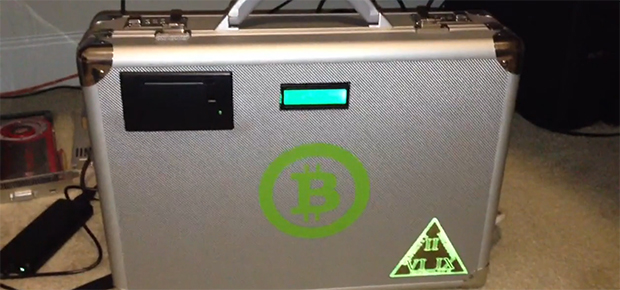
[gbg] put together a neat little project to get people familiarized with Bitcoins. A lot of techies know what Bitcoins are, but the impetus to download the Bitcoin client and start mining is a bit too much for some. [gbg] has a solution for this – a Bitcoin vending machine. Just dump your pocket change in the coin slot, and out comes a QR code that allows you to add Bitcoins to your wallet.

Inside this Bitcoin briefcase is a Raspberry Pi that connects to a local WiFi connection. Every five seconds, the Raspi looks at the current conversion rate of USD to Bitcoins. Once coins are deposited into the briefcase, a receipt complete with a scannable QR code is printed on a small thermal printer.

When [gbg] took this to the latest DEFCON, a lot of people were interested in the project and started shoveling change into the machine. So many people were interested that [gbg] and his compatriots are planning on turning this into a proper open-source device, complete with a bill reader and possibly an ASIC miner so the Pi can sell the coins it produces.

Check out the video below for some more info.

Continue reading “Put In Pocket Change, Get Bitcoins”

Building An Entire Pinball Machine From Just The Playfield

It all started  when [Iancole] bought a Fireball Home edition playfield on some famous auction website for $135. Originally, he had the intent of lighting the lamps with an Arduino, framing it, and hanging it on the wall of his office — which often happens with old pinball parts. But then his boys asked if he “could make it play”.

[Iancole] managed to find the pinball schematics online and started designing the electronics required by the many LEDs, solenoids and switches. As the LEDs and switches are on the same matrix, he chose a simple Arduino to cycle through them, giving the player the impression that the lights are constantly on. [Iancole] originally planned on using his raspberry Pi to control the solenoids, but he later switched to another Arduino because of the precise timing required.

Therefore, his Pi was used as the heart of the machine. It is interfaced to the two Arduinos to read states and send commands while running the game program, displaying HD graphics on a 24″ screen, playing music and game event sounds. All the electronics are proudly displayed on the backbox, and many developments are planned for it. Also, the machine will be on display at the Orlando Mini Maker Faire on October 5th!

Turning A Tiny Linux Box Into A Synthesizer

waveforms

For all the cool things the Raspberry Pi, BeagleBone, and other low-power Linux boards can do, there’s one thing we haven’t seen much of: creating music with software synthesizers. Yes, soft synths have been around for ages now, but compiling them for these ARM boards is something we haven’t seen much of (to say nothing of the Linux audio system). Luckily, [Paul] and [Trev] have put together a tutorial for making synthesizers on these small Linux boards using Csound, the premier audio programming language for Linux.

[Paul] and [Trev] have already put together a few Csound instruments that include a Vangelis-inspired synth, a Lorenz Strange Attractor FM synth, a drum machine, and a classic monophonic style synth. All these instruments are ready to play on a Raspi or BeagleBone and we’re sure we’ll see a few more applications of this great tool for creating musical instruments as more musicians are turned onto these small Linux boards.

Raspi Bitcoin Miner May Just Pay For Itself Eventually

We’re sure a lot of people out there have a Raspberry Pi or two lying around waiting for a project to come to mind.  [Dave] has an interesting solution to this orphaned hardware – use it to mine Bitcoins and perhaps put a few extra bucks in your pocket at the end of the year.

[Dave] is using a Raspberry Pi, powered USB hub, and an ASICMiner Block Erupter to do Bitcoin mining at 330 Megahashes per second. There are a few ancillary items such as a case and USB fan, but if you already have a Raspberry Pi, you’re only looking at a $50 USD investment to have a dedicated Bitcoin miner.

According to this Bitcoin mining profitability calculator, with a $50 investment that can mine at 330 MH/s, you’re looking at a hardware break even point of about 120 days. You could cut that down to just a few months if you overclock your ASICMiner, but it’s still relatively late in the game for amateur Bitcoin miners to make a substantial amount of money. Think of Bitcoin mining as more of hobby, and you’ll hopefully be more realistic about your goals.

Voice Controlled Home Automation Uses Raspberry Pi And LightwaveRF

It’s not quite artificial intelligence, but saying “Jeeves, lights!” will switch on the bulbs in the room. [Chipos81] built the voice-activated home automation around a Rapsberry Pi board with LightwaveRF devices switching lights and outlets.

The LightwaveRF system offers a WiFi link which provides Internet connectivity for all of those devices in your house. This makes it a snap for [Chipos81] to control them from the RPi. To provide speech recognition he’s using CMU Sphinx. It’s an open source speech recognition library developed by researchers at Carnegie Mellon University and released under a BSD license. It seems to do a great job in the video of quickly parsing several sets of commands.

“Jeeves” will even talk back to you to confirm a command. This is generated by Festival, a package developed by the University of Edinburgh.  This provides some entertainment in the last seconds of the video as we detect a distinct Scottish accent when it says “See you tomorrow”.

The GPIO pins provide a bit of feedback, using three colored LEDs to let you know what is going on with the system. There’s even an IR LED used to add voice control to your Television.

Continue reading “Voice Controlled Home Automation Uses Raspberry Pi And LightwaveRF”

Raspberry Pi Camera Built As Part Of Advertising Campaign

the-rpi-camera

Here’s yet another example of well targeted advertising. This camera built around a Raspberry Pi is a giveaway from Sprite. The “lucky” winner of the camera will have the pleasure of seeing the Sprite logo as a watermark on all of the images they snap with it. But in the right hands it’s a simple hack to remove that “feature” (they published the Python script that adds the watermark) or to just scrap the parts for another project. Either way, Sprite got us to say their name three times in this paragraph so the campaign worked.

The most obvious part of this build is the custom cast resin case that they came up with which is a gaudy cartoon-like monstrosity. It protects the case-less Raspberry Pi board, and mounts the Pi Camera board so that the lens is positioned correctly. The lipstick-sized module mounted in the lower back half of the case is a 2400 mAh portable power supply with a USB charging port sticking out the side. This makes us wonder, do you have to wait for the RPi to power up before snapping a picture? If the size and color didn’t get you noticed by everyone the shutter sound will. it shouts the name of the soda company whenever you press the shutter release button.

If you’re more of a high-end photography enthusiast this DSLR wedded with an RPi will be of more interest.

Xbox 360 Light Right And RF Module Connected To Raspberry Pi

rpi-connected-to-xbox-lightring

If you want to mess around with your Xbox 360 controllers on a computer Microsoft would be happy to sell you a USB dongle to do so. But [Tino] went a different route. The board that drives the Xbox 360’s status light ring also includes the RF module that wirelessly connects the controllers. He wired this up to his Raspberry Pi using the GPIO header.

The module connects via an internal cable and is treated much like a USB device by the Xbox motherboard. The problem is that it won’t actually handle the 5V rail found on a USB connector; it wants 3.3V. But this is no problem for the RPi’s pin header. Once a few connections have been made the lights are controlled via SPI I2C and [Tino] posted some example code up on Github to work with the RF module. He plans to post a follow-up that interfaces the module with a simple microcontroller rather than an RPi board. If you can’t wait for that we’re sure you can figure out the details you need by digging through his example code.