ARM Programming By Example

The ARM processor is popping up everywhere. From Raspberry Pis, to phones, to Blue Pill Arduino-like boards, you don’t have to go far to find an ARM processor these days. If you program in C, you probably don’t care much or even think about it. But do you know ARM assembly language? Well, if you look at it one way, it can’t be too hard. The CPU only has about 30 distinct operations — that’s why it is called RISC. Of course, sometimes fewer instructions actually make things more difficult. But you can get a great starting tutorial with the 21 programs on the ARM Assembly by Example website.

You need a 32-bit ARMv6 or better — so Raspberry Pi will work here. The compiler, of course, is gcc and all the associated tools. if you have the right hardware, there are sections on using the floating point unit and the NEON co-processor, too.

Continue reading “ARM Programming By Example”

A Raspberry Pi Phone For The Modern Era

While it might seem like mobile phones are special devices, both in their ease of use and in their ubiquity in the modern culture, they are essentially nothing more than small form-factor computers with an extra radio and a few specific pieces of software to run. In theory, as long as you can find that software (and you pay for a service plan of some sort) you can get any computer to work as a phone. So naturally, the Raspberry Pi was turned into one.

[asherdundas], the phone’s creator, actually found a prior build based around the Raspberry Pi before starting this one. The problem was that it was built nearly a decade ago, and hadn’t been updated since. This build brings some modernization to the antiquated Pi phone, and starts with a 3D printed case. It also houses a touchscreen and a GSM antenna to connect to the cell network. With some other odds and ends, like a speaker and microphone, plus a battery and the software to tie it all together, a modern functional Raspberry Pi phone was created, with some extra details available on the project page.

The phone has the expected features — including calling, texting, and even a camera. A small WiFi USB dongle allows it to connect to the Internet too, allowing it to do all of the internet browsing a modern smartphone might want to do. The only thing that it might be pretty difficult to do is install Android apps, and although there are ways to get Android apps working in Linux, it’s not always strictly necessary to have this functionality.

3d printed fish feeder system with food basin, electronic housing with red button on top and servo attached on the side. A pile of food is coming out of the 3D printed fish feeder mechanism. In the middle of the picture is a can of goldfish pellet food. On the right is a hand interacting with a propped up cell phone, setting a time.

Sleep Easy With The Fishes Well Fed

Sometimes daily tasks, like feeding pets, can feel like a real chore. To help with alleviate the mundane aspects of daily life, [Erik Berglund] has created an automatic fish feeder, complete with 3D print files, firmware, and an Android app for complete control over scheduling and feeding.

The mechanics of the fish feeder include a screw conveyor system that pushes the food pellets fed from a food store basin. The screw conveyor is driven by a Feetech FS5106R servo which provides enough force to overcome jamming that might occur with pellets getting stuck in the conveyor system. [Erik Berglund] writes that the system can dispense about 0.9 g/s and that it’s designed for granulated food, as flakes have problems because “their low density and large surface area tend to get them stuck in the throat of the hopper” — an issue that we’ve looked into previously.

[Erik Berglund] used [coberdas]’s fish feeder as the base, upgrading it with a better servo, adding a Raspberry Pi Zero W along with software for the Pi and an Android application to control the schedule of feedings. There’s also a DS1307 real time clock module to keep precision time and a push button for “manual” feeding. If you’re looking to follow along at home, you can find the Python scripts that run on the Pi and the source code for the Android application in their respective GitHub repositories.

Continue reading “Sleep Easy With The Fishes Well Fed”

An e-ink screen mounted on a small white box is flanked by four mechanical keyboard switches. A power cable is routed from the device to a power bank that is mostly out of frame.

DIY E-Reader Has Hot Swap Mechanical Keys

In the early days of e-readers, most devices had physical buttons to turn pages and otherwise navigate the device. [bwkrayb] longed for these halcyon days before touchscreen e-readers and improved on the concept by adding mechanical keyswitches.

By using an Adafruit NeoKey 1×4 as the keyboard interface, the e-reader has four hot-swappable keyboard sockets with built-in LEDs. [bwkrayb] is hoping to use these LEDs to implement a front lighting system in a future revision of the hardware.

The 3.7″ screen displays pages after running an EPUB through ebooklib and Beautiful Soup to generate files that can be used by the Waveshare drivers. Refresh time is reportedly slow, although [bwkrayb] suspects this  might be due more to the limited power of the Raspberry Pi Zero 2 more than the display itself.

If you want to see some other open e-reader projects we’ve covered, check out the EPub-Inkplate or the Open Book Project.

Mac 128K Emulator Gets DIY Ceramic Enclosure

Creative technologist [Joselyn McDonald] wanted to hone her ceramic skills by building an iconic Macintosh 128K sculpture, complete with a fully functional operating system.

At first, she was determined to use Processing to create an interface for her sculpture by recreating the UI visually and adding some touch controls. However, she soon abandoned this tedious task after discovering MacintoshPi, which steps you through installing Mac OS 7, 8, and 9 emulators on a Raspberry Pi. [Joselyn] has also installed several retro games, including DOOM II, Carmen Sandiego, and Sim City, thanks to sites like Macintosh Garden and Macintosh Repository. 

Next, [Joselyn] hopes to set it up to display her and her partner’s schedules, and to let friends play around with nostalgic games. This piece was made using hand building, but other cool ceramic techniques like this slip cast dog bowl and this stone 3D printer have us thinking about what other types of enclosures could be built!

Retro Speaker Becomes The Perfect Micro PC

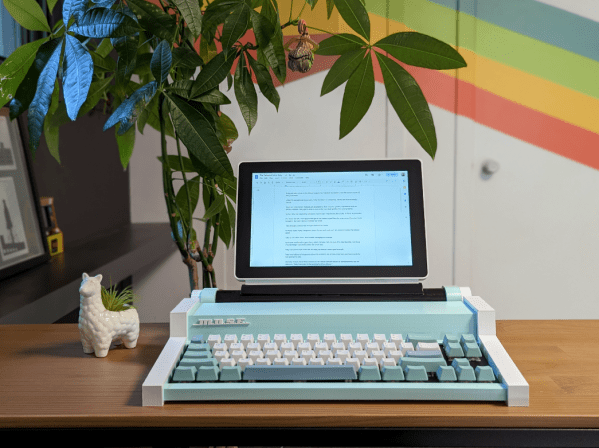
We’ve seen many cyberdecks and home built computers in our time here at Hackaday, but we’ve not seen many so tiny and so neatly built as this one from [Carter Hurd]. It takes the form of a tiny retro PC with a working display and keyboard, and we like it a lot.

The diminutive computer started life as a neat little retro themed Bluetooth speaker that a company bravely sent him for a project when he declined the chance to review it. Out came the speaker and electronics, and in went a USB Blackberry keyboard with a custom made bezel where the speaker’s keys had been.

The display is a 4″ LCD designed for a Raspberry Pi, and somewhat incredibly, he trimmed its corners to fit into the case. Making the curved CRT-style display front was achieved with vacuum form plastic, and a new display bezel was 3D printed.

A full-size Raspberry Pi fits in the base of the unit, and here he admits that it’s not the tidiest job. Perhaps a Pi Zero would have been more unobtrusive, but either way from the top and front it’s a really cute little machine. It may not be the only tiny cyberdeck we’ve seen, but it’s certainly a well-built one.

Continue reading “Retro Speaker Becomes The Perfect Micro PC”

A person sits on a couch in the background wearing a VR headset. A keyboard is on their lap and a backpack studded with antennas and cables sits in the foreground.

2022 Cyberdeck Contest: Cyberpack VR

Feeling confined by the “traditional” cyberdeck form factor, [adam] decided to build something a little bigger with his Cyberpack VR. If you’ve ever dreamed of being a WiFi-equipped porcupine, then this is the cyberdeck you’ve been waiting for.

Craving the upgradability and utility of a desktop in a more portable format, [adam] took an old commuter backpack and squeezed in a Windows 11 PC, Raspberry Pi, multiple wifi networks, an ergonomic keyboard, a Quest VR headset, and enough antennas to attract the attention of the FCC. The abundance of network hardware is due to [adam]’s “new interest: a deeper understanding of wifi, and control of my own home network even if my teenage kids become hackers.”

The Quest is setup to run multiple virtual displays via Immersed, and you can relax on the couch while leaving the bag on the floor nearby with the extra long umbilical. One of the neat details of this build is repurposing the bag’s external helmet mount to attach the terminal unit when not in use. Other details we love are the toggle switches and really integrated look of the antenna connectors and USB ports. The way these elements are integrated into the bag makes it feel borderline organic – all the better for your cyborg chic.

For more WiFi backpacking goodness you may be interested in the Pwnton Pack. We’ve also covered other non-traditional cyberdecks including the Steampunk Cyberdeck and the Galdeano. If you have your own cyberdeck, you have until September 30th to submit it to our 2022 Cyberdeck Contest!