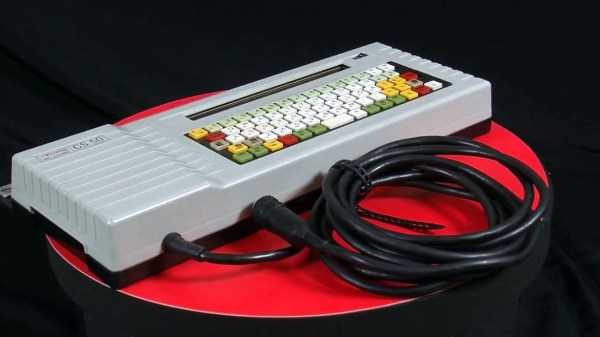
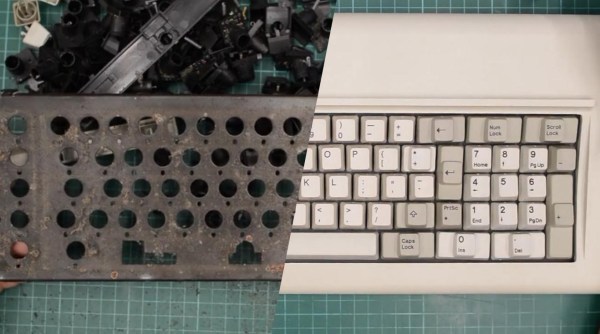
Performing A Chip Transplant To Resurrect A Dead Board

[Uri Shaked] accidentally touched a GPIO pin on his 3.3 V board with a 12 V alligator clip, frying the board. Sound familiar? A replacement would have cost $60, which for him wasn’t cheap. Also, he needed it for an upcoming conference so time was of the essence. His only option was to try to fix it, which in the end involved a delicate chip transplant.

Removing the shield on the Bluetooth LE boardThe board was the Pixl.js, an LCD board with the nRF52832 SoC with its ARM Cortex M4, RAM, flash, and Bluetooth LE. It also has a pre-installed Espruino JavaScript interpreter and of course the GPIO pins through which the damage was done.

Fortunately, he had the good instinct to feel the metal shield over the nRF52832 immediately after the event. It was hot. Applying 3.3 V to the board now also heated up the chip, confirming for him that the chip was short-circuiting. All he had to do was replace it.

Digging around, he found another nRF52832 on a different board. To our surprise, transplanting it and getting the board up and running again took only an hour, including the time to document it. If that sounds simple, it was only in the way that a skilled person makes something seem simple. It included plenty of delicate heat gun work, some soldering iron microsurgery, and persistence with a JLink debugger. But we’ll leave the details of the operation and its complications to his blog. You can see one of the steps in the video below.

It’s no surprise that [Uri] was able to dig up another board with the same nRF52832 chip. It’s a popular SoC, being used in tiny, pocket-sized robots, conference badges, and the Primo Core board along with a variety of other sensors.

Continue reading “Performing A Chip Transplant To Resurrect A Dead Board”

Epoxy Fix For A Combusted PCB

When the Magic Smoke is released, chances are pretty good that you’ve got some component-level diagnosis to do. It’s usually not that hard to find the faulty part, charred and crusty as it likely appears. In that case, some snips, a new non-crusty part, and a little solder are usually enough to get you back in business.

But what if the smoke came not from a component but from the PCB itself? [Happymacer] chanced upon this sorry situation in a power supply for an electric gate opener. Basking in the Australian sunshine for a few years, the opener started acting fussy at first, then not acting at all. Inspection of its innards revealed that some unlucky ants had shorted across line and neutral on the power supply board, which burned not only the traces but the FR4 of the board as well. Rather than replace the entire board, [Happymacer] carefully removed the carbonized (and therefore conductive) fiberglass and resin, leaving a gaping hole in the board. He fastened a patch for the hole from some epoxy glue; Araldite is the brand he used, but any two-part epoxy, like JB Weld, should work. One side of the hole was covered with tape and the epoxy was smeared into the hole, and after a week of curing and a little cleanup, it was ready for duty. The components were placed into freshly drilled holes, missing traces were replaced with wire, and it seems to be working fine.

This seems like a great tip to keep in mind for when catastrophe strikes your boards. There are more extreme ways to do it, of course, but perhaps none so flexible. After all, epoxy is versatile stuff.

Damaged Power Cord Repaired With Shop-Made Mold

We’ve likely all seen a power tool with a less-than-functional strain relief at one end of the power cord or the other. Fixing the plug end is easy, but at the tool end things are a little harder and often not worth the effort compared to the price of just replacing the tool. There’s no obsolescence like built-in obsolescence.

But in the land of Festo, that high-quality but exorbitantly priced brand of premium tools, the normal cost-benefit relationship of repairs is skewed. That’s what led [Mark Presling] to custom mold a new strain relief for a broken Festool cord. The dodgy tool is an orbital sander with Festool’s interchangeable “Plug It” type power cord, which could have been replaced for the princely sum of $65. Rather than suffer that disgrace, [Mark] built a mold for a new strain relief from two pieces of aluminum. The mold fits around the cord once it has been slathered with Sugru, a moldable adhesive compound. The video below shows the mold build, which has some interesting tips for the lathe, and the molding process itself. The Sugru was a little touchy about curing, but in the end the new strain relief looks almost like an original part.

Hats off to [Presser] for not taking the easy way out, and for showing off some techniques that could really help around the shop. We suppose the mold could have been 3D-printed rather than machined; after all, we’ve seen such molds before, and that 3D-printed dies can be robust enough to punch metal parts.

Continue reading “Damaged Power Cord Repaired With Shop-Made Mold”

A Stereo Tube Amp For Less Than $5

Many of us have aspirations of owning a tube amp. Regardless of the debate on whether or not tube audio is nicer to listen to, or even if you can hear the difference at all, they’re gorgeous to look at. However, the price of buying one to find out if it floats your boat is often too high to justify a purchase.

A motor transformer

[The Post Apocalyptic Inventor] has built a stereo tube amplifier in the style of the Fallout video games. The idea came when he realised that the TK 125 tape recorder manufactured by Grundig was still using tube audio in the late 60s. What’s more, they frequently sell on eBay for 1-10€ in Germany. [TPAI] was able to salvage the main power amplifier from one of these models, and restore it so that it could be re-purposed and see use once more.

The teardown of the original cassette recorder yields some interesting parts. Firstly, an integrated motor transformer — an induction motor whose stator acts as the magnetic core of the transformer responsible for the tube electronics. There’s also an integrated capacitor which contains three separate electrolytics. The video after the break is well worth a watch (we always find [TPAI]’s videos entertaining).

A new chassis is created out of a steel base plate and aluminium angle, and some neat frames for the motor transformers are made from scrap copper wire bent and soldered together. It looks great, though there’s always the option to use a cake tin instead.

If you’re interested in the design of tube amps, we’ve covered heaps of cool builds: from this low-voltage design to this tiny guitar amp, or even ones using tubes which are flat.

Continue reading “A Stereo Tube Amp For Less Than $5”

Amiga Repairs Put One Tough Little Machine Back In Service

Returning a piece of retro hardware to factory condition is generally a labor of love for the restorationist. A repair, on the other hand, is more about getting a piece of equipment back into service. But the line between repair and restoration is sometimes a fine one, with the goals of one bleeding over into the other, like in this effort to save an otherwise like-new Amiga 2000 with a leaky backup battery.

Having previously effected emergency repairs to staunch the flow of electrolyte from the old batteries and prevent further damage, [Retromat] entered the restoration phase of the project. The creeping ooze claimed several caps and the CPU socket as it spread across the PCB, but the main damage was to the solder resist film itself. In the video below you can clearly see flaky, bubbly areas in the mask where the schmoo did its damage.

Using a fiberglass eraser, some isopropyl alcohol, and far more patience than we have, [Retromat] was able to remove the damaged resist to reveal the true extent of the damage below. Thankfully, most of the traces were still intact; only a pair of lines under the CPU socket peeled off as he was removing it. After replacing them with fine pieces of wire, replacing the corroded caps and socket, and adding a coin-cell battery holder to replace the old battery, the exposed traces were coated with a varnish to protect them and the machine was almost as good as new.

Amigas were great machines in their day and launched more than one business. They’ve proved their staying power too, some even in mission-critical roles.

Continue reading “Amiga Repairs Put One Tough Little Machine Back In Service”

Repairing A Capacitor Inside A Potted Transformer

We always enjoy watching [Mr. Carlson’s] videos because he looks like he is taping in a rocket ship set from a 1950s drive-in movie. In a recent video, he identified an old oscilloscope that had a transformer assembly that is potted with a pair of capacitor inside. The capacitor failed so [Carlson] decided he would repair it. The problem? The transformer and capacitor are potted together with some sort of tar compound. You can see the result in the video below.

He actually didn’t know for sure the capacitor was really in the transformer, but they were in the schematic and by process of elimination, it had to be inside. Once he liberated the transformer, he did some tests to identify the capacitor before the depotting. The depotting takes a lot of heat and could damage the transformer, so he wanted to make sure it was really in there.

Continue reading “Repairing A Capacitor Inside A Potted Transformer”

Replace Old Electrolytics? Not So Fast… Maybe

[CuriousMarc] was restoring an old Model 19 TeleType. The design for these dates back to the 1930s, and they are built like tanks (well, except for the ones built during the war with parts using cheaper metals like zinc). Along the way, he restored a hefty tube-based power supply that had two very large electrolytic capacitors. These dated from the 1950s, and common wisdom says you should always replace old electrolytics because they don’t age well and could damage the assembly if powered up. [Marc] didn’t agree with common wisdom, and he made a video to defend his assertion which you can see below.

If you look at the construction of electrolytic capacitors, one plate of the capacitor is actually a thin layer that is formed electrically. In some cases, a capacitor with this plate is damaged can be reformed either by deliberate application of a constant current or possibly even just in normal operation.

Continue reading “Replace Old Electrolytics? Not So Fast… Maybe”