Cheap Spot Welder Teardown

It used to be hard to dump enough electricity through two pieces of metal to meld them together. But a lithium-ion battery can do it. The question is, should it? [The Signal Path] takes a cheap battery-based spot welder apart to see what’s inside and tries to answer that question. You can see the teardown in the video below.

The cheap welder has some obvious safety problems so the first thing was to trim down some wires and also retinning some of the PCB traces to ensure they are the lowest possible resistance. Of course, the less resistance in the wiring, the more current is available for welding.

Continue reading “Cheap Spot Welder Teardown”

Mustool Scopemeter Review And Teardown

There was a time when calculators became so powerful it was hard to tell them from little computers. The same thing seems to be happening now with multimeters. They now often have large screens and basic oscilloscope functionality. The specs keep getting better. While early cheap scopemeters were often relatively low frequency, many are now claiming bandwidths that would have cost quite a bit a few decades ago. A case in point is the Mustool MDS8207 which [IMSAI Guy] reviews and does a teardown of in the videos you can see below. It claims a 40 MHz bandwidth with 200 megasamples per second on a single channel.

The only downside in the claimed specifications is that the sensitivity isn’t great given that the lowest setting is 500 mV per division. Then again for a meter that runs under $100, any scope function would seem to be a bonus. The meter does all the other things you expect a meter to do these days, such as reading voltage, frequency, capacitors, temperature, etc. The response time of the meter is relatively slow, but you can get used to that.

Continue reading “Mustool Scopemeter Review And Teardown”

Beautiful Engineering In This Laser Unit From A Tornado Jet Fighter

Those of use hailing from the UK may be quite familiar with the Royal Air Force’s Tornado fighter jet, which was designed to fight in a theoretical nuclear war, and served the country for over 40 years. This flying deathtrap (words of an actual serving RAF fighter pilot this scribe met a few years ago) was an extremely complex machine, with state-of-the-art tech for its era, but did apparently have a bit of a habit for bursting into flames occasionally when in the air!

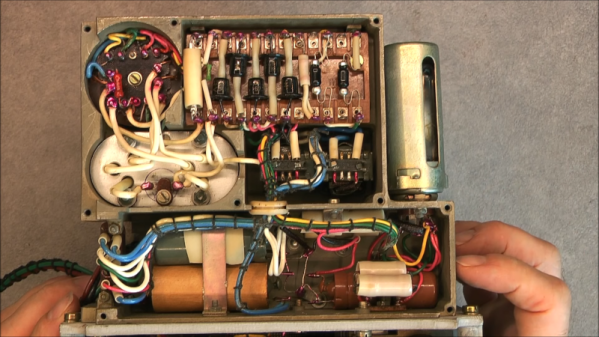
Anyway, the last fleet is now long retired and some of the tech inside it is starting to filter down into the public domain, as some parts can be bought on eBay of all places. [Mike] of mikeselectricstuff has been digging around inside the Tornado’s laser head unit,  which was part of the bomber’s laser-guided missile subsystem, and boy what a journey of mechanics and electronics this is!

Pulse-mode optically pumped YAG laser

This unit is largely dumb, with all the clever stuff happening deep in an avionics bay, but there is still plenty of older high-end tech on display. Using a xenon-discharge-tube pumped yttrium aluminum garnet (YAG) laser, operating in pulsed mode, the job of the unit is to illuminate the ground target with an IR spot, which the subsequently fired missiles will home on to.

Designed for ground-tracking, whilst the aircraft is operating at speed, the laser head has three degrees of moment, which likely is synchronized with the aircraft movement to keep the beam steady. The optical package is quite interesting, with the xenon tube and YAG rod swimming in a liquid cooling bath, inside a metal housing. The beam is bounced around inside the housing using many prisms, and gated with a Q-switch which allows the beam to build up in intensity, before be unleashed on the target. Also of note is the biggest photodiode we’ve ever seen — easily over an inch in diameter, split into four quadrants, enabling the sensor to resolve direction changes in the reflected IR spot and track its error. A separate photodiode receiver forms part of the time-of-flight optical range finder, which is also important information to have when targeting.

There are plenty of unusual 3-phase positioning motors, position sensors, and rate gyros in the mix, with the whole thing beautifully crafted and wired-up military spec. It is definitely an eye opener for what really was possible during the cold war years, even if such tech never quite filtered down to civilian applications.

We’ve seen a few bits about the Tornado before, like this over-engineered attitude indicator, and here’s the insides of an old aircraft QAR (Quick Access Recorder)

Continue reading “Beautiful Engineering In This Laser Unit From A Tornado Jet Fighter”

retro breadboard

Retro Breadboard Gives Up Its 1960s Secrets

When we see [Ken Shirriff] reverse engineering something, it tends to be on the microscopic level. His usual forte is looking at die photos of strange and obsolete chips and figuring out how they work. And while we love those efforts, it’s nice to see him in the macro world this time with a teardown and repair of a 1960s-era solderless breadboard system.

If you’d swear the “Elite 2 Circuit Design Test System” featured in [Ken]’s post looks familiar, it’s probably because you caught his partner-in-crime [CuriousMarc]’s video on the very same unit, an eBay score that arrived in non-working condition. The breadboard, which retailed for $1,300 in 1969 — an eye-watering $10,000 today — was clearly not aimed at the hobbyist market. Truth be told, we didn’t even know that solderless breadboards were a thing until the mid-70s, but live and learn. This unit has all the bells and whistles, including three variable power supplies, an array of switches, buttons, indicator lamps, and jacks for external connections, and a pulse generator as well as a legit function generator.

Legit, that would be, if it actually worked. [Ken]’s contribution to the repair was a thorough teardown of the device followed by reverse-engineering the design. Seeing how this thing was designed around the constraints of 1969 technology is a real treat; the metal can transistor and ICs and the neat and tidy PCB layout are worth the price of admission alone. And the fact that neon lamps and their drivers were cheaper and easier to use than LEDs says a lot about the state of the art at the time.

As for the necessary repairs, [Marc]’s video leaves off before getting there. That’s fine, we’re sure he’ll put [Ken]’s analysis to good use, and we always enjoy [Marc]’s video series anyway. The Apollo flight comms series was a great one, too. Continue reading “Retro Breadboard Gives Up Its 1960s Secrets”

Reflow Hotplate Teardown Uncovers The Bare Minimum

[EEforEveryone] is trying to find a good hot plate for reflow soldering. After trying one cheap unit, he got another one. He was a bit underwhelmed. The grounding was suspect and the bed wasn’t totally flat. He tore it apart and was surprised that there was very little inside. While the construction wasn’t perfect, it was better than the previous unit. You can see a video of the teardown and review below.

Before powering it up, the first order of business was to rewire the ground system. After that, it was time to try it. However, by confusing Fahrenheit and Centigrade, he set the temperature much higher than necessary which creating a little smoke. Fixing the temperature helped, but there was still a bit of a smoky smell that eventually subsided.

The verdict? The hot plate worked well enough, but you probably do want to check the ground wiring before using it. That’s often a good idea where cheap equipment is concerned, anyway. But the real takeaway is that it looks like you could homebrew something equivalent without much trouble. The controller is an off-the-shelf module. A switch and a plug aren’t hard to figure out. The heating element could be a silicone heater or PCB heater meant for a 3D printer.

Of course, there are other options. You could use a wok. Or why not a waffle iron? You can also make a custom PCB.

Continue reading “Reflow Hotplate Teardown Uncovers The Bare Minimum”

Pre-exploded PSU close-up: shown is inductor with the heatsink it shorted against.

The Little Replacement PSU That Could: Kill A Microsoft Surface And Monitor

Recently [Big Clive], everyone’s favorite purveyor of anything electronic that’s dodgy, cheap, cheerful, decidedly crispy or any combination thereof, got sent a very dead external power supply unit. Being clearly a third-party PSU with poorly written and many (likely not truthful) safety approval markings on its label, this PSU had the dubious honor of having destroyed a Microsoft Surface computer as well as the monitor that was connected at the time.

In [Clive]’s video (also embedded after the break) the black and very crispy board is examined, showing a wealth of vaporized traces and plenty of soot. What’s however most fascinating is the failure mode: instead of something obvious like e.g. the main transformer between the primary and secondary side failing, here it would seem that an inductor (see heading image) on the secondary side had its insulation rubbed off and shorted on a nearby heatsink. A heatsink that just happened to be also electrically connected on the primary (mains-level) side.

Judging by the former owner’s report and aftermath, this led to a very sudden and violent demise of the PSU, with mains power very likely making its way into the unsuspecting Surface system and connected monitor. The number of ‘very nope’ design decisions made in this PSU are astounding, and a lesson for both aspiring EEs and anyone considering getting a ‘cheap’ third-party replacement PSU.

(Thanks to [Helge] for the tip)

Continue reading “The Little Replacement PSU That Could: Kill A Microsoft Surface And Monitor”

Soviet-Era Auto Dialler Uses Magnetic Rope Core Memory

We’ve seen a few interesting magnetic core memories on these fine pages over the years, but we don’t recall seeing too many user programmable magnetic core memory devices. This interesting Russian telephone auto dialer in its day would have been a very useful device, capable of storing and dialing forty user programmable 7-digit numbers. [mikeselectricstuff] tore into one (video, embedded below), and found some very interesting tech. For its era, this is high technology stuff. Older Russian tech has a reputation for incredibly ingenious use of older parts, that can’t be denied. After all, if it works, then there’s no need to change it. But anyway, what’s interesting here is how the designers decided to solve the problem of programming and recalling of numbers, without using a microprocessor, by using discrete logic and core rope memory.

This is the same technology used by the Apollo Guidance Computer, but in a user configurable form, and obviously much smaller storage capacity. The core array consists of seven, four-bit words, one word per telephone digit, which will be read out sequentially bottom to top. The way you program your number is to take your programming wire, insert it into the appropriate hole (one row related to numbers 1-20, the other row is shifted 1-20 for the second bank) and thread it along the cores in a weave type pattern. Along the way, the wire is passed through or bypasses a particular core, depending upon the digit you are coding for. They key for this encoding is written on the device’s lid. At the end, you then need to terminate the wire in the matching top connector, to allow the circuit to be completed.

As far as we can tell, the encoding is a binary sequence, with a special ‘stop’ code to indicate telephone numbers with less than seven digits. We shall leave further analysis to interested parties, and just point you at the Original manufacturer schematics. Enjoy!

Of course we’re not just going to mention rope core memory and the AGC without linking to a fantastic article about the very same, and if that’s wetting your appetite for making a rope core memory, here’s a little thing about that too!

Continue reading “Soviet-Era Auto Dialler Uses Magnetic Rope Core Memory”