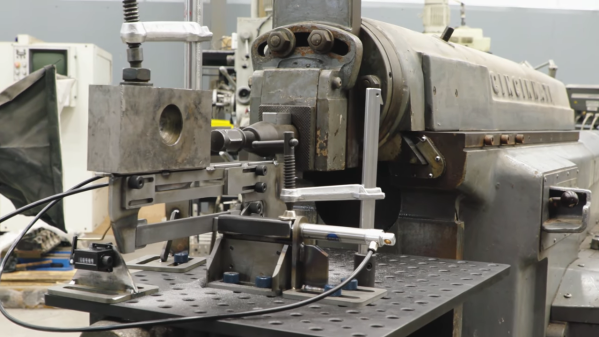
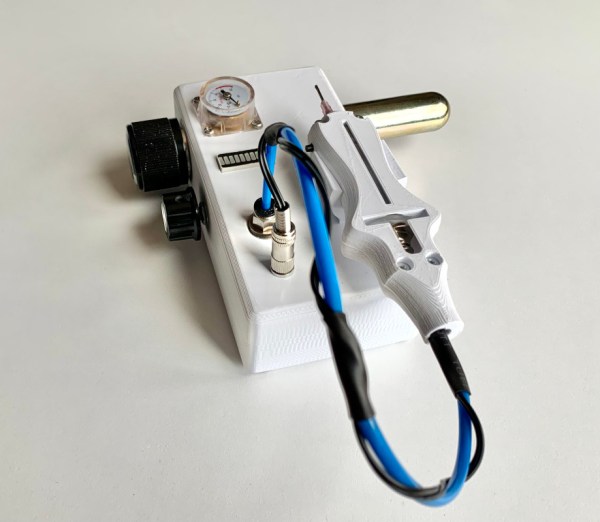
Homemade Metal Band Saw

As the channel name implies, [Workshop From Scratch] is building a growing list of tools and machines from scratch. His latest edition is a heavy-duty metal band saw.

As with all his tools, the frame consists of thick welded steel components. The blade runs on a pair of modified belt pulleys and is driven by a motor with a worm gearbox. The blade tension is adjustable, and so are the pair of blade guides. To slowly lower the blade while cutting, [Workshop From Scratch] added a hydraulic piston with an adjustable valve to limit the lowering speed. When it reaches the bottom, a limit switch turns off the motor. The saw is mounted on a heavy steel table and can rotate at the base to cut at different angles. A heavy-duty vise, also built from scratch holds the workpieces securely in place.

Judging by the amount of steel he cuts for his projects, we imagine this saw will be a welcome addition to the shop. It’s impressive what he is able to build with just a drill, angle grinder, and welder. Many of the other tools used in the video, like the magnetic drill press and hydraulic vise are also his handiwork. Continue reading “Homemade Metal Band Saw”

Modified Microwave Cures Resin Parts With Style

Once you make the leap to resin-based 3D printing, you’ll quickly find that putting parts out in the sun to cure isn’t always a viable solution. The best way to get consistent results is with a dedicated curing chamber that not only rotates the parts so they’re evenly exposed to the light, but allows you to dial in a specific curing time. A beeper that goes off when the part is done would be handy as well. Wait, this is starting to sound kind of familiar…

As you might expect, [Stynus] isn’t the first person to notice the similarities between an ideal UV curing machine and the lowly microwave oven. But his conversion is certainly one of the slickest we’ve ever seen. The final product doesn’t look like a hacked microwave so much as a purpose-built curing machine, thanks in large part to the fact that all of the original controls are still functional.

The big break there came when [Stynus] noticed that the control panel was powered by a one-time programmable PIC16C65B microcontroller. Swapping that out for the pin-compatible PIC16F877A opened up the possibility of writing custom firmware to interface with all the microwave’s original hardware, he just needed to reverse engineer how it was all wired up. It took some time to figure out how the limited pins on the microcontroller ran the LED display and read the buttons and switches at the same time, but we’d say the final result is more than worth the work.

With full control over the microwave’s hardware, all [Stynus] had to do was strip out all the scary high voltage bits (which were no longer functional to begin with) and install an array of UV LEDs. Now he can just toss a part on the plate, spin the dial to the desired curing time, and press a button. In the video below, you can see he’s even repurposed some of the buttons on the control panel to let him do things like set a new default “cook” time to EEPROM.

Compared to the more traditional fused deposition modeling (FDM) 3D printers, resin printing requires a lot of additional post-processing and equipment. You don’t necessarily have to gut your microwave just to cure your prints, but you’d be wise to fully consider your workflow will look like before pulling the trigger on that shiny new printer.

Continue reading “Modified Microwave Cures Resin Parts With Style”

If You Can Measure It, You Must Display It

When can you be sure that you’re logging enough data? When you’re logging all of the data! Of course there are exceptions to the above tongue-in-cheek maxim, but it’s certainly a good start. Especially since data storage on, for instance, an SD card is so easy and cheap these days, there’s almost no reason to not record most every little bit of data that your project can produce. Even without an SD card, many microcontrollers have enough onboard flash, or heck even RAM, to handle whatever you throw at them. The trick, then, is to make sense out of that data, and for me at least, that often means drawing pretty pictures.

I was impressed this week by a simple but elegant stepper motor diagnosis tool hacked together by [Zapta]. Essentially, it’s a simple device: it’s a “Black Pill” dev board, two current sensors, an EEPROM for storing settings, and a touchscreen. Given that most of us with 3D printers rely on stepper motors to get the job done, it’s certainly interesting to do some diagnostics.

By logging voltage and current measurement on each phase of a stepper motor, you can learn a lot about what’s going on, at least if you can visualize all that data. And that’s where [Zapta]’s tool shines. It plots current vs motor speed to detect impedance problems. Tuning the current in the first place is a snap with Lissajous patterns, and it’ll track your extruder’s progress or look out for skipped steps for you across an entire print job. It does all this with many carefully targeted graphs.

I was talking to [Niklas Roy] about this, and he said “oh check out my hoverboard battery logger“. Here we go again! It sits inline with the battery and logs current and voltage, charging or discharging. Graphs let you visualize power usage over time, and a real-time-clock lets you sync it with video of using the hoverboard to help make even more sense of the data.

So what are you waiting for? Sensors are cheap, storage is cheap, and utilities to graph your data after the fact are plentiful. If you’re not logging all the relevant data, you’re missing out on some valuable insights. And if you are, we’d love to see your projects! (Hint, hint.)

Homemade EDM Machine Moves From Prototype To Production

Of all the methods of making big pieces of metal into smaller pieces of metal, perhaps none is more interesting than electrical discharge machining. EDM is also notoriously fussy, what with having to control an arc discharge while precisely positioning the tool relative to the workpiece. Still, some home gamers give it a whirl, and we love to share their successes, like this work-in-progress EDM machine. (Video, embedded below.)

We’ve linked [Andy]’s first videos below the break, and we’d expect there will be a few more before all is said and done. But really, for being fairly early in the project, [Andy] has made a lot of progress. EDM is basically using an electric arc to remove material from a workpiece, but as anyone who has unintentionally performed EDM on, say, a screwdriver by shorting it across the terminals in a live outlet box, the process needs to be controlled to be useful.

Part 1 shows the start of the build using an old tap burning machine, a 60-volt power supply, and a simple pulse generator. This was enough to experiment with the basics of both the mechanical control of electrode positioning, and the electrical aspects of getting a sustained, useful discharge. Part 2 continues with refinements that led very quickly to the first useful parts, machined quickly and cleanly from thin stock using a custom tool. We’ll admit to being impressed — many EDM builds either never get to the point of making simple holes, or stop when progressing beyond that initial success proves daunting. Of course, when [Andy] drops the fact that he made the buttons for the control panel on his homemade injection molding machine, one gets the feeling that anything is possible.

We’re looking forward to more on this build. We’ve seen a few EDM builds before, but none with this much potential.

Continue reading “Homemade EDM Machine Moves From Prototype To Production”

Clever Gas Mixer Gets Just The Right Blend For Homebrew Laser Tubes

[Lucas] over at Cranktown City on YouTube has been very busy lately, but despite current appearances, his latest project is not a welder. Rather, he built a very clever gas mixer for filling his homemade CO2 laser tubes, which only looks like a welding machine. (Video, embedded below.)

We’ve been following [Lucas] on his journey to build a laser cutter from scratch — really from scratch, as he built his own laser tube rather than rely on something off-the-shelf. Getting the right mix of gas to fill the tube has been a bit of a pain, though, since he was using a party balloon to collect carbon dioxide, helium, and nitrogen at measuring the diameter of the ballon after each addition to determine the volumetric ratio of each. His attempt at automating the process centers around a so-called AirShim, which is basically a flat inflatable bag made of sturdy material that’s used by contractors to pry, wedge, lift, and shim using air pressure.

[Lucas]’ first idea was to measure the volume of gas in the bag using displacement of water and some photosensors, but that proved both impractical and unnecessary. It turned out to be far easier to sense when the bag is filled with a simple microswitch; each filling yields a fixed volume of gas, making it easy to figure out how much of each gas has been dispensed. An Arduino controls the pump, which is a reclaimed fridge compressor, monitors the limit switch and controls the solenoid valves, and calculates the volume of gas dispensed.

Judging by the video below, the mixer works pretty well, and we’re impressed by its simplicity. We’d never seriously thought about building our own laser tube before, but seeing [Lucas] have at it makes it seem quite approachable. We’re looking forward to watching his laser project come together.

Continue reading “Clever Gas Mixer Gets Just The Right Blend For Homebrew Laser Tubes”

Review: Sequre SQ-D60 Temperature Controlled Soldering Iron

Over the past few years a new class of soldering iron has arisen: a temperature controlled iron no longer tied to a bulky mains-powered base station, but using low-voltage DC power and with all electronics concealed in a svelte handle. First came the Miniware TS100, and then  many more, with slightly different feature sets and at varying price points. We’ve reviewed a few of them over the years, and today we have the most recent contender in the Sequre SQ-D60. It follows the formula closely, but costs only £20 (about $26). This price puts it in an attractive budget category, and its USB-C power option makes it forward-looking over models with barrel jacks. Description over, it’s time to plug it in and put it through its paces.

What’s In The Box?

That's a lot of extra bits for a budget iron!
That’s a lot of extra bits for a budget iron!

In the box, aside from the handle containing the electronics, were a surprisingly comprehensive array of parts and accessories. The handle itself is similarly-sized to its competitors, being only slightly longer than that of Pine64’s Pinecil. The tip supplied was unexpectedly a slanted chisel, so I may have managed to order incorrectly, though since it shares the same tip design as both the TS100 and the Pinecil I have plenty of alternative tips should I need one. Otherwise there was a little bag of hex screws along with a key and a driver for them, a little stand with a sponge, a set of Sequre stickers, a USB-C to barrel jack cable, and a barrel jack-to-XT60 connector for use with LiPo battery packs. These last two cables are a particularly useful addition.

At first sight the tip doesn’t seem to have any means of being fixed into its socket, but a closer inspection reveals that there is a hex screw hiding underneath a silicone finger sleeve that holds it securely when tightened. The handle has a simple enough interface, with just two buttons and a 3-digit, 7-segment display. Powering it up from a 45 W USB-PD power supply, and it heats up to 300 °C in around ten seconds after pressing one of the buttons. My usual soldering temperature is 360 °C, and it has an interface involving long presses of one of the buttons before they become up and down buttons to select the temperature. In prolonged use the handle doesn’t become noticeably warm, and aside from a slight new-electronics-getting-hot smell there was no immediate concern that it might release magic smoke. Continue reading “Review: Sequre SQ-D60 Temperature Controlled Soldering Iron”

The Evil Crow Is Ready To Cause Some RF Mayhem

There’s no doubt that the RTL-SDR project has made radio hacking more accessible than ever, but there’s only so far you can go with a repurposed TV tuner. Obviously the biggest shortcoming is the fact that you can only listen to signals, and not transmit them. If you’re ready to reach out and touch someone, but don’t necessarily want to spend the money on something like the HackRF, the Evil Crow RF might be your ideal next step.

This Creative Commons licensed board combines two CC1101 radio transceivers and an ESP32 in one handy package. The radios give you access to frequencies between 300 and 928 MHz (with some gaps), and the fact that there are two of them means you can listen on one frequency while transmitting on another; opening up interesting possibilities for relaying signals. With the standard firmware you connect to a web interface running on the ESP32 to configure basic reception and transmission options, but there’s also a more advanced RFQuack firmware that allows you to control the hardware via Python running on the host computer.

Using the Evil Crow RF without a computer.

One particularly nice feature is the series of buttons located down the side of the Evil Crow RF. Since the device is compatible with the Arduino IDE, you can easily modify the firmware to assign various functions or actions to the buttons.

In a demonstration by lead developer [Joel Serna], the physical buttons are used to trigger a replay attack while the device is plugged into a standard USB power bank. There’s a lot of potential there for covert operation, which makes sense, as the device was designed with pentesters in mind.

As an open source project you’re free to spin up your own build of the Evil Crow RF, but those looking for a more turn-key experience can order an assembled board from AliExpress for $27 USD. This approach to hardware manufacturing seems to be getting popular among the open source crowd, with the Open-SmartWatch offering a similar option.

[Thanks to DJ Biohazard for the tip.]