Electric LEGO Longboard Now Complete With Epic Road Test

We recently posted about [James Bruton]’s most excellent oversized LEGO electric longboard. Well, now he has completed the project by tidying a few things and building oversized versions of classic light-up bricks to serve as headlamps and the tail light. Most importantly, he’s hitting the road with it!

He built a LEGO-looking enclosure for the battery as well, based on a 2×6 brick. The battery pack sits behind the motor with the tail light on top and holds the radio control receiver as well the twin LiPos. The head and tail lights pack 24-LED discs and are controlled by [James]’ FS-GT2B 3-channel RC transmitter. Its third channel is just a button, and he can trip that button to activate the lights with the help of a Turnigy receiver-controlled switch.

For an added touch he printed some LEGO flowers and a minifig, suitably oversized, and took the skateboard on the road. The thing has some zip! [James] kept his balance while holding the controller in one hand and a selfie stick with the other. The headlamp housings fell off, and a while later the minifig fell off. Fortunately [James] was able to snap them back into place, in proper LEGO fashion.

[James] runs XRobots and also served as a judge for the 2016 Hackaday Prize. We wrote up his Star Wars builds a while back, as well as his tutorial on mixed reality filming without a green screen.

Continue reading “Electric LEGO Longboard Now Complete With Epic Road Test”

Going Digital: Upgrading A Boat’s Analog Gauge

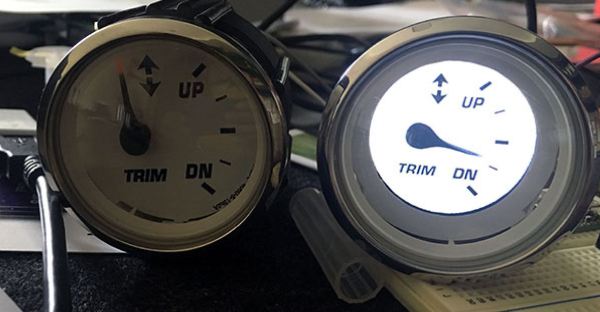
The odds are that many of you do not own a boat that you get to tinker around with. [Mavromatic] recently acquired one that had — much to his consternation — analog gauges. So in order to get his ship ship-shape, he built himself a custom digital gauge to monitor his vessel’s data.

Restricted to the two-inch hole in his boat’s helm, trawling the web for displays turned up a 1.38-inch LCD display from 4D Systems. Given the confined space, a Teensy 3.2 proved to be trim enough to fit inside the confined space alongside a custom circuit board — the latter of which includes some backup circuits if [mavromatic] ever wanted to revert to an analog gauge.

Two days of acclimatization to the display’s IDE and he had enough code to produce a functional display right when the parts arrived.

Continue reading “Going Digital: Upgrading A Boat’s Analog Gauge”

Retrotechtacular: London Bus Overhaul

If you have ever visited London as a tourist, what memories did you take away as iconic of the British capital city? The sound of Big Ben sounding the hour in the Elizabeth Tower of the Palace of Westminster perhaps, the Yeoman Warders at the Tower of London, or maybe the guardsmen at Buckingham Palace. Or how about the red double-decker buses? They’re something that, while not unique to the city, have certainly become part of its public image in a way that perhaps the public transport of other capitals hasn’t.

A city the size of London has many thousands of buses in the fleet required to provide transport to its sprawling suburbs. Until a few years ago the majority of these machines were built to a series of standard designs under the London Transport banner, so a Londoner with an eye for buses could have seen near-identical vehicles in any corner of the city. Each of these buses would have carried millions of passengers over hundreds of thousands of miles in a typical year, so many in fact that every few years they would have required a complete overhaul. For that task, London Transport maintained a dedicated factory capable of overhauling hundreds of buses simultaneously, and this factory is our subject today.

The overhaul works at Aldenham was the subject of a 1957 British Transport Films picture, Overhaul, in which we follow a bus in its journey through the system from tired-out to brand-new. We see the bus given a thorough inspection before being stripped of its upholstery and then having its body separated from its chassis and cleaned, then we see each part being refurbished. Along the way we gain a fascinating insight into the construction of a mid-century passenger transport vehicle, with its wooden frame and aluminium exterior panels being refurbished and rebuilt where necessary, before the camera. Meanwhile we see the chassis, with its separate gearbox in the centre of the vehicle, before it is painted to resist more years of road grime and reunited with a bus body. The completed vehicle is then taken for a test run before being sent to the paint shop for a coat of that iconic London Transport red. Enjoy the film in its entirety below the break.

The buses in the film are the AEC/London Transport “RT” vehicles, which entered service in the late 1930s and last ran in the 1970s. Their replacement, the visually similar “Routemaster” had only started to appear the previous year, and continued in regular service until 2005. Meanwhile the Aldenham bus overhaul works survived until its closure in 1986 due to the appearance of a range of new buses in the capital that did not conform to the standard design that it had been designed to serve.

Continue reading “Retrotechtacular: London Bus Overhaul”

Manned Multirotor Flies Again, Electric Style

You can’t keep a good hacker down. [Amazingdiyprojects] wants to build a reliable manned multirotor, and by golly, he’s doing it.  After a crash of his petrol powered design, [Amazingdiyprojects] went back to the drawing board. The new version is called chAIR, and is electric-powered.

The flying machine is lifted by 76 Multistar Elite quadcopter motors. Control is passed through 5 KK 2.1 quadcopter controllers. The KK board is a very simple controller, and we’re a bit surprised [Amazingdiyprojects] didn’t go with a newer setup. Batteries are 80x Multistar 4S 5.2Ah packs, stored below the seat. If these names sound familiar, it’s because just about every electrical part was purchased from Hobby King – an online hobby retailer.

The machine has an all up weight of 162 kg. A bit more than a single person can carry, but chAIR breaks down for easy transport.

We’re blown away by all the little details on chAIR – including the new control system. The left stick controls throttle, while right appears to control aileron/elevator and twist for the rudder control. Somewhat different from the collective/cycle controls found on conventional helicopters!

Even the battery connectors needed custom work. How do you connect 20 batteries at once? [AmazingDiyProjects] mounted XT60 connectors in a metal ring. The ring is compressed with a central screw. A quick spin with a battery-powered drill allows this new aviator to connect all his batteries at once. Is this the future of aviation, or is this guy just a bit crazy? Tell us in the comments!

Continue reading “Manned Multirotor Flies Again, Electric Style”

Fly Across The Water On A 3D-Printed Electric Hydrofoil

Paddleboards, which are surfboard-like watercraft designed to by stood upon and paddled around calm waters, are a common sight these days. So imagine the surprise on the faces of beachgoers when what looks like a paddleboard suddenly but silently lurches forward and rises up off the surface, lifting the rider on a flight over the water.

That may or may not be [pacificmeister]’s goal with his DIY 3D-printed electric hydrofoil, but it’s likely the result. Currently at part 12 of his YouTube playlist in which he completes the first successful lift-off, [pacificmeister] has been on this project for quite a while and has a lot of design iterations that are pretty instructive — we especially liked the virtual reality walkthrough of his CAD design and the ability to take sections and manipulate them. All the bits of the propulsion pod are 3D-printed, which came in handy when the first test failed to achieve liftoff. A quick redesign of the prop and duct gave him enough thrust to finally fly.

There are commercially available e-foils with a hefty price tag, of course; the header image shows [pacificmeister] testing one, in fact. But why buy it when you can build it? We’ve seen a few hydrofoil builds before, from electric-powered scale models to bicycle powered full-size craft. [pacificmeister]’s build really rises above, though.

[pacificmeister], if you’re out there, this might be a good entry in the Hackaday Prize Wheels, Wings, and Walkers round. Just sayin’.

Continue reading “Fly Across The Water On A 3D-Printed Electric Hydrofoil”

IPad, Not Flux Capacitor, Brings DeLorean Back To The Future

Add a flux capacitor and a Mr. Fusion to a DeLorean and it becomes a time machine. But without those, a DeLorean is just a car. A 35-year old car at that, and thus lacking even the most basic modern amenities. No GPS, no Bluetooth — not even remote locks for the gullwing doors!

To fix that, [TheKingofDub] decided to deck his DeLorean out with an iPad dash computer that upgrades the cockpit experience, and we have to say we’re impressed by the results. Luckily, the space occupied by the original stereo and dash vents in the center console is the perfect size for an iPad mini, even with the Lightning cable and audio extension cable attached. A Bluetooth relay module is used to interface to the doors, windows, trunk, garage door remote, and outdoor temperature sensor. A WiFi backup camera frames the rear license plate. Custom software ties everything together with OEM-looking icons and a big GPS speedometer. The build looks great, adds functionality, and should make road trips a little easier.

When [TheKingofDub] finally gets sick of people complaining about where the BTTF guts are, maybe he can add a flux capacitor and time circuits.

[via r/electronics]

Spice Up Your Shop With A VW Pickup Wall Decoration

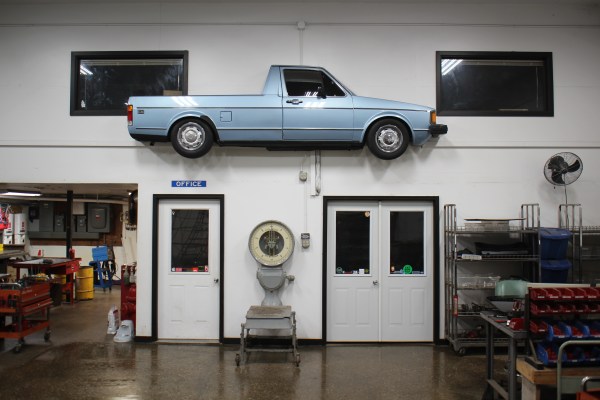
Seeing a half car is always a disconcerting experience. Especially when that half car is about 14 feet up in the air. [PanasonicModelRC6015] — We’ll call him [RC6015] for short — has gone and mounted 1/2 (actually more like 1/4) of a VW Rabbit Caddy pickup MK1 up on his shop wall.

The caddy started life as a regular 1983 VW pickup. Unfortunately, the years had not been kind to it. The body panels were in good shape, but there were serious rust problems in the floors, strut towers, rockers, and control arm mounts. According to [RC6015], this is beyond “weld on few replacement panels”, though he’s been heavily questioned on it in his Reddit thread.

Cutting the truck down was easy – a reciprocating saw did most of the work. The VW has a unibody design, so there was still some frame there to hold things together. A 2×12 board then was then bolted from the front of the truck to the rear. This made everything stable and provided a solid mounting point. A second 2×12 was lag bolted to several studs on the wall. Then it was just a matter of lifting the truck into position and bolting the two boards together. We’re guessing the [RC6015]’s wall has solid wood studs. Don’t try hanging a 500 lb truck from the wall if you’ve only got thin metal studs behind your sheetrock.

Just in case you’re wondering, the Panasonic Model RC-6015 is a vintage flip display alarm clock, the same one Marty used in Back to the Future.

If a truck on the wall is a bit much for your shop, check out this wall mounted weather display.