Social Engineering By Railways

Where do you travel every day? Are there any subtle ploys to manipulate your behavior? Would you recognize them or are they just part of the location? Social engineering sometimes gets a bad rap (or is it rep?) in the mainstream, but the public-facing edge of that sword can keep order as it does in Japanese train stations. They employ a whirlwind of psychological methods to make the stations run like clockwork.

The scope of strategies ranges from the diabolical placement of speakers emitting high-frequency tones to discourage youthful loitering to the considerate installation of blue lights to deter suicides. Not every tactic is as enlightened as suicide prevention, sometimes, just changing the grating departure buzzer to a unique tune for each station goes a long way to relieving anxiety. Who wants to stand next to an anxious traveler who is just getting more and more sweaty? Listen below the break to hear what Tokyo subway tunes sound like.

Maybe you can spot some of these tricks where you live or something similar can ease your own commute. Perhaps the nearest subway has a piano for stairs or a 3D printing cyborg.

Continue reading “Social Engineering By Railways”

Tesla Model 3 Battery Pack Teardown

The Tesla Model 3 has been available for almost a year now, and hackers and tinkerers all over the world are eager to dig into Elon’s latest ride to see what makes it tick. But while it’s considerably cheaper than the Model S that came before it, the $35,000+ USD price tag on the new Tesla is still a bit too high to buy one just to take it apart. So for budget conscious grease monkeys, the only thing to do is wait until somebody with more money than you crashes one and then buy the wreckage cheaply.

Tesla Model 3 battery monitor board

Which is exactly what electric vehicle connoisseur [Jack Rickard] did. He bought the first wrecked Model 3 he could get his hands on, and proceeded to do a lengthy teardown on what’s arguably the heart and soul of the machine: its 75 kWh battery pack. Along the way he made some interesting discoveries, and gained some insight on to how Tesla has been able to drop the cost of the Model 3 so low compared to their previous vehicles.

On a Tesla, the battery pack is a large flat panel which takes up effectively the entire underside of the vehicle. To remove it, [Jack] and his assistant raise the wreck of the Model 3 up on a standard lift and then drop the battery down with a small lift table. Here the first differences are observed: while the Model S battery was made for rapid swapping (a feature apparently rarely utilized in practice), the battery in the Model 3 battery is obviously intended to be a permanent piece of the car; removing it required taking out a good portion of the interior.

With the battery out of the car and opened up, the biggest change for the Model 3 becomes apparent. The battery pack actually contains the charger, DC-DC converter, and battery management system in one integrated unit. Whereas on the Model S these components were installed in the vehicle itself, on the Model 3, most of the primary electronics are stored in this single module.

That greatly reduces the wiring and complexity of the car, and [Jack] mentions the only significant hardware left inside the Model 3 (beyond the motors) would be the user interface computer in the dashboard. When the communication protocol for this electronics module is reverse engineered, it may end up being exceptionally useful for not only electric vehicle conversions but things like off-grid energy storage.

A little over a year ago we featured a similar teardown for the battery back in the Tesla Model S, as well as the incredible project that built a working car from multiple wrecks.

[Thanks to DarksideDave for the tip.]

Continue reading “Tesla Model 3 Battery Pack Teardown”

Testing DIY battery pack on E-bike

[GreatScott] Tests His DIY Battery Pack On His E-Bike

[GreatScott] has now joined the ranks of Electric Bike users. Or has he? We previously covered how he made his own lithium-ion battery pack to see if doing so would be cheaper than buying a commercially made one. But while it powered his E-bike conversion kit on his benchtop, turning the motor while the wheel was mounted in a vice, that’s no substitution for a real-world test with him on a bike on the road.

Since then he’s designed and 3D printed an enclosure for his DIY battery pack and mounted it on his bike along with most of the rest of his E-bike kit. He couldn’t use the kit’s brake levers since his existing brake levers and gear-shift system share an enclosure. There also weren’t enough instructions in the kit for him to mount the pedal assistance system. But he had enough to do some road testing.

Based on a GPS tracker app on his phone, his top speed was 43 km/h (27 miles per hour). His DIY 5 Ah battery pack was half full after 5 km (3.1 miles) and he was able to ride 11.75 km (7.3 miles) on a single charge. So, success! The battery pack did the job and if he needs to go further then he can build a bigger pack with some idea of how it would improve his travel distance.

Sadly though, he had to remove it all from his bike since he lives in Germany and European rules state that for it to be considered an electric bike, it must be pedal assisted and the speed must the be progressively reduced as it reaches a cut-off speed of 25 km/h (15 miles per hour). In other words, his E-bike was more like a moped or small motorcycle. But it did offer him some good opportunities for hacking, and that’s often enough. Check out his final assembly and testing in the video below.

Continue reading “[GreatScott] Tests His DIY Battery Pack On His E-Bike”

Animated Bluetooth Bike Turn Signals

Tired of risking his life every time he had to signal a turn using his hands while riding his bicycle in rainy Vancouver, [Simon Wong] decided he needed something a bit higher tech. But rather than buy something off the shelf, he decided to make it into his first serious Arduino project. Given the final results and the laundry list of features, we’d say he really knocked this one out of the park. If this is him getting started, we’re very keen to see where he goes from here.

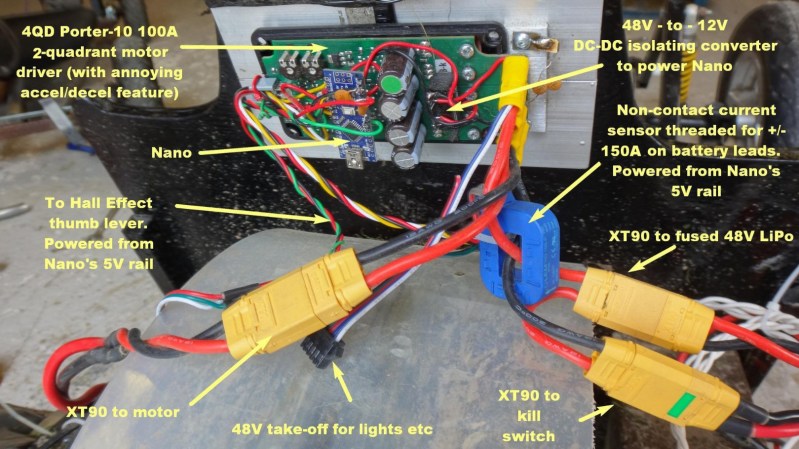
So what makes these turn signals so special? Well for one, he wanted to make it so nobody would try to steal his setup. He wanted the main signal to be easily removable so he could take it inside, and the controls to be so well-integrated into the bike that they wouldn’t be obvious. In the end he managed to stuff a battery pack, Arduino Nano, and an HC-05 module inside the handlebars; with just a switch protruding from the very end to hint that everything wasn’t stock.

On the other side, a ATMEGA328P microcontroller along with another HC-05 drives two 8×8 LED matrices with MAX7219 controllers. Everything is powered by a 18650 lithium-ion battery with a 134N3P module to bring it up to 5 VDC. To make the device easily removable, as well as keep the elements out, all the hardware is enclosed in a commercial waterproof case. As a final touch, [Simon] added a Qi wireless charging receiver to the mix so he could just pull the signal off and drop it on a charging pad without needing to open it up.

It’s been some time since we’ve seen a bike turn signal build, so it’s nice to see one done with a bit more modern hardware. But the real question: will he be donning a lighted helmet for added safety?

Continue reading “Animated Bluetooth Bike Turn Signals”

Spared No Expense: Cloning The Jurassic Park Explorer

While you’d be hard pressed to find any serious figures on such things, we’d wager there’s never been a vehicle from a TV show or movie that has been duplicated by fans more than the Staff Jeeps from Jurassic Park. Which is no great surprise: not only do they look cool, but it’s a relatively easy build. A decent paint job and some stickers will turn a stock Wrangler into a “JP Jeep” that John Hammond himself would be proud of.

While no less iconic, there are far fewer DIY builds of the highly customized Ford Explorer “Tour Vehicles”. As a rather large stretch of the film takes place within them, the interiors were much more detailed and bears little resemblance to the stock Explorer. Building a truly screen accurate Jurassic Park Tour Vehicle was considered so difficult that nobody has pulled it off since the movie came out in 1993. That is until [Brock Afentul] of PropCulture decided to take on the challenge.

In an epic journey spanning five years, [Brock] has created what he believes is the most accurate Jurassic Park Tour Vehicle ever produced; and looking at the side by side shots he’s done comparing his Explorer to the ones from the movie, it’s hard to disagree. A massive amount of work went into the interior, leaving essentially nothing untouched. While previous builds have tried to modify the stock dashboard to look like the one from the movie, he built a completely new dash from MDF and foam and coated it in fiberglass. The center console featuring the large display was also faithfully reproduced from the movie, and runs screen accurate animations, maps, and tour information. The seats also had to be replaced, multiple times in fact, as he had a considerable amount of trouble getting somebody to upholster them to his standards.

But perhaps the most difficult component of all was the clear acrylic roof bubble. These were critical to filming the movie, as they not only let the viewer see down into the Tour Vehicles but also let the characters see out during the iconic tyrannosaurus attack. But because the roof bubble was created only for the movie and never existed as a real aftermarket product, it usually gets ignored in Tour Vehicle builds. It’s simply too difficult to produce for most people. The omission of the bubble was always considered a case of artistic license; in the same way nobody expects a replica DeLorean from Back to the Future to actually fly or travel through time.

But [Brock] wanted to take his Tour Vehicle all the way, so he partnered up with a local glass shop that let him rent time in their oven so he could heat up acrylic sheets. Once heated to the appropriate temperature, they could be removed and wrapped around a mold to make the bubble. The process took weeks to perfect, but in the end he and a few friends got the hang of it and were able to produce a gorgeous roof bubble that they fitted to the already very impressive Explorer.

While previous Jurassic Park Tour Vehicle replicas were unquestionably awesome, this build really does take it to the next level. Short of equipping the garage with a movie-accurate super computer, it’s hard to see how the bar can get any higher.

Build Your Own Avionics Suite, If You Dare

If you’re really interested in aircraft and flying, there are many ways to explore that interest. There are models of a wide range of sizes and complexities that are powered and remote-controlled, and even some small lightweight aircraft that can get you airborne yourself for a minimum of expense. If you’re lucky enough to have your own proper airplane, though, and you’re really into open source projects, you can also replace your airplane’s avionics kit with your own open source one.

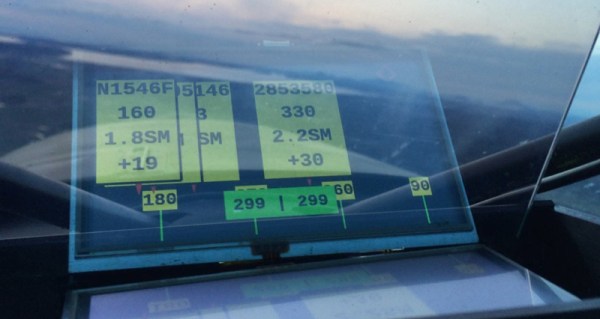
Avionics are the electronics that control and monitor the aircraft, and they’re a significant part of the aircraft’s ability to fly properly. This avionics package from [j-omega] (who can also be found on hackaday.io) will fit onto a small aircraft engine and monitor things like oil temperature, RPM, coolant temperature, and a wide array of other features of the engine. It’s based on an ATmega microcontroller, and has open-source schematics for the entire project and instructions for building it yourself. Right now it doesn’t seem like the firmware is available on the GitHub page yet, but will hopefully be posted soon for anyone who’s interested in an open-source avionics package like this.

The project page does mention that this is experimental as well, so it might not be advised to use in your own personal aircraft without some proper testing first. That being said, if you’ve heard that warning and have decided just to stay on the ground, it’s possible to have a great experience without getting in a real airplane at all.

Save The Tally Ho: Rebuilding A Historic Yacht

[Leo Sampson Goolden] is a boatbuilder and Sailor. He’s a prime example of a dwindling group of shipwrights who build sailing vessels the traditional way. In 2017, he was given the opportunity to buy Tally Ho, a Yacht built back in 1910. Once a proud ship, Tally Ho now sat as a shell under a shrink-wrap tarp. Her deck was rotted, her keel cracked. Any sane person would have moved on. Thankfully [Leo] is not quite sane, and began a quest to bring this history ship back to its former glory.

Tally Ho isn’t just an old boat. She is a 48-foot long gaff cutter yacht designed by the famous Albert Strange and built in Sussex, England. Tally Ho won the 1927 Fastnet Race (corrected time) when rough seas caused all but two boats to bow out.

To say [Leo] has his work cut out for him would be an understatement. Tally Ho lived a hard life, from racing to fishing. A complete restoration was needed. In fact, it would have been cheaper and easier to build a replica rather than restore the original. [Leo] wanted to save Tally Ho though, so he bought the boat for one dollar, and began to put all his time, effort, and funds into restoring her. This work includes carefully documenting each piece as it is removed.

Some of the tools and materials are traditional – such as chisels and red lead putty. But [Leo] is using power tools as well, including a custom-built chainsaw mount for shaping the keel. His videos are entertaining and illustrate many techniques of boat building. Wherever possible, [Leo] adds captions to explain the meanings of boat building terms, as well as explains the different terms used in England and the USA. In the latest video, you can watch along as [Leo] creates a Dutchman to fill in a knot in the keel. Can check that out in the video after the break.

Continue reading “Save The Tally Ho: Rebuilding A Historic Yacht”