Custom Powerbank In Compact Form Factor

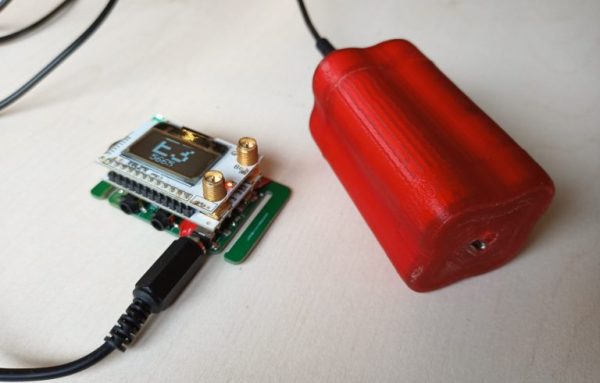
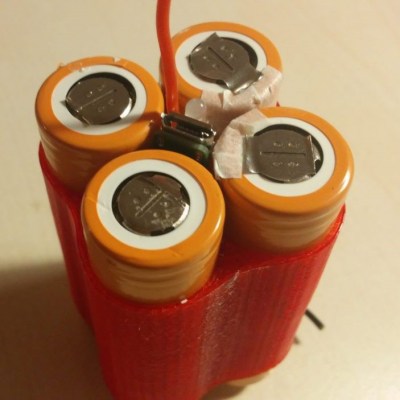
The wide availability and power density of 18650 lithium-ion cells have made them a good option for everything from electric cars to flashlights. [Theo] needed a new power source for his FPV drone goggles, so he designed his own power bank with a very compact charge controller.The narrow PCB slips in between the cells

While [Theo] could charge the batteries with an RC battery charger, he preferred the convenience of one with a standard 5V micro USB input, and wanted battery level indication to avoid having the FPV goggles die unexpectedly mid-flight. When four 18650 cells are held in a cube arrangement, a 8x8x65 mm gap is formed between the cells. In this space [Theo] was able to fit a custom PCB with a micro USB jack, 1.3 mm power jack, BQ25606 charge controller, TPS61085 boost converter, and ATtiny MCU with LED for battery level feedback. The charge controller also allows 5V devices to be charged via USB, while the boost converter outputs 9V via the 1.3mm jack for [Theo]’s FPV goggles. Everything fits inside a nice compact 3D printed enclosure.

The project was not without hiccups. After ordering and building the PCB he discovered some minor PCB layout mistakes, and realized the boost converted could only output 600mA at 9V, which was not enough for his more power-hungry googles. He plans to fix this in the next version.

We’ve seen custom power banks in quite a few shapes and sizes, including one that runs on power tool batteries (which probably also have 18650s inside) and one that has just about every output you could want, including AC and wireless QI charging.

Building A Cell Testing Station For 18650s

The 18650 is perhaps the world’s favorite lithium battery, even if electric car manufacturers are beginning to move towards larger cells such as the 21700. Used heavily in laptops and flashlights, it packs a useful amount of energy into a compact, easy to use package. There’s a small industry that has developed around harvesting these cells from old equipment and repurposing them, and [MakerMan] wanted to a piece of the action. Thus, he created a cell testing station to help in the effort.

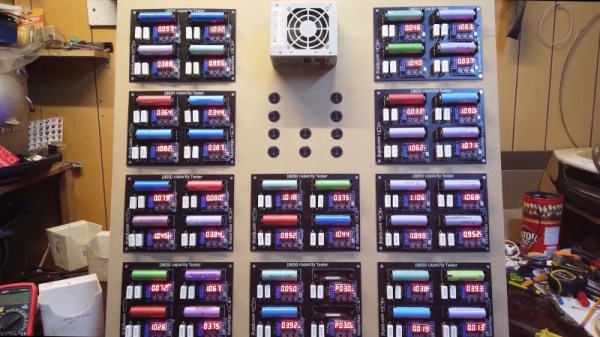
Make no mistake, this is not a grandiose smart cell tester with 40 slots that logs every last iota of data into a cloud spreadsheet for further analysis. Nope, this is good old fashioned batch processing. [MakerMan] designed a single PCB that replicates the same cell testing circuit four times. Since PCB houses generally have a minimum order quantity of ten units, [MakerMan] ended up with forty individual cell testers on ten PCBs. Once populated, the boards were installed on a wooden frame with an ATX power supply which supplies the juice to run the system.

Overall, it’s a quick, cheap way for capacity testing cells en masse that should serve [MakerMan] well. We look forward to seeing where these cells end up. We’ve seen his work before, too – with a self-built laser engraver a particular highlight. Video after the break.

Continue reading “Building A Cell Testing Station For 18650s”

Building A Serious Solar Inverter Battery Pack

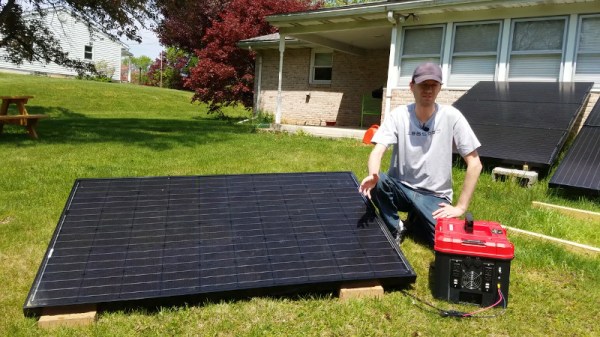
If you’re out in the wilderness, having plenty of electricity on hand is a blessing. Eschewing fossil fuels, [LithiumSolar] is, as their name suggests, a fan of other technologies – undertaking the construction of a 3.5kWh solar generator that’s rugged and ready for the outdoors.

The build starts with 18650 lithium-ion cells sourced from a recycler, packed inside obsolete modem battery packs. After harvesting 390 cells, the best 364 are chosen and assembled into plastic holders to create a 14S26P configuration. A spot welder is employed to weld the pack together, with XT60 connectors used as the main bus connectors, albeit in a very non-standard configuration. Balance leads are hooked up to a 14S battery management system, to keep things in check. The huge pack is then installed inside a stout Craftsman toolbox, along with a MPPT solar charger module, and a 1500W inverter for output.

The build video is a great resource for anyone interested in building custom 18650 packs or battery solar power systems. [LithiumSolar] does a great job of clearly explaining each step and the reasons for part selections along the way. Of course, in a neat dovetail to this project, we’ve even seen solar-powered spot welders before – which would be useful if you need to replicate this build out in the field somewhere. Video after the break.

Continue reading “Building A Serious Solar Inverter Battery Pack”

Old Laptop Gets New Lease On Life With Raspberry Pi

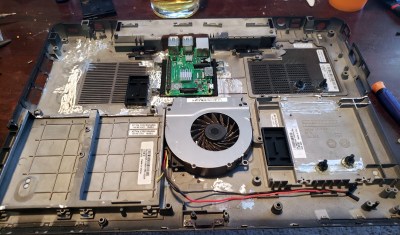
It seems not a day goes by that we don’t see somebody cramming a Raspberry Pi into some unwilling piece of consumer electronics. But despite being a pretty obvious application for the diminutive ARM board, we don’t often see it installed in an actual computer. Which makes this very clean Raspberry Pi laptop conversion by [Sherbethead2010] all the more interesting.

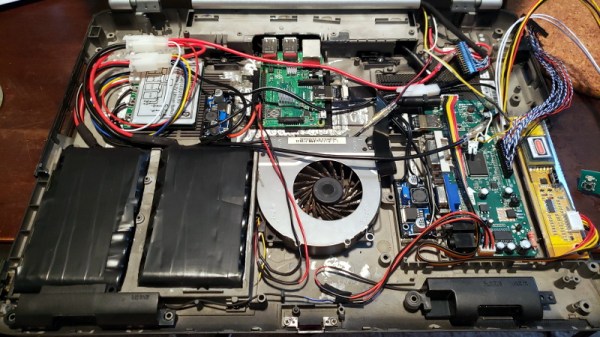
The first step involved taking a Dremel to the Dell’s chassis and essentially leveling out the entire internal volume. The only component that got reused was the fan, and even that appears to be relocated, so all the mounting posts were just standing in the way of progress.

[Sherbethead2010] mounted the Raspberry Pi towards the rear of the case so its USB and Ethernet ports would be available from the outside, and installed a driver board for the original Phillips LP171 LCD panel in the old drive bay. Power is provided by two custom 18650 battery packs connected to dedicated buck converters, along with an onboard charge controller to safely top them off.

Rather than trying to adapt the original input devices, [Sherbethead2010] decided to take the easy route and installed a Rii K22 wireless keyboard with integrated track pad into the top of the laptop. It turned out to be an almost perfect fit, and beyond the keys being slightly off-center, at first glance it looks like it could be stock.

The last time we saw a Raspberry Pi so well integrated into a real laptop, it was to create a functioning version of one of the props from Hackers. While that build was a joy for its own reasons, it’s hard not to be impressed with how unassuming this computer looks after all the work that’s been done to it.

Heavyweight Cyberdeck Is In A Class Of Its Own

Inspired by other builds he’d seen online, [BlastoSupreme] decided to build his very own cyberdeck. There was only one problem: he’d never designed and assembled anything like this before. Wanting to avoid any problems down the line, he reasoned that the safest approach would be to make it so big that he wouldn’t struggle to fit everything inside. Some may say the resulting NX-Yamato, named for the most massive battleship ever constructed, ended up being too large. But that’s only because they are afraid.

A finish like the Yamato’s doesn’t come easy.

In his write-up on The Cyberdeck Cafe, a site dedicated to the community sprouting up around these futuristic personal computers, [BlastoSupreme] describes building this cyberdeck as something of a transformative experience. Looking at the incredible effort that went into this project, we can believe it. From the intricate CAD work to the absolutely phenomenal finish on the Yamato’s 3D printed frame, there’s not a cut corner in sight.

That’s right, nearly every component of this cyberdeck was conjured into existence by squirting out hot plastic. About two kilograms of it, to be precise. It was printed in vertical chunks which were then assembled with adhesive and screws. This modular construction technique allowed [BlastoSupreme] to build what he believes to be the largest cyberdeck ever made. Sounds a lot like a challenge to us.

Admittedly, the massive internal volume of the Yamato is largely unused; all that’s inside it right now is a Raspberry Pi 4 and a X705 power management board that allows the deck to run off of 18650 cells. Of course, all that space could easily be put to use with additional gear or even a larger and more powerful Single Board Computer (SBC) such as the Atomic Pi. There’s even a dedicated compartment in the side for snacks, so no worries there. As [BlastoSupreme] puts it, all that empty space inside is a feature, not a bug.

Plenty of room inside for whatever hardware you want to take with you into the Sprawl.

In the nearly two years that have passed since we first came across one of these Neuromancer inspired builds, we’ve been absolutely blown away by the increasing scale and complexity of these extremely personal computers. Since it seems there’s only a fairly loose idea of what a “proper” cyberdeck should look like in the canonical sense, these builds have been free to fill in the blanks with some pretty outlandish designs. Some of which have earned William Gibson’s personal seal of approval.

What’s In A Name For A Tool Battery Pack?

Power tools have come a long way. It used to be you needed extension cords or a generator for your tools, but now you can get just about anything with a nice rechargeable battery pack. As it turns out, most of those packs are made by the same company, and [syonyk] wanted to see how similar two different Makita packs and a Rayovac pack were. What he found was surprising. The outsides were very similar, but what was on the inside?

The Rayovac pack was easy to open and had a controller, a thermal cutoff device, and two layers of 18650 batteries. The similar Makita pack looked identical from the outside until he tried to take it apart. The maker had plugged one screw hole and used security screws instead of the Phillips heads like on the Rayovac.

Continue reading “What’s In A Name For A Tool Battery Pack?”

Fun-Size Tesla Might Be The World’s Smallest

We get all kinds of tips about “the world’s something-est” widget, which normally end up attracting the debunkers in droves. So normally, we shy away from making superlative claims about a project, no matter how they bill themselves. But we’re comfortable that this is the world’s smallest Tesla, at least if we have to stretch the definition of Tesla a bit.

This clown-car version of the Tesla Model S that [Austin] built is based around a Radio Flyer replica of the electric sedan. The $600 battery-powered original doesn’t deliver exactly the same neck-snapping acceleration of its full-size cousin, so he stripped off the nicely detailed plastic body and put that onto a heavily modified go-cart chassis. The tiny wheelbase left little in the way of legroom, but with the seat mounted far enough back into the wheelie-inducing zone, it was possible for [Austin] to squeeze in. He chose to pay homage to Tesla’s battery pack design and built 16 modules with fourteen 18650 cells in each, a still-substantial battery for such a small vehicle. Hydraulic brakes were also added, a wise decision since the 4800 Watt BLDC is a little snappier than the stock motor, to say the least. The video below shows the build, as well as a dangerous test ride where the speed read 72 at one point; we’re not sure if that’s MPH or km/h, but either way, it’s terrifying. The drifts were pretty sick too.

It seems [Austin] has the need for speed, and for drifting.  We’ve seen his water-cooled electric drift trike before, as well as his ridiculously overpowered crazy cart.

Continue reading “Fun-Size Tesla Might Be The World’s Smallest”