Small low-cost CNC mill with rotary tool

Minimal Mill: The Minamil

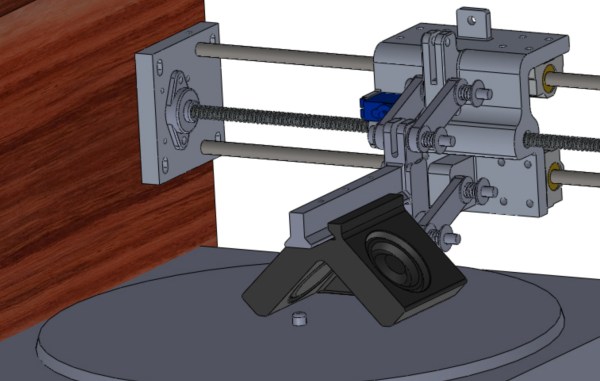
Having a few machine tools at one’s disposal is a luxury that not many of us are afforded, and often an expensive one at that. It is something that a large percentage of us may dream about, though, and with some commonly available tools and inexpensive electronics a few people have put together some very inexpensive CNC machines. The latest is the Minamil, which uses a rotary tool and straps it to an economical frame in order to get a functional CNC mill setup working.

This project boasts impressively low costs at around $15 per axis. Each axis uses readily available parts such as bearings and threaded rods that are readily installed in the mill, and for a cutting head the build is based on a Dremel-like rotary tool that has a similarly low price tag. Let’s not ignore the essentially free counterweight that is used.

For control, an Arduino with a CNC shield powers the three-axis device which is likely the bulk of the cost of this project. [Paul McClay] also points out that a lot of the material he needed for this build can be salvaged from things like old printers, so the $45 price tag is a ceiling, not a floor.

The Minamil has been demonstrated milling a wide variety of materials with excellent precision. Both acrylic and aluminum are able to be worked with this machine, but [Paul] also demonstrates it in its capacity to mill PCBs. It does have some limitations but for the price it seems that this mill can’t be beat, even compared to his previous CNC build which repurposed old CD drives.

CAD design for a vinyl record cutter.

VinyGo Stereo Vinyl Recorder Will Put You In The Groove

A long time ago, there were these vinyl recording booths. You could go in there and cut a 45PM record as easily as getting a strip of four pictures of yourself in the next booth along the boardwalk. With their 2021 Hackaday Prize entry called VinyGo, [mras2an] seeks to reinvigorate this concept for private use by musicians, artists, or anyone else who has always wanted to cut their own vinyl.

VinyGo is for people looking to make a few dozen copies or fewer. Apparently there’s a polymer shortage right now on top of everything else, and smaller clients are getting the shaft from record-pressing companies. This way, people can cut their own records for about $4 a unit on top of the cost of building VinyGo, which is meant to be both affordable and accessible.

You probably know how a record player works, but how about a record cutter? As [mras2an] explains over on IO, music coming through a pair of speakers vibrates a diamond cutting head, which cuts a groove in the vinyl that’s an exact representation of the music. Once it’s been cut, a regular stylus picks up the groove and plays back the vibrations. Check it out after the break.

[mras2an] plans to enter VinyGo into the Hackaday Prize during the Wildcard round, where anything goes. Does your project defy categorization? Or are you just running a little behind? The Wildcard round runs from Monday, September 27th to Wednesday, October 27th and is your last chance to enter this year’s Prize.

Not your kind of vinyl cutter? We’ve got those, too.

Continue reading “VinyGo Stereo Vinyl Recorder Will Put You In The Groove”

Ruggedized Solar Power bank

Rugged Solar Generator Packs A Punch

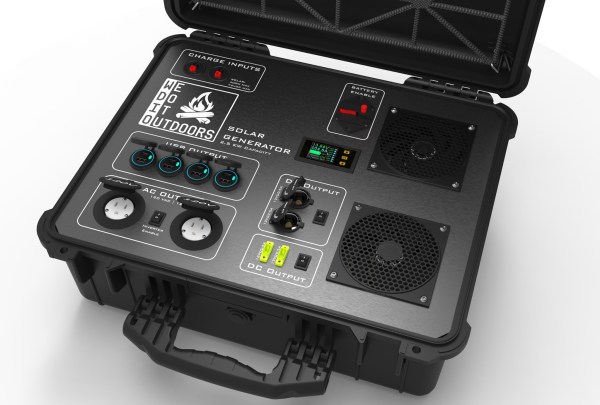
Hackaday Prize 2021 entrant [Philip Ian Haasnoot] has been building a well-polished power bank. But this is no ordinary little power bank the like you would throw in your rucksack for a day out. No, this 2.5 kW luggable power bank is neatly encased in a tough, waterproof Pelican 1550 case, and is suitably decked out with all the power sockets you could possibly need for a long weekend of wilderness camping and photography.

Testing the hand-built 18650 based battery bank
Boy, that’s a lot of tab welding

This box sports USB-C and USB 3.0 connectors for gadget charging, as well as 12 VDC cigarette lighter and XT-60 ports for high-drag devices. Also it provides a pair of 120 VAC sockets via an integrated inverter, which at 1.5 kW could run a small heater if you were really desperate, but more likely useful to keep your laptop going for a while. Now if only you could get Wi-Fi out in the desert!

[Philip] doesn’t actually talk much about the solar panels themselves, but we know the box contains a 600 W MPPT boost converter to take solar power in, and feed the LiPo battery pack in the correct manner.

The battery pack is custom-made from salvaged and tested 18650 cells, as you would expect, which we reckon took an absolute age to make by hand. The whole project is nicely finished, and looks like something we’d be happy to throw in the back of the car before heading out into our local wilderness.

As [Philip] says in the project description, it’s a tough job to carry enough power and keep all his drones, cameras and lighting equipment charged, not mention helping prevent the campsite occupants from freezing overnight during the chilly Arizona nights.

Many power bank designs have graced these fair pages over the years, like this rather polished build, and long may they continue to do so.

M4 Breadstick Is A Tasty Prototyping Alternative

What does “breadboard-friendly” mean to you? It’s become a game of minimum viability. Sure, it fits in the breadboard, but are there any accessible tie points left for wires and components? What good is a development board if you can’t easily prototype with it?

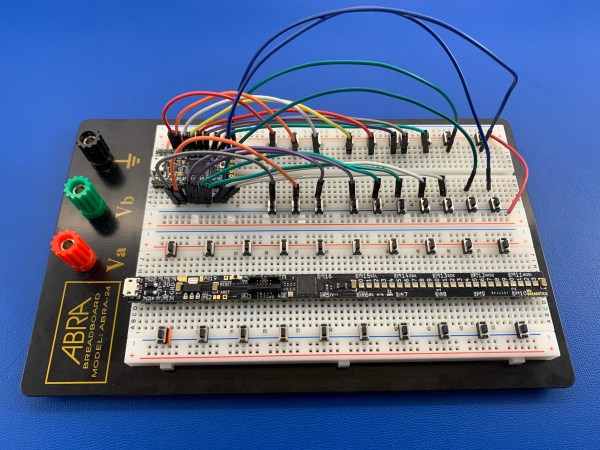
A few years ago, [Michael Rangen] set out to change all of that by creating a long and skinny development board that spaces out the I/O pins and simplifies wiring, making every circuit beautiful and easier to take in visually. The current version is an adaptation of Adafruit’s ItsyBitsy M4 Express. It has 20 I/O pins, all spread out along the length and numbered around the horn like an IC. [Michael] dipped this breadstick in 24 tiny RGB LEDs, all of which are on a dedicated com bus.

We think this is a great idea that will definitely make microcontrollers more hackable. This type of layout would make checking students’ work a breeze, and you can make tidy prototypes with it yourself after class. Today the board runs CircuitPython, and it will be able to run Arduino in the future.

This ESP socket may not leave quite as many tie points open, but it’s way easier than soldering header to it.

Wearable Scope Lets Your Fingers Do The Probing

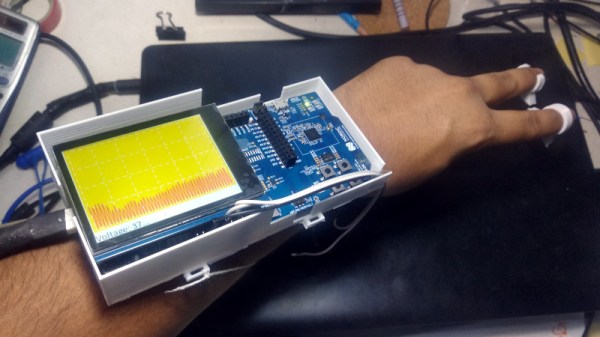
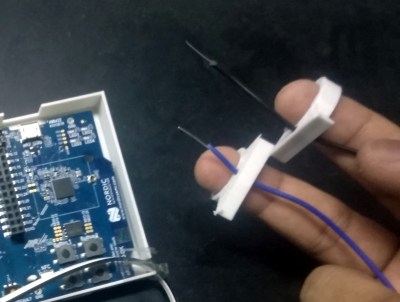
For frantic hacking sessions where seconds count, this forearm mounted oscilloscope with fingertip probes built by [aniketdhole] might be just what you need. Well, maybe. It’s not immediately clear why you might want to wear an oscilloscope on your arm, and sticking your fingers inside of powered up electronic devices sounds specifically like something your mother probably told you not to do, but here it is anyway.

The scope consists of an nRF5340 evaluation board in a 3D printed mount, with an SPI-connected Adafruit 2.8″ TFT display on top. With a pair of wires run from the board’s ADC and ground pins, [aniketdhole] just needed a bit of code to glue it all together and show some basic signal visualizations on the display. It’s been tested against PWM signals generated by an Arduino and some potentiometer controlled voltages, but anything much wilder than that is probably a bit too much to ask for from this rig in its current configuration.

In the future, [aniketdhole] wants to add some step-down circuity so you can probe higher voltages than the nRF5340 can handle normally, as well as a shunt to allow current measurement. Once the hardware is in place, the next order of business will be an improved touch-capable user interface that lets the user adjust settings and switch between functions.

Even if you’re not sold on the idea of an arm-mounted oscilloscope, this is still an interesting platform for general wearable experimentation. Throw enough sensors into it, and we’re sure there’s more than a few hackers who wouldn’t mind strapping one of these on.

A Microcontroller Friendly AR Headset On The Cheap

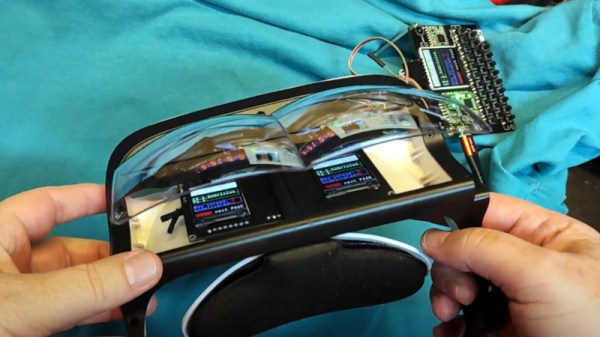
Generating the real-time images required for augmented reality (AR) goggles usually requires a fair amount of processing power, to the point that DIY efforts based around the Raspberry Pi often have trouble keeping up. But what if your AR aspirations don’t require fancy high-resolution graphics? If text and the occasional icon is enough to get the job done, then these lo-fi AR goggles from [bobricius] might be the ideal solution.

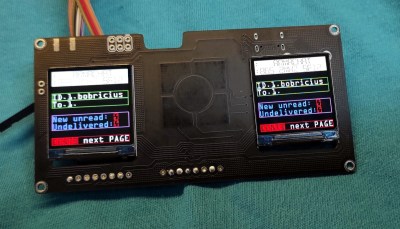
As with previous homebrew AR rigs we’ve seen, this one starts with an affordable headset designed to project the display of a smartphone onto a pair of curved optical combiners. But instead of tucking a phone into the headset, [bobricius] is using a custom PCB that holds a pair of ST7789 1.3 inch 240 x 240 IPS displays. Connected over SPI and supported by just about any microcontroller you’d care to use, tossing some textual data over your field of vision can be accomplished in just a few lines of code.

[bobricius] has actually put together a couple different versions of the PCB for this project. One uses his custom ATSAMD21E18-based “ArmaBrain” module that packs the MCU and an array of common components onto a 28 mm square board that can be easily dropped into other projects. If you’d rather roll your own solution, the second version of the board that simply holds the two displays in the appropriate position and routes the SPI lines to a convenient header should do nicely.

We’ve seen augmented reality displays using microcontrollers like the ESP32 before, but those were essentially just remote displays for a more powerful system. We like this simplified approach, as there are plenty of applications where just getting a few lines of text or some low-resolution images would be more than sufficient for the task at hand. Plus, the commercially-made headset this project is based on certainly looks better than some of the other donor goggles we’ve contemplated modifying in the past.

Continue reading “A Microcontroller Friendly AR Headset On The Cheap”

See The Unseen With This Magnetic Field Visualizer

The average Hackaday reader likely knows, at least in the academic sense, what a magnetic field looks like. But as the gelatinous orbs in our skull can perceive only a tiny fraction of the EM spectrum, we have to take those textbook diagrams at face value. That is, unless you’ve got one of these nifty magnetic field visualizers developed by [Dr.Stone].

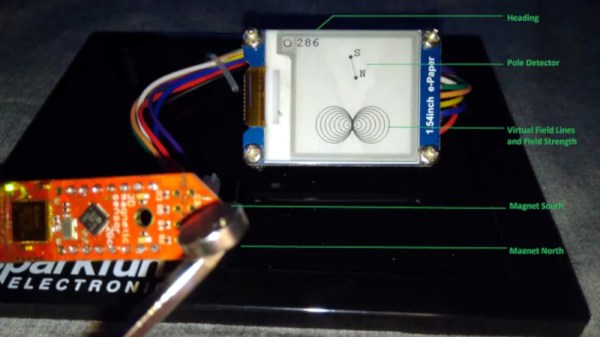
Using an XMC1100 microcontroller development board and a TLV49 3D magnetic sensor, the device is able to track the poles of a magnet in real-time and produce an approximation of what the field lines would look like on its electronic paper display. Relative field strength is indicated by the size of the visualization, which allows the user to easily compare multiple magnets. Incidentally, [Dr.Stone] notes that the current version of the hardware and software can only handle one magnet at a time; visualizing complex magnetic fields and more than two poles would take an array of sensors and likely a more powerful processor.

Do you need to visualize the field lines around a magnet? Perhaps not. But being able to quickly get an idea of how strong a magnet is and identify where its poles are could certainly come in handy. We’d like to see [Dr.Stone] take the project to the next phase and turn this into a handheld device for convenient workbench use. It would be a lot less messy than some of the previous methods we’ve seen for visualizing magnetic fields, though if you’re only worried about field strength, there’s arguably more straightforward ways to display it.

Continue reading “See The Unseen With This Magnetic Field Visualizer”