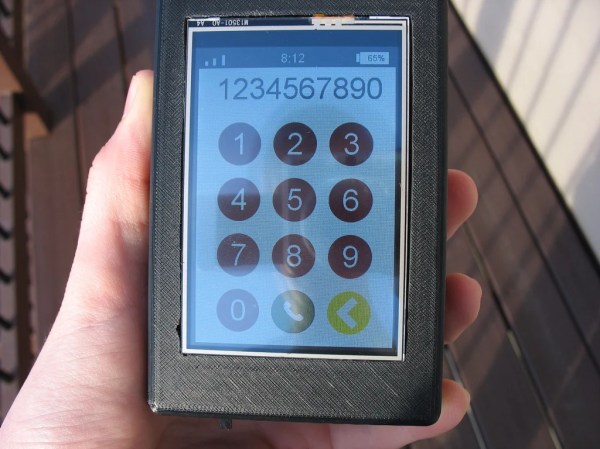
3D Printed Marble Music Machine Looking Good Already

Inspired by the enormous marble music machines from the staggeringly talented [Wintergatan] and the marble run builds by [Daniel de Bruin], [Ivan Miranda] has been busy again building a largely 3D printed contraption to test his ideas around building his own marble music machine from scratch. (Video, embedded below.)

Leveraging his recent experiences with resin printing and his own giant 3D printer, he had no difficulty in producing everything he needed from his workshop, even if the design work apparently took ages.

The build shows how early in development this project is, as there are clearly quite a few issues to be dealt with, but progress looks encouraging so far. To be clear, plans are to ‘go big’ and this little eight-channel testbed is just to explore this issues around ball guiding, transport and ball release onto the first audio test device, a Korg Nano Pad 2.

Some significant teething problems were identified, such as when [Ivan] designed the ball lifter, he intended the balls to load from the rear, but then needed to switch it to load from the front. No big deal, simply reverse the motor direction to load balls on the opposite side of the mechanism. Sadly, that also meant the directly coupled note drum was now also rotating the wrong way to release the balls. Oops. A quick hack later and [Ivan] was back in business. Various parts needed shimming up with plates, but with 3D printers on the bench, knocking those out took little time or effort. This just shows how darn useful 3D printers can be, allowing you to iterate in a short time and feed your hacks back into the final version.

[Ivan] is clearly going to have a lot of ‘fun’ with this one, as [Wintergatan] will surely testify, these big musical marble machine builds are quite some undertaking. We shall definitely be tuning in later on to see where this one goes!

While we’re on the subject of the [Wintergatan] marble machines, here’s a mini homage to the latest Marble Machine X, and if you’re in the need for a 3D printed marble clock, then try this one for starters.

Continue reading “3D Printed Marble Music Machine Looking Good Already”

a money shot of the hidden arcade

Arcade Machine Pack And Play

There’s something about the large imposing wooden box of an arcade machine that lends a confident presence to a room. The problem with a tall and heavy box is that it takes up quite a bit of space and readily draws the eye. So [Alexandre Chappel] set out to avoid that and build an arcade machine that could hide in plain sight.

Extra points awarded for neat wiring on the inside.

The idea is a wooden box hung on the wall that folds up when not in use. [Alex] starts with Baltic birch plywood cut into the panels. Next, he applies edge banding (a thin veneer with some glue on the backside) so that all the exposed edges look like natural wood. Next, a screen hole is routed into the face frame, allowing an LCD monitor to sit snuggly in. A combination of pocket holes and biscuits allows [Alex] to assemble everything with no visible screws or fasteners.

With the help of a 3D printer, he quickly fabricated a locking mechanism to keep the front panel attached when it folds up. The hinge is also 3D printed. The typical Raspberry Pi 4 powers this particular machine. Two french cleats hold the box onto the wall, and once the system is on the wall, we have to say it looks incredible.

If you’re looking for a smaller but more traditional arcade cabinet, why not take a look at this arcade cabinet for toddlers? Or, if you loved the solid wood look of the hidden arcade, this full-sized solid oak cabinet would be something you would enjoy. Video after the break.

Continue reading “Arcade Machine Pack And Play”

Trying And (Mostly) Failing To 3D Print A Hydrofoil

[Sam Barker] had a boring dingy that he wanted to spice up a bit, so he resolved to 3D print a hydrofoil wing for it so that it could fly across the water. (Video, embedded below.)

With a large wing designed and sliced into several pieces, and a total print time of 200 hours, [Sam] was ready to glue the foil wing together when he realized his scale was way off and the wings were far too large for his boat. With some hacking, [Sam] was able to use a single wing across the bottom of the ship. [Tom Stanton] came over to help with fiberglassing, and they were ready for a test.

As you might have guessed from the title, the test wasn’t particularly successful. Swapping the engine on the boat for a more potent motor gave the lift he needed in the front, but without a back foil, it was a wheelie rather than what [Sam] hoped for. Back at home, they printed a second wing and went back for a second test. The boat would start to lift out the water, but the shaft of the engine lifted out of the water, sending him back down. Unfortunately, a downpour cut the test short.

Not to be defeated entirely, [Sam] connected it to a much larger boat once the weather cleared and pulled his dingy along behind. To [Sam’s] credit, they did get some solid foiling, and the ship did lift out of the water until the wings sheared off from the stress. All in all, an entertaining story of engineering while racing against the weather.

We admire [Sam’s] ambition, and if you’re thinking about building a whole hydrofoil, we suggest starting with a smaller RC model and scaling up from there.

3D Printed Absolute Encoder Is Absolutely Wonderful

When you need to record the angle of something rotating, whether it’s a knob or a joint in a robotic arm, absolute rotary encoders are almost always the way to go. They’re cheap, they’re readily available, and it turns out you can make a pretty fantastic one out of a magnetic sensor, a zip tie, and a skateboard bearing.

When [Scott Bezek] got his hands on a AS5600 magnet sensor breakout board, that’s just what he did. The sensor itself is an IC situated in the middle of the board, which in Scott’s design sits on a 3D-printed carrier. A bearing mount sits atop it, which holds — you guessed it — a bearing. Specifically a standard 608 skateboard bearing, which is snapped into the mount and held securely by a zip tie cinched around the mount’s tabs. The final part is a 3D-printed knob with a tiny magnet embedded within, perpendicular to the axis of rotation. The knob slides into the bearing and the AS5600 reads the orientation of the magnet.

Of course, if you just wanted a rotary knob you could have just purchased an encoder and been done with it, but this method has its advantages. Maybe you can’t fit a commercially-available encoder in your design. Maybe you need the super-smooth rotation provided by the bearing. Or maybe you’re actually building that robotic arm — custom magnetic encoders like this one are extremely common in actuator design, and while the more industrial versions (usually) have fewer zip ties, [Scott]’s design would fit right in.

Continue reading “3D Printed Absolute Encoder Is Absolutely Wonderful”

Prepare For Wildfire Season With An Air Quality Monitor

For some reason, wildfire seasons in Australia, North America, and other places around the world seem to happen more and more frequently and with greater and greater fervor. Living in these areas requires special precautions, even for those who live far away from the fires. If you’re not sure if the wildfires are impacting your area or not, one of the tools you can build on your own is an air quality meter like [Costas Vav] shows us in this latest build.

The air quality indicator is based around an Adafruit Feather RP2040 which is in turn based on the 32-bit Cortex M0+ dual core processor. This makes for a quite capable processor in a small package, and helps accomplish one of the design goals of a rapid startup time. Another design goal was to use off-the-shelf components so that anyone could easily build one for themselves, so while the Feather is easily obtained the PMS5003 PM2.5 air quality sensor needed to be as well. From there, all of the components are wrapped up in an easily-printed enclosure and given a small (and also readily-available) OLED screen.

[Costas Vav] has made all of the files needed to build one of these available, from the bill of materials to the software running on the Pi-compatible board to the case designs. It’s a valuable piece of technology to have around even if you don’t live in fire-prone areas. Not only can wildfire smoke travel across entire continents but simple household activities such as cooking (especially with natural gas or propane) can decimate indoor air quality. You can see that for yourself with an army of ESP32-based air quality sensors.

Waterjet-Powered Speedboat For Fun And Research

There are a lot of cliches about the perils of boat ownership. “The best two days of a boat owner’s life are the day they buy their boat, and the day they sell it” immediately springs to mind, for example, but there is a loophole to an otherwise bottomless pit of boat ownership: building a small robotic speedboat instead of owning the full-size version. Not only will you save loads of money and frustration, but you can also use your 3D-printed boat as a base for educational and research projects.

The autonomous speedboats have a modular hull design to make them easy to 3D print, and they use a waterjet for propulsion which improves their reliability in shallow waters and reduces the likelihood that they will get tangled on anything or injure an animal or human. The platform is specifically designed to be able to house any of a wide array of sensors to enable people to easily perform automated tasks in bodies of water such as monitoring for pollution, search-and-rescue, and various inspections. A monohull version with a single jet was prototyped first, but eventually a twin-hulled catamaran with two jets was produced which improved the stability and reliability of the platform.

All of the files needed to get started with your own autonomous (or remote-controlled) speedboat are available on the project’s page. The creators are hopeful that this platform suits a wide variety of needs and that a community is created of technology enthusiasts, engineers, and researchers working on autonomous marine robotic platforms. If you’d prefer to ditch the motor, though, we have seen a few autonomous sailboats used for research purposes as well.

Continue reading “Waterjet-Powered Speedboat For Fun And Research”

PCB sitting inside a 3D printed holder job, with holes to apply vacuum

Solder Paste Stencilling That Doesn’t Suck

Working with solder paste stencils can be a real faff, they rarely sit flat and move around when you so much as breath on them. [Unexpected Maker] airs his frustrations, and comes up with a simple solution, he simply makes a 3D-printed jig to align the PCB panel and applies his shop vacuum cleaner and hey presto!

If you’re ever been tempted to switch from frameless to framed solder stencils, then you’ll notice they can be rather awkward to work with. The usual online vendors have plenty of listings for stencil frame holders, but they do all seem to us, exactly the same, and more suited to stencilling T-shirts, than working with tiny PCB footprints.

The problem with unframed stencils is one of clamping and registration to the PCB, which framed stencils fix, when used with a jig that can dial in the rotation and translation errors.

But problem with those is, unless you have a perfectly flat support region all round the PCB, the weight of the frame tends to make the stencil bow up over the PCB, causing parts of it to lift away from the solder lands. This results in paste not being pushed into the places you want it, and instead it sticks to the stencil apertures and comes away when you lift it up. Most irritating.

You can try offset it by taping spare PCBs of the same thickness all around, but this is not always terribly successful in this scribe’s extensive experience doing this job by hand. [Unexpected Maker] solves this bowing issue by making a 3D printed jig that bolts to the stencil holder, takes a custom top plate with holes in, which in turns allows a vacuum to be applied from below. This sucks the PCB down to the jig, keeping it flat (in case it is also warped) and also pulls the stencil plate directly down to the PCB, making it also lie perfectly flat.

Continue reading “Solder Paste Stencilling That Doesn’t Suck”